
What is Concordion?
Concordion is a powerful tool to write and manage automated acceptance tests in Java based projects. It directly integrates with JUnit framework, making it ready to be used with all popular JAVA based IDEs like Netbeans, Eclipse, IntelliJ IDEA.
Active software specification
Active software specification is a way to specify the behaviour of a feature. It also provides a way to implement and verify the software specification by having a connection with the system under development.
An active specification in Concordion is of two parts:
- A cleanly written requirement document which describes the desired functionality written using XHTML. The XHTML based specifications contain descriptions of the functionality provided with acceptance test examples. Example's data is marked using simple HTML tags.
- Acceptance tests are written in Java language called fixture code. Using a Concordion extension of a standard JUnit test case, test are implemented. It is the responsiblity of Fixture Code to find the example's data marked by tag and use them to verify the software under development.
Output of Cncordion
When Concordion active specification tests are run, outpu XHTML files shows the original specification and test results. Successful test are highlighted using "green" color and failed test are highlighted using "red". As any change in system will result in failing the test, which helps to identify that specifiction are to be updated, Concordion terms these specifications as active specifications. Therefore specifications are always up-to-date.
Key Features
Following are the key features of Concordion:
- Specifications as documentation - Concordion specification being highly readable can be used as active system documentation. As Concordion based specifications are written in HTML, these documents can be hyperlinked.
- Specifications are live - Concordion specification contains working examples of behavior which are executed against the system. Specifications are color coded so that any one can see whether examples are working or not. Executing Concordion specifications regularly makes documentation up-to-date.
- Separate "what?" from "how?" - Concordion specification helps in maintaining seperation between implementation and required behaviour of system. It provides flexibility that implementation can be changed later on.
- Simple to learn - Concordion library is designed keeping learning curve short and concise. It has very few commands to learn and examples are automated using JUnit tests so that tests can be run easily and can be integrated with existing projects easily.
- Powerful Customization - Concordion provides extensions API which allows to add functionality. For example, Excel spreadsheets can be used as specifications, screenshots can be added to the output, logging information can be displayed, and much more.
Concordion - Environment Setup
This tutorial will guide you on how to prepare a development environment to start your work with Spring Framework. This tutorial will also teach you how to setup JDK, Tomcat and Eclipse on your machine before you setup Spring Framework:
Step 1 - Setup Java Development Kit (JDK):
You can download the latest version of SDK from Oracle's Java site: Java SE Downloads. You will find instructions for installing JDK in downloaded files, follow the given instructions to install and configure the setup. Finally set PATH and JAVA_HOME environment variables to refer to the directory that contains java and javac, typically java_install_dir/bin and java_install_dir respectively.
If you are running Windows and installed the JDK in C:\jdk1.7.0_75, you would have to put the following line in your C:\autoexec.bat file.
set PATH=C:\jdk1.7.0_75\bin;%PATH%
set JAVA_HOME=C:\jdk1.7.0_75
Alternatively, on Windows NT/2000/XP, you could also right-click on My Computer, select Properties, then Advanced, then Environment Variables. Then, you would update the PATH value and press the OK button.
On Unix (Solaris, Linux, etc.), if the SDK is installed in /usr/local/jdk1.7.0_75 and you use the C shell, you would put the following into your .cshrc file.
setenv PATH /usr/local/jdk1.7.0_75/bin:$PATH
setenv JAVA_HOME /usr/local/jdk1.7.0_75
Alternatively, if you use an Integrated Development Environment (IDE) like Borland JBuilder, Eclipse, IntelliJ IDEA, or Sun ONE Studio, compile and run a simple program to confirm that the IDE knows where you installed Java, otherwise do proper setup as given document of the IDE.
Step 2 - Setup Eclipse IDE
All the examples in this tutorial have been written using Eclipse IDE. So I would suggest you should have latest version of Eclipse installed on your machine.
To install Eclipse IDE, download the latest Eclipse binaries from http://www.eclipse.org/downloads/. Once you downloaded the installation, unpack the binary distribution into a convenient location. For example in C:\eclipse on windows, or /usr/local/eclipse on Linux/Unix and finally set PATH variable appropriately.
Eclipse can be started by executing the following commands on windows machine, or you can simply double click on eclipse.exe
%C:\eclipse\eclipse.exe
Eclipse can be started by executing the following commands on Unix (Solaris, Linux, etc.) machine:
$/usr/local/eclipse/eclipse
After a successful startup, if everything is fine then it should display following result:
Step 3: Download Junit archive
Download latest version of JUnit jar file from http://www.junit.org. At the time of writing this tutorial, I downloaded Junit-4.10.jar and copied it into C:\>JUnit folder.
| OS | Archive name |
|---|---|
| Windows | junit4.10.jar |
| Linux | junit4.10.jar |
| Mac | junit4.10.jar |
Step 4: Set JUnit environment
Set the JUNIT_HOME environment variable to point to the base directory location where JUNIT jar is stored on your machine. Assuming, we've stored junit4.10.jar in JUNIT folder on various Operating Systems as follows.
| OS | Output |
|---|---|
| Windows | Set the environment variable JUNIT_HOME to C:\JUNIT |
| Linux | export JUNIT_HOME=/usr/local/JUNIT |
| Mac | export JUNIT_HOME=/Library/JUNIT |
Step 5: Set CLASSPATH variable
Set the CLASSPATH environment variable to point to the JUNIT jar location. Assuming, we've stored junit4.10.jar in JUNIT folder on various Operating Systems as follows.
| OS | Output |
|---|---|
| Windows | Set the environment variable CLASSPATH to %CLASSPATH%;%JUNIT_HOME%\junit4.10.jar;.; |
| Linux | export CLASSPATH=$CLASSPATH:$JUNIT_HOME/junit4.10.jar:. |
| Mac | export CLASSPATH=$CLASSPATH:$JUNIT_HOME/junit4.10.jar:. |
Step 6 - Setup concordion Libraries
Now if everything is fine, then you can proceed to setup your Concordion libraries. Following are the simple steps to download and install the framework on your machine.
Download the latest version of Concordion framework binaries from http://dl.bintray.com/concordion/downloads/concordion-1.5.1.zip.
At the time of writing this tutorial, I downloaded concordion-1.5.1 on my Windows machine and when you unzip the downloaded file it will give you following directory structure inside E:\concordion-1.5.1 as follows.
- lib - Library folder
- hamcrest-core-1.3.jar
- junit-4.12.jar
- ognl-2.6.9.jar
- xom-1.2.5.jar
- src - Source code folder
- main
- test
- test-dummies
- concordion-1.5.1.jar
You will find all the Concordion dependency libraries in the directory E:\concordion\lib. Make sure you set your CLASSPATH variable on this directory properly otherwise you will face problem while running your application. If you are using Eclipse then it is not required to set CLASSPATH because all the setting will be done through Eclipse.
Once you are done with this last step, you are ready to proceed for your first Concordion Example which you will see in the next chapter.
Concordion - First Application
Let us start programming with Concordion. Before you start writing your first example using Concordion, you have to make sure that you have set up your Concordion environment properly as explained in Concordion - Environment Setup tutorial. We also assume that you have a little bit working knowledge of Eclipse IDE.
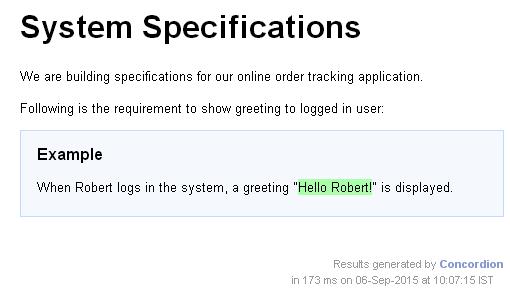
So let us proceed to write a simple Concordion application which will print the following acceptance test −
Example
When Robert logs in the system, a greeting "Hello Robert!" is displayed.
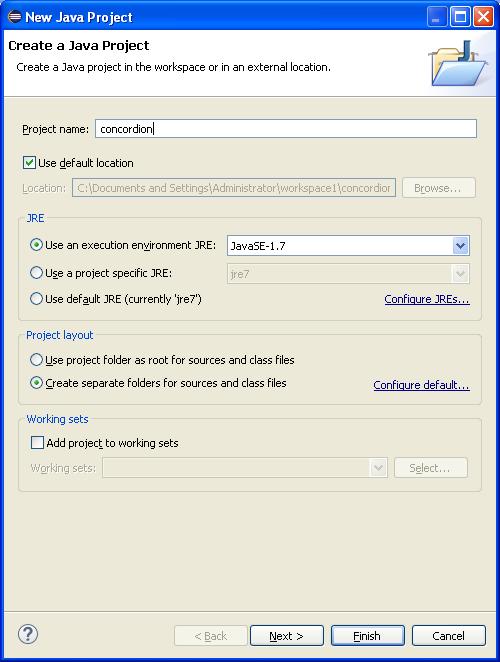
Step 1 - Create Java Project
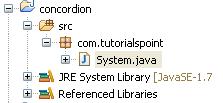
The first step is to create a simple Java project using Eclipse IDE. Follow the option File → New → Project and finally select Java Project wizard from the wizard list. Now name your project as Concordion using the wizard window as follows −
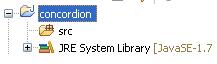
Once your project is created successfully, you will have the following content in your Project Explorer −
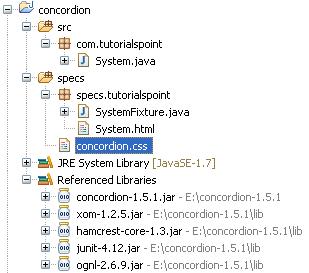
Step 2 - Add Required Libraries
Let us add concordion and its dependencies in our project. To do this, right-click on your project name concordion and then follow the options available in the context menu: Build Path → Configure Build Path to display the Java Build Path window as follows −
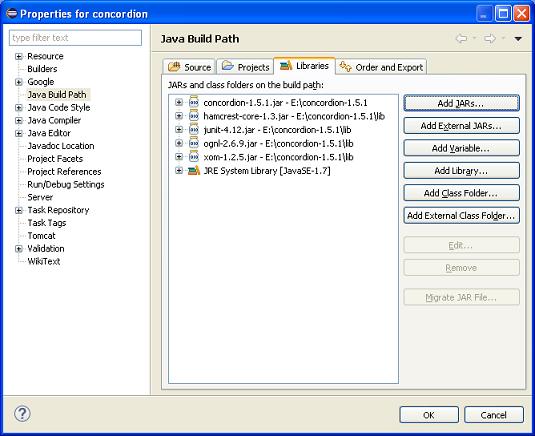
Now use Add External JARs button available under Libraries tab to add the following core JAR from the Concordion folder.
- concordion-1.5.1
- hamcrest-core-1.3
- junit-4.12
- ognl-2.6.9
- xom-1.2.5
Step 3 - Create Source Files
Now let us create actual source files under the concordion project. First, we need to create a package called com.tutorialspoint. To do this, right-click on src in the package explorer section and follow the option : New → Package.
Next, we will create System .java file under the com.tutorialspoint package.
Here is the content of System.java file −
package com.tutorialspoint;

public class System {
   public String getGreeting(String userName){
      return "Hello " + userName + "!";
   }
}
Step 4 - Create Specification Files
Now let us create actual specification files under the concordion project. First, we need to create a new source folder named specs. This folder will contain specification files like JUnitFixture or test runner and html files which are specifications. Now we need to create a package called specs.tutorialspoint. To do this, right-click on spec in the package explorer section and follow the option : New → Package.
Next, we will create System.html and SystemFixture.java files under the specs.tutorialspoint package. Thereafter, we will add concordion.css under specs source folder.
Here is the content of the System.html file −
<html xmlns:concordion = "http://www.concordion.org/2007/concordion">
   <head>
      <link href = "../concordion.css" rel = "stylesheet" type="text/css" />
   </head>

   <body>
      <h1>System Specifications</h1>
      <p>We are building specifications for our online order tracking application.</p>
      <p>Following is the requirement to show greeting to logged in user:</p>
      <div class = "example">
         <h3>Example</h3>
         <p>When <span concordion:set = "#userName">Robert</span>
            logs in the system, a greeting "<span concordion:assertEquals = "getGreeting(#userName)">
            Hello Robert!</span>" is displayed.</p>
      </div>
   </body>

</html>
Here is the content of the SystemFixture.java file −
package specs.tutorialspoint;

import com.tutorialspoint.System;
import org.concordion.integration.junit4.ConcordionRunner;
import org.junit.runner.RunWith;

@RunWith(ConcordionRunner.class)

public class SystemFixture {

   System system = new System();

   public String getGreeting(String userName){
      return system.getGreeting(userName);
   }
}
Here is the content of the concordion.css file −
* {
   font-family: Arial;
}

body {
   padding: 32px;
}

pre {
   padding: 6px 28px 6px 28px;
   background-color: #E8EEF7;
}

pre, pre *, code, code *, kbd {
   font-family: Courier New, Courier;
   font-size: 10pt;
}

h1, h1 * {
   font-size: 24pt;
}

p, td, th, li, .breadcrumbs {
   font-size: 10pt;
}

p, li {
   line-height: 140%;
}

table {
   border-collapse: collapse;
   empty-cells: show;
   margin: 8px 0px 8px 0px;
}

th, td {
   border: 1px solid black;
   padding: 3px;
}

td {
   background-color: white;
   vertical-align: top;
}

th {
   background-color: #C3D9FF;
}

li {
   margin-top: 6px;
   margin-bottom: 6px;
}

.example {
   padding: 6px 16px 6px 16px;
   border: 1px solid #D7D7D7;
   margin: 6px 0px 28px 0px;
   background-color: #F7F7F7;
}

.example h3 {
   margin-top: 8px;
   margin-bottom: 8px;
   font-size: 12pt;
}

.special {
  font-style: italic;
}

.idea {
  font-size: 9pt;
  color: #888;
  font-style: italic;
}

.tight li {
  margin-top: 1px;
  margin-bottom: 1px;
}

.commentary {
  float: right;
  width: 200px;
  background-color: #ffffd0;
  padding:8px;
  border: 3px solid #eeeeb0;
  margin: 10px 0px 10px 10px;
}

.commentary, .commentary * {
  font-size: 8pt;
}
There are two important points to note about the specification html file and the Test Fixture −
- System.html is the specification html file that uses the concordion namespace.
<html xmlns:concordion="http://www.concordion.org/2007/concordion">
- System.html uses concordion:set command to set a value of temporary variables userName to be Robert. Here, userName is the parameter to be passed to the getGreeting method of System fixture.
When <span concordion:set="#userName">Robert</span> logs in the system
- System.html uses concordion:assertEquals command to check the output of getGreeting(userName) function to be Hello Robert!.
a greeting "<span concordion:assertEquals="getGreeting(#userName)">
Hello Robert!</span>" is displayed.
- SystemFixture is a JUnit test fixture annotated with ConcordionRunner.class.
@RunWith(ConcordionRunner.class)
public class SystemFixture {
- SystemFixture has a getGreeting method that returns greetings to the user.
public String getGreeting(String userName){
   return system.getGreeting(userName);
}
Step 5 - Running the Program
Right-click on the content area of SystemFixture and select Run as > JUnit Test Case. You will see the following output with junit success.
C:\DOCUME~1\ADMINI~1\LOCALS~1\Temp\concordion\specs\tutorialspoint\System.html
Successes: 1, Failures: 0
System.html is the output of Concordion test run.
Congratulations, you have created your first Concordion Acceptance test successfully. Further, let us start doing something more interesting in the next few chapters.
Concordion - set Command
Concordion set command is used to store temporary variables that can be used in other Concordion commands.
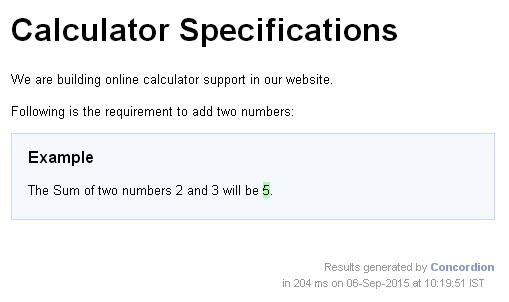
Consider the following requirement −
The Sum of two numbers 2 and 3 will be 5.
If we want the numbers 2 and 3 to be as parameters and pass them to the sum function as parameter so that they can be verified against the result returned by the system, then we can use concordion:set command within span tags around the numbers.
<p>The Sum of two numbers <span concordion:set = "#firstNumber">2</span>
   and <span concordion:set = "#secondNumber">3</span> will be
   <span concordion:assertEquals = "sum(#firstNumber, #secondNumber)">5
   </span>.</p>
When Concordion parses the document, it will set a temporary variable #firstNumber to be the value "2" and #secondNumber to be the value "3" and then call the sum() method with parameters as #firstNumber and #secondNumber and check that the result is equal to "5".
Example
Let us have a working Eclipse IDE in place and follow the steps given below to create a Concordion application −
| Step | Description |
|---|---|
| 1 | Create a project with a name concordion and create a package com.tutorialspoint under the src folder in the created project. |
| 2 | Add the required Concordion libraries using Add External JARs option as explained in the Concordion - First Application chapter. |
| 3 | Create Java class System under the com.tutorialspoint package. |
| 4 | Create Fixture class SystemFixture under the specs.tutorialspoint package. |
| 5 | Create Specification html System.html under the specs.tutorialspointpackage. |
| 6 | The final step is to create the content of all the Java files and specificiation file and run the application as explained below. |
Here is the content of System.java file −
package com.tutorialspoint;
public class System {
   public int sum(int firstNumber, int secondNumber) {
      return firstNumber + secondNumber;
   }
}
Following is the content of SystemFixture.java file −
package specs.tutorialspoint;

import org.concordion.integration.junit4.ConcordionRunner;
import org.junit.runner.RunWith;
import com.tutorialspoint.System;

@RunWith(ConcordionRunner.class)

public class SystemFixture {
   System system = new System();
   public int sum(int firstNumber, int secondNumber) {
      return system.sum(firstNumber, secondNumber);
   }
}
Following is the content of System.html file −
<html xmlns:concordion = "http://www.concordion.org/2007/concordion">
   <head>
      <link href = "../concordion.css" rel = "stylesheet" type = "text/css" />
   </head>

   <body>
      <h1>Calculator Specifications</h1>
      <p>We are building online calculator support in our website.</p>
      <p>Following is the requirement to add two numbers:</p>

      <div class = "example">
         <h3>Example</h3>
         <p>The Sum of two numbers <span concordion:set = "#firstNumber">2</span>
            and <span concordion:set = "#secondNumber">3</span> will be
            <span concordion:execute = "#result = sum(#firstNumber, #secondNumber)"></span>
            <span concordion:assertEquals = "#result">5</span>.</p>
      </div>
   </body>

</html>
Once you are done with creating source and specification files, let us run the application as JUnit test. If everything is fine with your application, it will produce the following result −
C:\DOCUME>1\ADMINI>1\LOCALS>1\Temp\concordion\specs\tutorialspoint\System.html
Successes: 1, Failures: 0
System.html is the output of concordion test run.
Concordion - assertEquals Command
Concordion assertEquals command is used to check Java bean property or method result against a specified value.
Consider the following requirement −
The sum of two numbers 2 and 3 will be 5.
If we want the numbers 2 and 3 to be as parameters and pass them to sum function as parameter so that it can be verified against the result as 5 returned by the system then we can use concordion:assertEquals command within span tag around the sum function.
<p>The Sum of two numbers <span concordion:set="#firstNumber">2</span>
   and  <span concordion:set="#secondNumber">3</span> will be
   <span concordion:assertEquals="sum(#firstNumber, #secondNumber)">5</span>.</p>
When Concordion parses the document, it will set a temporary variable #firstNumber to be the value "2" and #secondNumber to be the value "3" using set command and then call the sum() method with parameters as #firstNumber and #secondNumber and check that the result is equal to "5" using the assertEquals command.
Example
Let us have working Eclipse IDE in place and follow the following steps to create a Concordion application −
| Step | Description |
|---|---|
| 1 | Create a project with a name concordion and create a package com.tutorialspoint under the src folder in the created project. |
| 2 | Add required Concordion libraries using Add External JARs option as explained in the Concordion - First Application chapter. |
| 3 | Create Java class System under the com.tutorialspoint package. |
| 4 | Create Fixture class SystemFixture under the specs.tutorialspoint package. |
| 5 | Create Specification html System.html under the specs.tutorialspointpackage. |
| 6 | The final step is to create the content of all the Java files and specificiation file and run the application as explained below. |
Here is the content of the System.java file −
package com.tutorialspoint;
public class System {
   public int sum(int firstNumber, int secondNumber) {
      return firstNumber + secondNumber;
   }
}
Following is the content of the SystemFixture.java file −
package specs.tutorialspoint;

import org.concordion.integration.junit4.ConcordionRunner;
import org.junit.runner.RunWith;
import com.tutorialspoint.System;

@RunWith(ConcordionRunner.class)

public class SystemFixture {
   System system = new System();
   public int sum(int firstNumber, int secondNumber) {
      return system.sum(firstNumber, secondNumber);
   }
}
Following is the content of the System.html file −
<html xmlns:concordion = "http://www.concordion.org/2007/concordion">
   <head>
      <link href = "../concordion.css" rel = "stylesheet" type = "text/css" />
   </head>

   <body>
      <h1>Calculator Specifications</h1>
      <p>We are building online calculator support in our website.</p>
      <p>Following is the requirement to add two numbers:</p>

      <div class = "example">
         <h3>Example</h3>
         <p>The Sum of two numbers <span concordion:set = "#firstNumber">2</span>
            and  <span concordion:set = "#secondNumber">3</span> will be
            <span concordion:assertEquals = "sum(#firstNumber, #secondNumber)">5</span>.</p>
      </div>

   </body>

</html>
Once you are done with creating source and specification files, let us run the application as JUnit Test. If everything is fine with your application, then it will show the following result −
C:\DOCUME~1\ADMINI~1\LOCALS~1\Temp\concordion\specs\tutorialspoint\System.html
Successes: 1, Failures: 0
System.html is the output of Concordion test run.
Successes: 1, Failures: 0
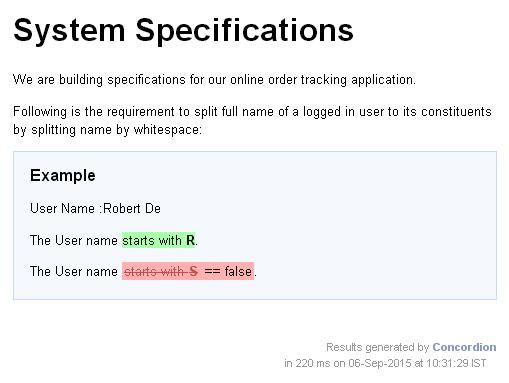
Concordion - assertTrue Command
Concordion assertTrue command is used when the fixture needs to know the expected result in order to perform a test.
Consider the following requirement −
User Name : Robert De
The User name starts with R.
The User name starts with S == false.
If we want a test to be executed on the User Name and check whether the user name starts with R or not.
<p>User Name :<span concordion:set = "#userName">Robert De</span></p>
<p>The User name <span concordion:assertTrue = "#userName.startsWith(#letter)">starts
   with <b concordion:set = "#letter">R</b></span>.</p>
<p>The User name <span concordion:assertTrue = "#userName.startsWith(#letter)">starts
   with <b concordion:set = "#letter">S</b></span>.</p>
When Concordion parses the document, it will set a temporary variable #userName to be the value "Robert De". Then it will check if the userName starts with the letter specified by #letter variable set in next command.
Example
Let us have a working Eclipse IDE in place and follow the steps given below to create a Concordion application −
| Step | Description |
|---|---|
| 1 | Create a project with a name concordion and create a package com.tutorialspoint under the src folder in the created project. |
| 2 | Add the required Concordion libraries using Add External JARs option as explained in the Concordion - First Application chapter. |
| 3 | Create Java class System under the com.tutorialspoint package. |
| 4 | Create Fixture class SystemFixture under the specs.tutorialspoint package. |
| 5 | Create Specification html System.html under the specs.tutorialspointpackage. |
| 6 | The final step is to create the content of all the Java files and specification file and run the application as explained below. |
Here is the content of the System.java file −
package com.tutorialspoint;
public class System {
}
Following is the content of the SystemFixture.java file −
package specs.tutorialspoint;

import org.concordion.integration.junit4.ConcordionRunner;
import org.junit.runner.RunWith;

@RunWith(ConcordionRunner.class)

public class SystemFixture {
}
Following is the content of the System.html file −
<html xmlns:concordion = "http://www.concordion.org/2007/concordion">
   <head>
      <link href = "../concordion.css" rel = "stylesheet" type = "text/css" />
   </head>

   <body>
      <h1>System Specifications</h1>
      <p>We are building specifications for our online order tracking application.</p>
      <p>Following is the requirement to split full name of a logged in user to
         its constituents by splitting name by whitespace:</p>

      <div class = "example">
         <h3>Example</h3>
         <p>User Name :<span concordion:set = "#userName">Robert De</span></p>
         <p>The User name <span concordion:assertTrue = "#userName.startsWith(#letter)">starts
            with <b concordion:set = "#letter">R</b></span>.</p>
         <p>The User name <span concordion:assertTrue = "#userName.startsWith(#letter)">starts
            with <b concordion:set = "#letter">S</b></span>.</p>
      </div>

   </body>

</html>
Once you are done with creating source and specification files, let us run the application as JUnit Test. If everything is fine with your application, then it will produce the following result −
C:\DOCUME~1\ADMINI~1\LOCALS~1\Temp\concordion\specs\tutorialspoint\System.html
Successes: 1, Failures: 1
System.html is the output of Concordion test run.
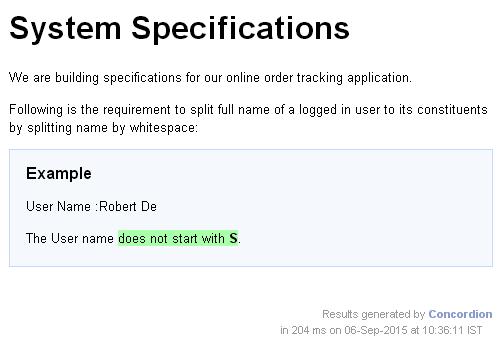
Concordion - assertFalse Command
Concordion assertFalse command is used when the fixture needs to know the expected result in order to perform a test.
Consider the following requirement −
User Name : Robert De
The User name does not start with S.
If we want a test to be executed on the User Name and check that the user name does not start with S.
<p>User Name :<span concordion:set = "#userName">Robert De</span></p>
<p>The User name <span concordion:assertFalse = "#userName.startsWith(#letter)">does not start
   with <b concordion:set = "#letter">S</b></span>.</p>
When Concordion parses the document, it will set a temporary variable #userName to be the value "Robert De". Then, it will check if the userName starts with the letter specified by #letter variable set in next command.
Example
Let us have a working Eclipse IDE in place and follow the steps given below to create a Concordion application −
| Step | Description |
|---|---|
| 1 | Create a project with a name concordion and create a package com.tutorialspoint under the src folder in the created project. |
| 2 | Add the required Concordion libraries using Add External JARs option as explained in the Concordion - First Application chapter. |
| 3 | Create Java class System under the com.tutorialspoint package. |
| 4 | Create Fixture class SystemFixture under the specs.tutorialspoint package. |
| 5 | Create Specification html System.html under the specs.tutorialspointpackage. |
| 6 | The final step is to create the content of all the Java files and specification file and run the application as explained below. |
Here is the content of the System.java file −
package com.tutorialspoint;
public class System {
}
Following is the content of the SystemFixture.java file −
package specs.tutorialspoint;

import org.concordion.integration.junit4.ConcordionRunner;
import org.junit.runner.RunWith;

@RunWith(ConcordionRunner.class)

public class SystemFixture {
}
Following is the content of the System.html file −
<html xmlns:concordion = "http://www.concordion.org/2007/concordion">
   <head>
      <link href = "../concordion.css" rel = "stylesheet" type = "text/css" />
   </head>

   <body>
      <h1>System Specifications</h1>
      <p>We are building specifications for our online order tracking application.</p>
      <p>Following is the requirement to split full name of a logged in user to its
         constituents by splitting name by whitespace:</p>

      <div class = "example">
         <h3>Example</h3>
         <p>User Name :<span concordion:set = "#userName">Robert De</span></p>
         <p>The User name <span concordion:assertFalse = "#userName.startsWith(#letter)">
            does not start with <b concordion:set = "#letter">
            S</b></span>.</p>
      </div>

   </body>

</html>
Once you are done with creating source and specification files, let us run the application as JUnit Test. If everything is fine with your application, then it will produce the following result −
C:\DOCUME~1\ADMINI~1\LOCALS~1\Temp\concordion\specs\tutorialspoint\System.html
Successes: 1, Failures: 0
System.html is the output of Concordion test run.
Concordion - execute Command
Concordion execute command is used run the operation of concordion fixture. Consider the following requirement −
The sum of two numbers 2 and 3 will be 5.
If we want to write a specification for a sum function which will accept two numbers and output their sum, then the specification will be as follows −
<p>The Sum of two numbers <span concordion:set = "#firstNumber">2</span> and
   <span concordion:set = "#secondNumber">3</span> will be
   <span concordion:execute = "#result = sum(#firstNumber, #secondNumber)">
   </span><span concordion:assertEquals = "#result">5</span>.</p>
When Concordion parses the document, it will set a temporary variable #firstNumber to be the value "2" and #secondNumber to be the value "3" and then execute the sum() method with parameters as #firstNumber and #secondNumber using the execute command and set the result into #result variable and check that the #result variable is equal to "5".
Example
Let us have a working Eclipse IDE in place and follow the steps given below to create a Concordion application −
| Step | Description |
|---|---|
| 1 | Create a project with a name concordion and create a package com.tutorialspoint under the src folder in the created project. |
| 2 | Add required Concordion libraries using Add External JARs option as explained in the Concordion - First Application chapter. |
| 3 | Create Java class System under the com.tutorialspoint package. |
| 4 | Create Fixture class SystemFixture under the specs.tutorialspoint package. |
| 5 | Create Specification html System.html under the specs.tutorialspointpackage. |
| 6 | The final step is to create the content of all the Java files and specification file and run the application as explained below. |
Here is the content of the System.java file −
package com.tutorialspoint;
public class System {
   public int sum(int firstNumber, int secondNumber) {
      return firstNumber + secondNumber;
   }
}
Following is the content of the SystemFixture.java file −
package specs.tutorialspoint;

import org.concordion.integration.junit4.ConcordionRunner;
import org.junit.runner.RunWith;
import com.tutorialspoint.System;

@RunWith(ConcordionRunner.class)

public class SystemFixture {
   System system = new System();
   public int sum(int firstNumber, int secondNumber) {
      return system.sum(firstNumber, secondNumber);
   }
}
Following is the content of the System.html file −
<html xmlns:concordion = "http://www.concordion.org/2007/concordion">
   <head>
      <link href = "../concordion.css" rel = "stylesheet" type = "text/css" />
   </head>

   <body>
      <h1>Calculator Specifications</h1>
      <p>We are building online calculator support in our website.</p>
      <p>Following is the requirement to add two numbers:</p>

      <div class = "example">
         <h3>Example</h3>
         <p>The Sum of two numbers <span concordion:set = "#firstNumber">2</span>
            and <span concordion:set = "#secondNumber">3</span> will be
            <span concordion:execute = "#result = sum(#firstNumber, #secondNumber)">
            </span><span concordion:assertEquals = "#result">5</span>.</p>
      </div>

   </body>

</html>
Once you are done with creating source and specification files, let us run the application as JUnit Test. If everything is fine with your application, then it will produce the following result −
C:\DOCUME~1\ADMINI~1\LOCALS~1\Temp\concordion\specs\tutorialspoint\System.html
Successes: 1, Failures: 0
System.html is the output of Concordion test run.
Concordion - Returning Object
Concordion execute command can be used to get the result of a behavior in the form of object using which we can get multiple outputs of a behavior. For example, consider the following requirement −
The full name Robert De is to be broken into first name Robert and last name De.
Here we need to have a split function which accepts a user name and returns a result object having the first name and the last name as its properties so that we can use them.
If we want to write a specification for such a split function which will expect a user name and output a result object, then the following will be the specification −
<p>The full name <span concordion:execute = "#result = split(#TEXT)">Robert
   De</span> is to be broken into first name
   <span concordion:assertEquals = "#result.firstName">Robert</span> and last name
   <span concordion:assertEquals = "#result.lastName">De</span>.</p>
When Concordion parses the document, it will set the value of the special variable #TEXT as the value of the current element as "Robert De" and pass it to the split function. Then it will execute the split() method with parameters as #TEXT using the execute command and set the result into the #result variable and using the result object, print the firstName and the lastName properties as the output.
Example
Let us have a working Eclipse IDE in place and follow the steps given below to create a Concordion application −
| Step | Description |
|---|---|
| 1 | Create a project with the name concordion and create a package com.tutorialspoint under the src folder in the created project. |
| 2 | Add the required Concordion libraries using the Add External JARs option as explained in the Concordion - First Application chapter. |
| 3 | Create Java class System, Result under the com.tutorialspoint package. |
| 4 | Create Fixture class SystemFixture under the specs.tutorialspoint package. |
| 5 | Create Specification html System.html under the specs.tutorialspointpackage. |
| 6 | The final step is to create the content of all the Java files and specification file and run the application as explained below. |
Here is the content of Result.java file −
package com.tutorialspoint;
public class Result {
   private String firstName;
   private String lastName;

   public String getFirstName() {
      return firstName;
   }

   public void setFirstName(String firstName) {
      this.firstName = firstName;
   }

   public String getLastName() {
      return lastName;
   }

   public void setLastName(String lastName) {
      this.lastName = lastName;
   }
}
Here is the content of System.java file −
package com.tutorialspoint;
public class System {
   public Result split(String userName){
      Result result = new Result();
      String[] words = userName.split(" ");
      result.setFirstName(words[0]);
      result.setLastName(words[1]);
      return result;
   }
}
Following is the content of SystemFixture.java file−
package specs.tutorialspoint;

import com.tutorialspoint.Result;
import com.tutorialspoint.System;
import org.concordion.integration.junit4.ConcordionRunner;
import org.junit.runner.RunWith;

@RunWith(ConcordionRunner.class)

public class SystemFixture {
   System system = new System();
   public Result split(String userName){
      return system.split(userName);
   }
}
Following is the content of System.html file −
<html xmlns:concordion = "http://www.concordion.org/2007/concordion">
   <head>
      <link href = "../concordion.css" rel = "stylesheet" type = "text/css" />
   </head>

   <body>
      <h1>System Specifications</h1>
      <p>We are building specifications for our online order tracking application.</p>
      <p>Following is the requirement to split full name of a logged in user to its
         constituents by splitting name by whitespace:</p>

      <div class = "example">
         <h3>Example</h3>
         <p>The full name <span concordion:execute = "#result = split(#TEXT)">Robert
            De</span> is to be broken into first name <span
            concordion:assertEquals = "#result.firstName">Robert</span> and last name <span
            concordion:assertEquals = "#result.lastName">De</span>.</p>
      </div>

   </body>

</html>
Once you are done with creating the source and specification files, let us run the application as JUnit Test. If everything is fine with your application, then it will produce the following result −
C:\DOCUME~1\ADMINI~1\LOCALS~1\Temp\concordion\specs\tutorialspoint\System.html
Successes: 1, Failures: 0
System.html is the output of Concordion test run.

Concordion - Returning Map
Concordion execute command can be used to get the result of a behavior in the form of a Map using which we can get multiple outputs of a behavior. For example, consider the following requirement −
The full name Robert De is to be broken into its first name Robert and last name De.
Here we need to have a spilt function which accepts a user name and returns a Map object having the firstName and the lastName as its keys having corresponding values so that we can use them.
If we want to write a specification for such a split function which will accept a user name and output a result object, then the following will be the specification −
<p>The full name <span concordion:execute = "#result = split(#TEXT)">Robert
   De</span> is to be broken into first name <span
   concordion:assertEquals = "#result.firstName">Robert</span> and last name <span
   concordion:assertEquals = "#result.lastName">De</span>.</p>
When Concordion parses the document, it will set the value of the special variable #TEXT to be the value of the current element as "Robert De" and pass it to the split function. Then it will execute the split() method with parameters as #TEXT using the execute command and set the result into the #result variable and using result map, print the firstName and lastName values as output.
Example
Let us have a working Eclipse IDE in place and follow the steps given below to create a Concordion application −
| Step | Description |
|---|---|
| 1 | Create a project with a name concordion and create a package com.tutorialspoint under the src folder in the created project. |
| 2 | Add the required Concordion libraries using Add External JARs option as explained in the Concordion - First Application chapter. |
| 3 | Create Java class System under the com.tutorialspoint package. |
| 4 | Create Fixture class SystemFixture under the specs.tutorialspoint package. |
| 5 | Create Specification html System.html under the specs.tutorialspointpackage. |
| 6 | The final step is to create the content of all the Java files and specification file and run the application as explained below. |
Here is the content of System.java file −
package com.tutorialspoint;

import java.util.HashMap;
import java.util.Map;

public class System {
   public Map split(String userName){
      Map<String, String> result = new HashMap<String, String>();
      String[] words = userName.split(" ");
      result.put("firstName", words[0]);
      result.put("lastName", words[1]);
      return result;
   }
}
Following is the content of SystemFixture.java file −
package specs.tutorialspoint;

import java.util.Map;
import com.tutorialspoint.Result;
import com.tutorialspoint.System;
import org.concordion.integration.junit4.ConcordionRunner;
import org.junit.runner.RunWith;

@RunWith(ConcordionRunner.class)

public class SystemFixture {
   System system = new System();
   public Map<String, String> split(String userName){
      return system.split(userName);
   }
}
Following is the content of System.html file −
<html xmlns:concordion = "http://www.concordion.org/2007/concordion">
   <head>
      <link href = "../concordion.css" rel = "stylesheet" type = "text/css" />
   </head>

   <body>
      <h1>System Specifications</h1>
      <p>We are building specifications for our online order tracking application.</p>
      <p>Following is the requirement to split full name of a logged in user to its
         constituents by splitting name by whitespace:</p>

      <div class = "example">
         <h3>Example</h3>
         <p>The full name <span concordion:execute = "#result = split(#TEXT)">Robert
            De</span> is to be broken into first name <span
            concordion:assertEquals = "#result.firstName">Robert</span> and last name
            <span concordion:assertEquals = "#result.lastName">De</span>.</p>
      </div>

   </body>

</html>
Once you are done with creating the source and specification files, let us run the application as JUnit Test. If everything is fine with your application, then it will produce the following result −
C:\DOCUME~1\ADMINI~1\LOCALS~1\Temp\concordion\specs\tutorialspoint\System.html
Successes: 1, Failures: 0
System.html is the output of Concordion test run.
Concordion - Returning MultiValueResult
Concordion execute command can be used to get the result of a behavior in the form of a Map using which we can get multiple outputs of a behavior. For example, consider the following requirement −
The full name Robert De is to be broken into its first name Robert and last name De.
Here we need to have a split function which accepts a user name and returns a Map object having firstName and lastName as its keys with their corresponding values so that we can use them.
If we want write a specification for such a split function which will accept a user name and output a result object, then the specification would be as follows −
<p>The full name <span concordion:execute = "#result = split(#TEXT)">Robert
   De</span> is to be broken into first name
   <span concordion:assertEquals = "#result.firstName">Robert</span> and last name
   <span concordion:assertEquals = "#result.lastName">De</span>.</p>
When Concordion parses the document, it will set the value of the special variable #TEXT to be the value of current element as "Robert De" and pass it to the split function. Then it will execute the split() method with parameters as #TEXT using execute command and set the result into the #result variable and using result map, print the firstName and lastName values as the output.
Example
Let us have a working Eclipse IDE in place and follow the steps given below to create a Concordion application −
| Step | Description |
|---|---|
| 1 | Create a project with the name concordion and create a package com.tutorialspoint under the src folder in the created project. |
| 2 | Add the required Concordion libraries using Add External JARs option as explained in the Concordion - First Application chapter. |
| 3 | Create Java class System under the com.tutorialspoint package. |
| 4 | Create Fixture class SystemFixture under the specs.tutorialspoint package. |
| 5 | Create Specification html System.html under the specs.tutorialspointpackage. |
| 6 | The final step is to create the content of all the Java files and specification file and run the application as explained below. |
Here is the content of System.java file −
package com.tutorialspoint;
import org.concordion.api.MultiValueResult;

public class System {
   public MultiValueResult split(String userName){
      MultiValueResult result = new MultiValueResult();
      String[] words = userName.split(" ");
      result.with("firstName", words[0]).with("lastName", words[1]);
      return result;
   }
}
Following is the content of SystemFixture.java file −
package specs.tutorialspoint;

import org.concordion.api.MultiValueResult;
import org.concordion.integration.junit4.ConcordionRunner;
import org.junit.runner.RunWith;

import com.tutorialspoint.System;

@RunWith(ConcordionRunner.class)
public class SystemFixture {
   System system = new System();
   public MultiValueResult split(String userName){
      return system.split(userName);
   }
}
Following is the content of System.html file −
<html xmlns:concordion = "http://www.concordion.org/2007/concordion">
   <head>
      <link href = "../concordion.css" rel = "stylesheet" type = "text/css" />
   </head>

   <body>
      <h1>System Specifications</h1>
      <p>We are building specifications for our online order tracking application.</p>
      <p>Following is the requirement to split full name of a logged in
         user to its constituents by splitting name by whitespace:</p>

      <div class = "example">
         <h3>Example</h3>
         <p>The full name <span concordion:execute = "#result = split(#TEXT)">Robert De</span>
            is to be broken into first name <span
            concordion:assertEquals = "#result.firstName">Robert</span> and last name <span
            concordion:assertEquals = "#result.lastName">De</span>.</p>
      </div>

   </body>

</html>
Once you are done with creating the source and specification files, let us run the application as JUnit Test. If everything is fine with your application, then it will produce the following result −
C:\DOCUME~1\ADMINI~1\LOCALS~1\Temp\concordion\specs\tutorialspoint\System.html
Successes: 2, Failures: 0
System.html is the output of Concordion test run.
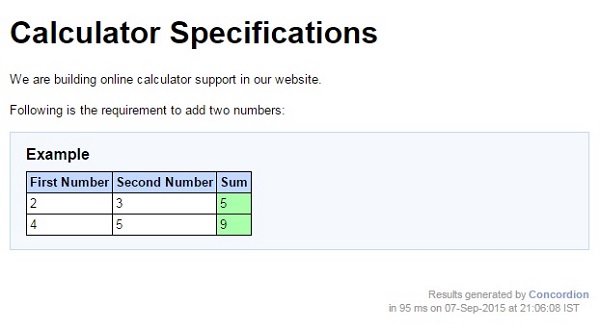
Concordion - Execute on Table
Concordion execute command can be used to run the operation of concordion fixture in a repeating manner. For example, it will be useful if we want to illustrate a requirement with multiple examples in the form of a table.
Consider the following requirement −
<table>
   <tr><th>First Number</th><th>Second Number</th><th>Sum</th></tr>
   <tr><td>2</td><td>3</td><td>5</td></tr>
   <tr><td>4</td><td>5</td><td>9</td></tr>
</table>
If we want to write a specification for a sum function which will accept two numbers and output their sum, then the specification would be as follows −
<table>
   <tr><th>First Number</th><th>Second Number</th><th>Sum</th></tr>
   <tr concordion:execute = "#result = sum(#fullName)">
      <td concordion:set = "#firstNumber">2</td>
      <td concordion:set = "#secondNumber">3</td>
      <td concordion:assertEquals = "#result">5</td>
   </tr>
   <tr concordion:execute = "#result = sum(#fullName)">
      <td concordion:set = "#firstNumber">4</td>
      <td concordion:set = "#secondNumber">5</td>
      <td concordion:assertEquals = "#result">9</td>
   </tr>
</table>
When Concordion parses the document, it will set a temporary variable #firstNumber to be the value "2" and #secondNumber to be the value "3". Then it will execute the sum() method with parameters as #firstNumber and #secondNumber using execute command and set the result into the #result variable and check that the #result variable is equal to "5". This process is repeated for each table row element.
Example
Let us have a working Eclipse IDE in place and follow the steps given below to create a Concordion application −
| Step | Description |
|---|---|
| 1 | Create a project with a name concordion and create a package com.tutorialspoint under the src folder in the created project. |
| 2 | Add required Concordion libraries using Add External JARs option as explained in the Concordion - First Application chapter. |
| 3 | Create Java class System under the com.tutorialspoint package. |
| 4 | Create Fixture class SystemFixture under the specs.tutorialspoint package. |
| 5 | Create Specification html System.html under the specs.tutorialspointpackage. |
| 6 | The final step is to create the content of all the Java files and specification file and run the application as explained below. |
Here is the content of System.java file −
package com.tutorialspoint;
public class System {
   public int sum(int firstNumber, int secondNumber) {
      return firstNumber + secondNumber;
   }
}
Following is the content of SystemFixture.java file −
package specs.tutorialspoint;

import org.concordion.integration.junit4.ConcordionRunner;
import org.junit.runner.RunWith;
import com.tutorialspoint.System;

@RunWith(ConcordionRunner.class)

public class SystemFixture {
   System system = new System();
   public int sum(int firstNumber, int secondNumber) {
      return system.sum(firstNumber, secondNumber);
   }
}
Following is the content of System.html file −
<html xmlns:concordion = "http://www.concordion.org/2007/concordion">
   <head>
      <link href = "../concordion.css" rel = "stylesheet" type = "text/css" />
   </head>

   <body>
      <h1>Calculator Specifications</h1>
      <p>We are building online calculator support in our website.</p>
      <p>Following is the requirement to add two numbers:</p>

      <div class = "example">
         <h3>Example</h3>
         <table>
            <tr>
               <th>First Number</th>
               <th>Second Number</th>
               <th>Sum</th>
            </tr>
            <tr concordion:execute = "#result = sum(#firstNumber, #secondNumber)">
               <td concordion:set = "#firstNumber">2</td>
               <td concordion:set = "#secondNumber">3</td>
               <td concordion:assertEquals = "#result">5</td>
            </tr>
            <tr concordion:execute = "#result = sum(#firstNumber, #secondNumber)">
               <td concordion:set = "#firstNumber">4</td>
               <td concordion:set = "#secondNumber">5</td>
               <td concordion:assertEquals = "#result">9</td>
            </tr>
         </table>
      </div>

   </body>

</html>
Once you are done with creating the source and specification files, let us run the application as JUnit Test. If everything is fine with your application, then it will produce the following result −
C:\DOCUME~1\ADMINI~1\LOCALS~1\Temp\concordion\specs\tutorialspoint\System.html
Successes: 2, Failures: 0
System.html is the output of Concordion test run.
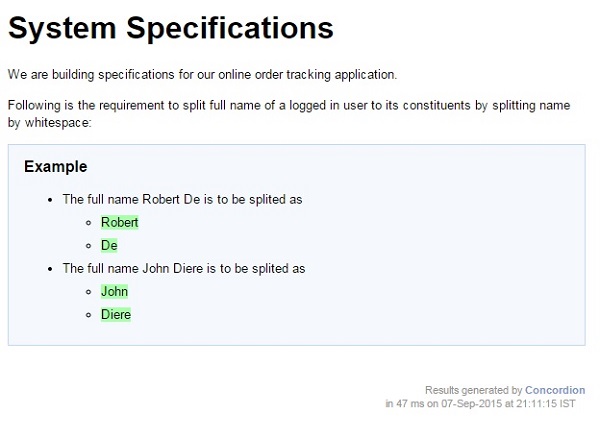
Concordion - Execute on List
Concordion execute command can be used to run the operation of concordion fixture in a repeating manner. For example, it will be useful if we want to illustrate a requirement with multiple examples in the form of a list.
Consider the following requirement −
<ul>
   <li>The full name Robert De is to be split as
      <ul>
         <li>Robert</li>
         <li>De</li>
      </ul>
   </li>

   <li>The full name John Diere is to be split as
      <ul>
         <li>John</li>
         <li>Diere</li>
      </ul>
   </li>

</ul>
If we want write a specification for a split function which will split a name into its first name and last name, then the specification would be as follows −
<ul>
   <li>The full name <span concordion:execute = "#result = split(#TEXT)">
      Robert De</span> is to be splited as
      <ul>
         <li><span concordion:assertEquals = "#result.firstName">Robert</span></li>
         <li><span concordion:assertEquals = "#result.lastName">De</span></li>
      </ul>
   </li>

   <li>The full name <span concordion:execute = "#result = split(#TEXT)">
      John Diere</span> is to be splited as
      <ul>
         <li><span concordion:assertEquals = "#result.firstName">John</span></li>
         <li><span concordion:assertEquals = "#result.lastName">Diere</span></li>
      </ul>
   </li>
</ul>
When Concordion parses the document, it will set the value of the special variable #TEXT to be the value of the current element as "Robert De" and pass it to the split function. Then it will execute the split() method with parameters as #TEXT using execute command and set the result into #result variable and using result, print the firstName and lastName values as the output.
Example
Let us have a working Eclipse IDE in place and follow the steps given below to create a Concordion application −
| Step | Description |
|---|---|
| 1 | Create a project with a name concordion and create a package com.tutorialspoint under the src folder in the created project. |
| 2 | Add required Concordion libraries using Add External JARs option as explained in the Concordion - First Application chapter. |
| 3 | Create Java class System under the com.tutorialspoint package. |
| 4 | Create Fixture class SystemFixture under the specs.tutorialspoint package. |
| 5 | Create Specification html System.html under the specs.tutorialspointpackage. |
| 6 | The final step is to create the content of all the Java files and specification file and run the application as explained below. |
Here is the content of System.java file −
package com.tutorialspoint;
import org.concordion.api.MultiValueResult;

public class System {
   public MultiValueResult split(String userName){
      MultiValueResult result = new MultiValueResult();
      String[] words = userName.split(" ");
      result.with("firstName", words[0]).with("lastName", words[1]);
      return result;
   }
}
Following is the content of SystemFixture.java file −
package specs.tutorialspoint;

import org.concordion.api.MultiValueResult;
import org.concordion.integration.junit4.ConcordionRunner;
import org.junit.runner.RunWith;
import com.tutorialspoint.System;

@RunWith(ConcordionRunner.class)

public class SystemFixture {
   System system = new System();
   public MultiValueResult split(String userName){
      return system.split(userName);
   }
}
Following is the content of System.html file −
<html xmlns:concordion = "http://www.concordion.org/2007/concordion">
   <head>
      <link href = "../concordion.css" rel = "stylesheet" type = "text/css" />
   </head>

   <body>
      <h1>System Specifications</h1>
      <p>We are building specifications for our online order tracking application.</p>
      <p>Following is the requirement to split full name of a logged
         in user to its constituents by splitting name by whitespace:</p>

      <div class = "example">
         <h3>Example</h3>
         <ul>
            <li>The full name <span concordion:execute = "#result = split(#TEXT)">
               Robert De</span> is to be splited as
               <ul>
                  <li><span concordion:assertEquals = "#result.firstName">
                     Robert</span></li>
                  <li><span concordion:assertEquals = "#result.lastName">
                     De</span></li>
               </ul>
            </li>

            <li>The full name <span concordion:execute ="#result = split(#TEXT)">
               John Diere</span> is to be splited as
               <ul>
                  <li><span concordion:assertEquals = "#result.firstName">
                     John</span></li>
                  <li><span concordion:assertEquals = "#result.lastName">
                     Diere</span></li>
               </ul>
            </li>
         </ul>
      </div>
   </body>

</html>
Once you are done with creating source and specification files, let us run the application as JUnit Test. If everything is fine with your application, then it will produce the following result −
C:\DOCUME~1\ADMINI~1\LOCALS~1\Temp\concordion\specs\tutorialspoint\System.html
Successes: 4, Failures: 0
System.html is the output of Concordion test run.
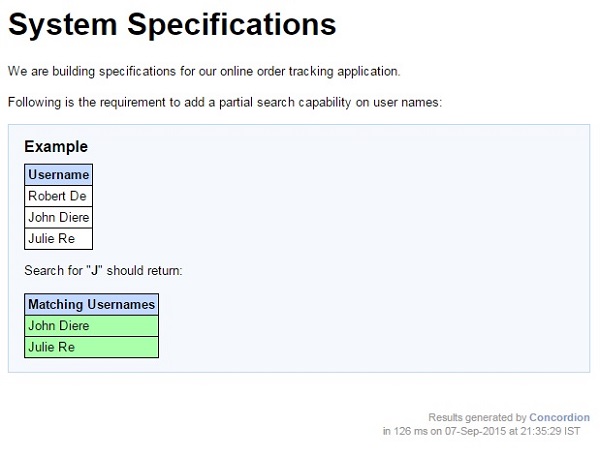
Concordion - verifyRows Command
Concordion verifyRows command can be used to check the content of a collection returned as a result by the system. For example, if we set up a set of users in the system and do a partial search on them, then the system should return the matching elements, otherwise our acceptance tests should fail.
Consider the following requirement −
<table>
   <tr><th>Users</th></tr>
   <tr><td>Robert De</td></tr>
   <tr><td>John Diere</td></tr>
   <tr><td>Julie Re</td></tr>
</table>

<p>Search for J should return:</p>

<table>
   <tr><th>Matching Users</th></tr>
   <tr><td>John Diere</td></tr>
   <tr><td>Julie Re</td></tr>
</table>
If we want write a specification for such a search function which will search and return a collection, then the specification will be as follows −
<table concordion:execute = "addUser(#username)">
   <tr><th concordion:set = "#username">Username</th></tr>
   <tr><td>Robert De</td></tr>
   <tr><td>John Diere</td></tr>
   <tr><td>Julie Re</td></tr>
</table>

<p>Search for "<b concordion:set = "#searchString">J</b>" should return:</p>

<table concordion:verifyRows = "#username : search(#searchString)">
   <tr><th concordion:assertEquals = "#username">Matching Usernames</th></tr>
   <tr><td>John Diere</td></tr>
   <tr><td>Julie Re</td></tr>
</table>
When Concordion parses the document, it will execute addUser() on each row of the first table and then set the searchString to be J. Next, Concordion will execute the search function which should return a Iterable object with a predictable iteration order, (e.g. a List, LinkedHashSet or a TreeSet), verifyRows runs for each item of the collection and runs the assertEquals command.
Example
Let us have a working Eclipse IDE in place and follow the steps given below to create a Concordion application −
| Step | Description |
|---|---|
| 1 | Create a project with a name concordion and create a package com.tutorialspoint under the src folder in the created project. |
| 2 | Add the required Concordion libraries using Add External JARs option as explained in the Concordion - First Application chapter. |
| 3 | Create Java class System under the com.tutorialspoint package. |
| 4 | Create Fixture class SystemFixture under the specs.tutorialspoint package. |
| 5 | Create Specification html System.html under the specs.tutorialspointpackage. |
| 6 | The final step is to create the content of all the Java files and specification file and run the application as explained below. |
Here is the content of System.java file −
package com.tutorialspoint;

import java.util.HashSet;
import java.util.Set;
import java.util.SortedSet;
import java.util.TreeSet;

public class System {
   private Set<String> users = new HashSet<String>();

   public void addUser(String username) {
      users.add(username);
   }

   public Iterable<String> search(String searchString) {
      SortedSet<String> matches = new TreeSet<String>();

      for (String username : users) {
         if (username.contains(searchString)) {
            matches.add(username);
         }
      }

      return matches;
   }
}
Following is the content of SystemFixture.java file −
package specs.tutorialspoint;

import org.concordion.integration.junit4.ConcordionRunner;
import org.junit.runner.RunWith;
import com.tutorialspoint.System;

@RunWith(ConcordionRunner.class)

public class SystemFixture {
   System system = new System();
   public void addUser(String username) {
      system.addUser(username);
   }

   public Iterable<String> search(String searchString) {
      return system.search(searchString);
   }
}
Following is the content of System.html file −
<html xmlns:concordion = "http://www.concordion.org/2007/concordion">
   <head>
      <link href = "../concordion.css" rel = "stylesheet" type = "text/css" />
   </head>

   <body>
      <h1>System Specifications</h1>
      <p>We are building specifications for our online order tracking application.</p>
      <p>Following is the requirement to add a partial search capability on user names:</p>

      <div class = "example">
         <h3>Example</h3>

         <table concordion:execute = "addUser(#username)">
            <tr><th concordion:set = "#username">Username</th></tr>
            <tr><td>Robert De</td></tr>
            <tr><td>John Diere</td></tr>
            <tr><td>Julie Re</td></tr>
         </table>

         <p>Search for "<b concordion:set = "#searchString">J</b>" should return:</p>

         <table concordion:verifyRows = "#username : search(#searchString)">
            <tr><th concordion:assertEquals = "#username">Matching Usernames</th></tr>
            <tr><td>John Diere</td></tr>
            <tr><td>Julie Re</td></tr>
         </table>

      </div>

   </body>

</html>
Once you are done with creating the source and specification files, let us run the application as JUnit Test. If everything is fine with your application, then it will produce the following result −
C:\DOCUME~1\ADMINI~1\LOCALS~1\Temp\concordion\specs\tutorialspoint\System.html
Successes: 2, Failures: 0
System.html is the output of Concordion test run.
Concordion - Run Command
Concordion run command can be used to link multiple specifications together and display them at one central page. This command can run all the specifications, while displaying the link's background in green / red / gray as appropriate.
Now we are going to create two specifications and link them together. We'll be reusing the specifications created in Concordion - Execute on List and Concordion - Execute on Table chapters as System Specifications and Calculator Specifications.
Example
Let us have a working Eclipse IDE in place and follow the steps given below to create a Concordion application −
| Step | Description |
|---|---|
| 1 | Create a project with a name concordion and create a package com.tutorialspoint under the src folder in the created project. |
| 2 | Add the required Concordion libraries using Add External JARs option as explained in the Concordion - First Application chapter. |
| 3 | Create Java class System under the com.tutorialspoint package. |
| 4 | Create Fixture classes SystemFixture, CalculatorFixture under the specs.tutorialspoint package. |
| 5 | Create Specification html files System.html, Calculator.html under the specs.tutorialspoint package. |
| 6 | The final step is to create the content of all the Java files and specification file and run the application as explained below. |
Here is the content of System.java file −
package com.tutorialspoint;
import org.concordion.api.MultiValueResult;

public class System {
   public MultiValueResult split(String userName){
      MultiValueResult result = new MultiValueResult();
      String[] words = userName.split(" ");
      result.with("firstName", words[0]).with("lastName", words[1]);
      return result;
   }

   public int sum(int firstNumber, int secondNumber) {
      return firstNumber + secondNumber;
   }
}
Following is the content of SystemFixture.java file −
package specs.tutorialspoint;

import org.concordion.api.MultiValueResult;
import org.concordion.integration.junit4.ConcordionRunner;
import org.junit.runner.RunWith;
import com.tutorialspoint.System;

@RunWith(ConcordionRunner.class)

public class SystemFixture {
   System system = new System();
   public MultiValueResult split(String userName){
      return system.split(userName);
   }
}
Following is the content of CalculatorFixture.java file −
package specs.tutorialspoint;

import org.concordion.integration.junit4.ConcordionRunner;
import org.junit.runner.RunWith;
import com.tutorialspoint.System;

@RunWith(ConcordionRunner.class)

public class CalculatorFixture {
   System system = new System();
   public int sum(int firstNumber, int secondNumber) {
      return system.sum(firstNumber, secondNumber);
   }
}
Following is the content of System.html file −
<html xmlns:concordion = "http://www.concordion.org/2007/concordion">
   <head>
      <link href = "../concordion.css" rel = "stylesheet" type = "text/css" />
   </head>

   <body>
      <h1>System Specifications</h1>
      <p>We are building specifications for our online
         order tracking application.</p>
      <p>Following is the requirement to split full name of a
         logged in user to its constituents by splitting name by whitespace:</p>

      <div class = "example">
         <h3>Example</h3>

         <ul>
            <li>The full name <span concordion:execute = "#result = split(#TEXT)">
               Robert De</span> is to be splited as
               <ul>
                  <li><span concordion:assertEquals = "#result.firstName">
                     Robert</span></li>
                  <li><span concordion:assertEquals = "#result.lastName">
                     De</span></li>
               </ul>
            </li>

            <li>The full name <span concordion:execute = "#result = split(#TEXT)">
               John Diere</span> is to be splited as
               <ul>
                  <li><span concordion:assertEquals = "#result.firstName">
                     John</span></li>
                  <li><span concordion:assertEquals = "#result.lastName">
                     Diere</span></li>
               </ul>
            </li>

         </ul>
      </div>

      <a concordion:run = "concordion" href = "Calculator.html">
         Calculator Service Specifications</a>
   </body>

</html>
Following is the content of Calculator.html file −
<html xmlns:concordion = "http://www.concordion.org/2007/concordion">
   <head>
      <link href = "../concordion.css" rel = "stylesheet" type = "text/css" />
   </head>

   <body>
      <h1>Calculator Specifications</h1>
      <p>We are building online calculator support in our website.</p>
      <p>Following is the requirement to add two numbers:</p>

      <div class = "example">
         <h3>Example</h3>

         <table>
            <tr>
               <th>First Number</th>
               <th>Second Number</th>
               <th>Sum</th>
            </tr>
            <tr concordion:execute = "#result = sum(#firstNumber, #secondNumber)">
               <td concordion:set = "#firstNumber">2</td>
               <td concordion:set = "#secondNumber">3</td>
               <td concordion:assertEquals = "#result">5</td>
            </tr>
            <tr concordion:execute = "#result = sum(#firstNumber, #secondNumber)">
               <td concordion:set = "#firstNumber">4</td>
               <td concordion:set = "#secondNumber">5</td>
               <td concordion:assertEquals = "#result">9</td>
            </tr>
         </table>

      </div>
   </body>

</html>
Once you are done with creating source and specification files, let us run the application as JUnit Test. If everything is fine with your application, then it will produce the following result −
C:\DOCUME~1\ADMINI~1\LOCALS~1\Temp\concordion\specs\tutorialspoint\System.html
Successes: 2, Failures: 0
C:\DOCUME~1\ADMINI~1\LOCALS~1\Temp\concordion\specs\tutorialspoint\System.html
Successes: 6, Failures: 0
System.html is the output of Concordion test run.
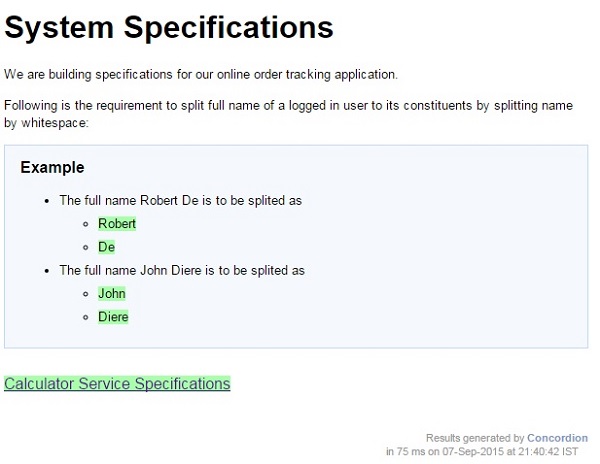
Click on the link Calculator Service Specifications. You will see the following output −


Comments
Post a Comment