
Continuous Integration was first introduced in the year 2000 with the software known as Cruise Control. Over the years, Continuous Integration has become a key practice in any software organization. This is a development practice that calls upon development teams to ensure that a build and subsequent testing is conducted for every code change made to a software program. This concept was meant to remove the problem of finding late occurrences of issues in the build lifecycle. Instead of the developers working in isolation and not integrating enough, Continuous Integration was introduced to ensure that the code changes and builds were never done in isolation.
Why Continuous Integration?
Continuous integration has become a very integral part of any software development process. The continuous Integration process helps to answer the following questions for the software development team.
- Do all the software components work together as they should? – Sometimes systems can become so complex that there are multiple interfaces for each component. In such cases, it’s always critical to ensure that all the software components work seamlessly with each other.
- Is the code too complex for integration purposes? – If the continuous integration process keeps on failing, there could be a possibility that the code is just too complex. And this could be a signal to apply proper design patterns to make the code lesser complex and more maintainable.
- Does the code adhere to the established coding standards? – Most of the test cases will always check that the code is adhering to the proper coding standards. By doing an automated test after the automated build, this is a good point to check if the code meets all the desired coding standards.
- How much code is covered by automated tests? – There is no point in testing code if the test cases don’t cover the required functionality of the code. So it’s always a good practice to ensure that the test cases written should cover all the key scenarios of the application.
- Were all the tests successful after the latest change? – If a test fails, then there is no point in proceeding with the deployment of the code, so this is a good point to check if the code is ready to move to the deployment stage or not.
Workflow
The following image shows a quick workflow of how the entire Continuous Integration workflow works in any software development project. We will look at this in detail in the subsequent chapters.
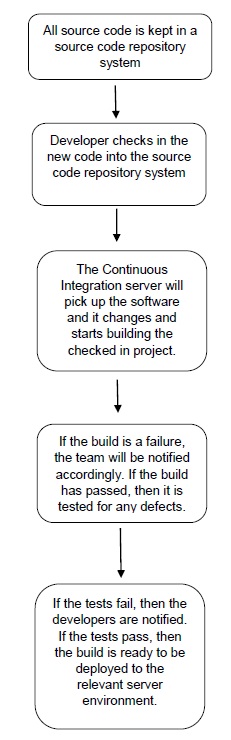
So, based on the above workflow, this is generally how the continuous integration process works.
- First, a developer commits the code to the version control repository. Meanwhile, the Continuous Integration server on the integration build machine polls source code repository for changes (e.g., every few minutes).
- Soon after a commit occurs, the Continuous Integration server detects that changes have occurred in the version control repository, so the Continuous Integration server retrieves the latest copy of the code from the repository and then executes a build script, which integrates the software
- The Continuous Integration server generates feedback by e-mailing build results to the specified project members.
- Unit tests are then carried out if the build of that project passes. If the tests are successful, the code is ready to be deployed to either the staging or production server.
- The Continuous Integration server continues to poll for changes in the version control repository and the whole process repeats.
Continuous Integration - Software
The software part is the most important aspect of any Continuous Integration process. This chapter focusses on the software which will be needed for the entire Continuous Integration process.
Source Code Repository
The source code repository is used for maintaining all the source code and all the changes made to it. The two most popular ones for source code repository management is subversion and Git with Git being the most recent popular system. We will now look at how to get Git installed on the system.
System Requirements
| Memory | 2 GB RAM (recommended) |
| Disk Space | 200 MB HDD for the installation. Additional storage is required to store the project source code and this is dependent on the source code being added. |
| Operating System Version | Can be installed on Windows, Ubuntu/Debian, Red Hat/Fedora/CentOS, Mac OS X. |
Installing Git
Step 1 − The official website for Git is https://git-scm.com/. If you click on the link, you will get to the home page of the Git official website as shown in the following screenshot.
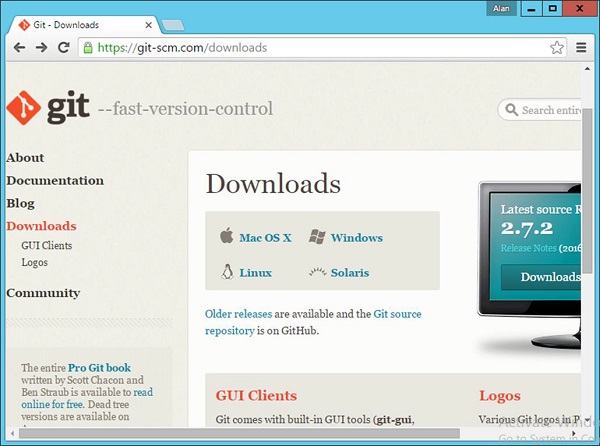
Step 2 − To download Git, just scroll down the screen and go to the Downloads section and click Downloads.
Step 3 − Click the Windows link and the download for Git will begin automatically.
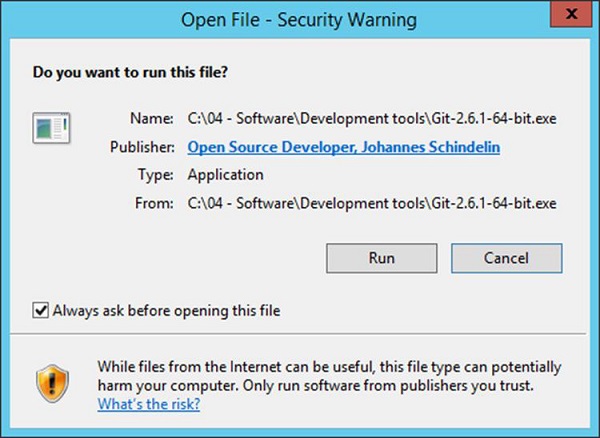
Step 4 − Click the downloaded .exe file for Git. In our case, we are using the Git-2.6.1-64-bit.exe file. Click Run which comes appears on the next screen.
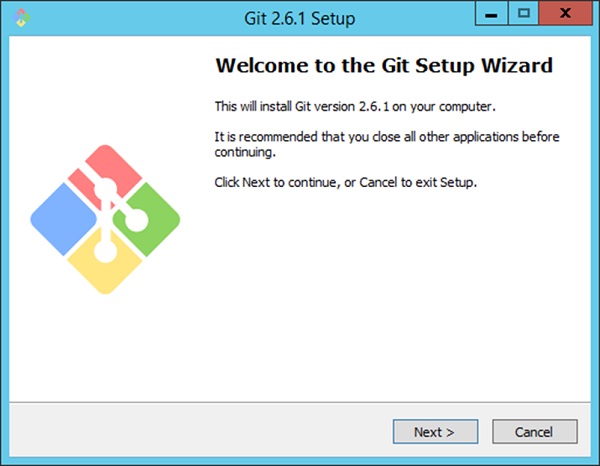
Step 5 − Click the Next button that appears on the following screen.
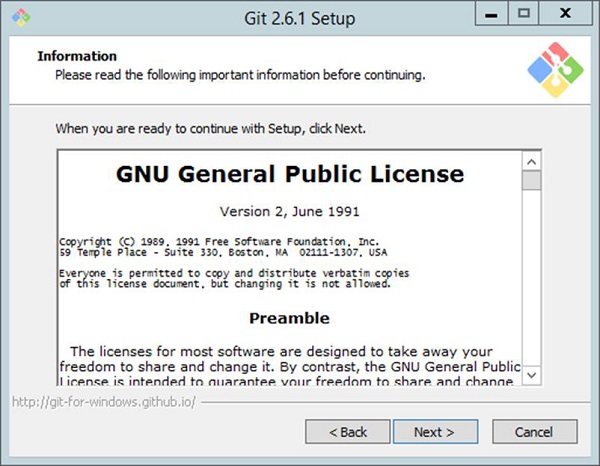
Step 6 − Click Next in the following screen to accept the General License agreement.
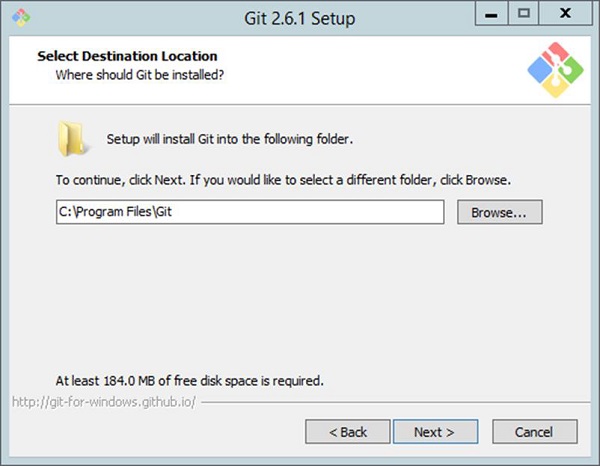
Step 7 − Choose the location for your Git installation.
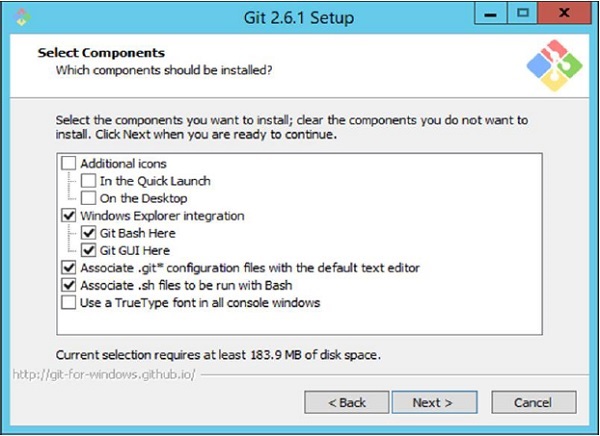
Step 8 − Click Next to accept the default components that are need to be installed.
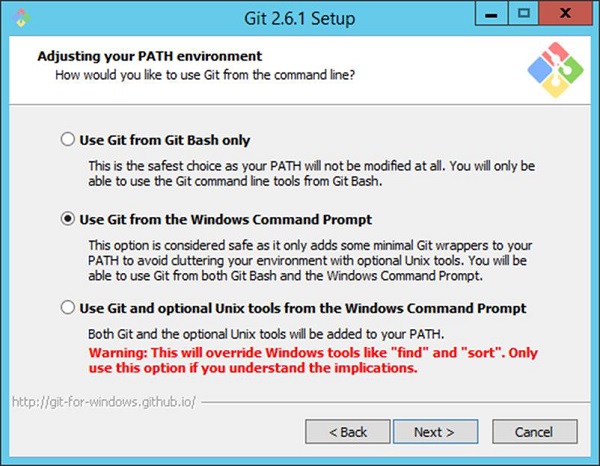
Step 9 − Choose the option of ‘Use Git from the Windows command prompt’ since we are going to be using Git from Windows.
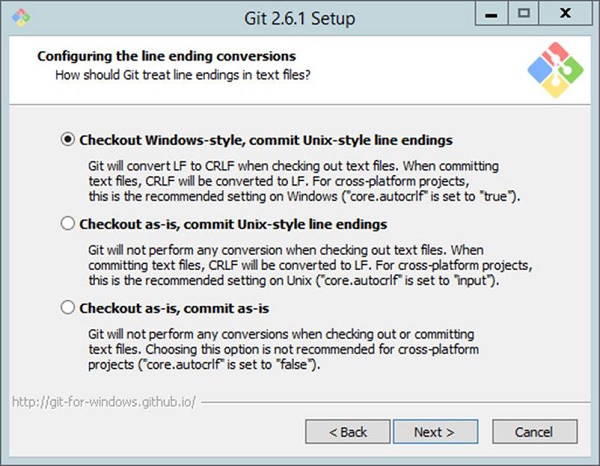
Step 10 − In the following screen, accept the default setting of ‘Checkout Windows-style, commit Unix-style line endings’ and click Next.
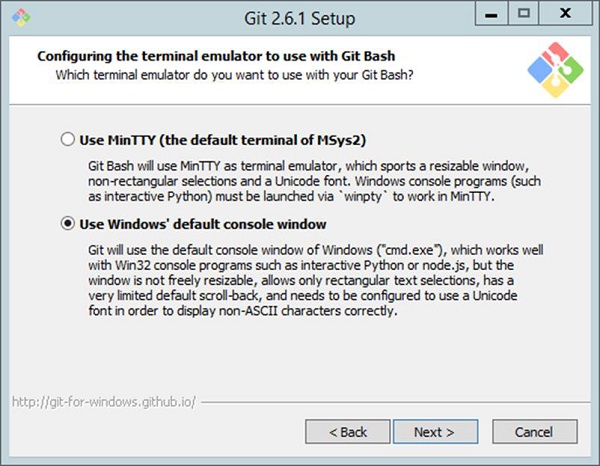
Step 11 − In the following screen, choose the option of ‘Use Windows default console window’, since we are using Windows as the system for installation of Git.
The installation will now start, and the subsequent steps can be followed for configuring Git, once the installation is complete.
Configuring Git
Once Git has been installed, the configuration steps need to be carried out for the initial configuration of Git.
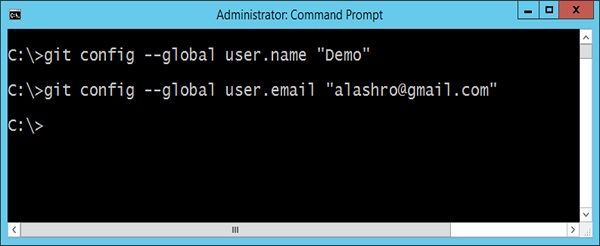
The first thing that needs to be done is to configure the identity in Git and then to configure a user name and email. This is important because every Git commit uses this information, and it’s immutably baked into the commits you start creating. One can do this by opening the command prompt and then enter the following commands −
git config –global user.name “Username”
git config –global user.email “emailid”
The following screenshot is an example for better understanding.
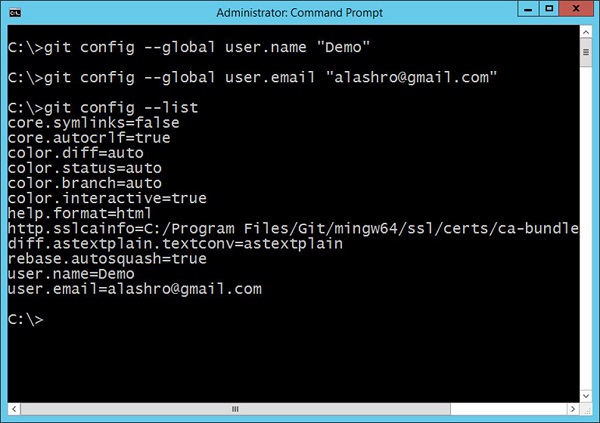
These commands will actually change the configuration file of Git accordingly. To ensure your settings have taken effect, you can list down the settings of the Git configuration file by using issuing the following command.
git config --list
An example of the output is shown in the following screenshot.
Continuous Integration Server
The next crucial software required for the entire continuous integration pipeline is the Continuous Integration software itself. Following are the most commonly used Continuous Integration softwares used in the industry −
- Jenkins− This is an open source Continuous Integration software which is used by a lot of development communities.
- Jet Brains TeamCity − This is one of the most popular commercial Continuous Integration software’s available and most companies use this for their Continuous Integration needs.
- Atlassian Bamboo − This is another popular Continuous Integration software provided by a company called Atlassian Pvt. Ltd.
All of the softwares mentioned above, work on the same model for Continuous Integration. For the purpose of this tutorial, we will look at Jetbrains TeamCity for the Continuous Integration server.
Installing TeamCity
Following are the steps and the system requirements for installing Jet Brains TeamCity in your computer.
System Requirements
| Memory | 4 GB RAM (recommended) |
| Disk Space | 1 GB HDD for the installation. Additional storage is required to store the build workspace for each project. |
| Operating System Version | Can be installed on Windows, Linux, Mac OS X. |
Installation
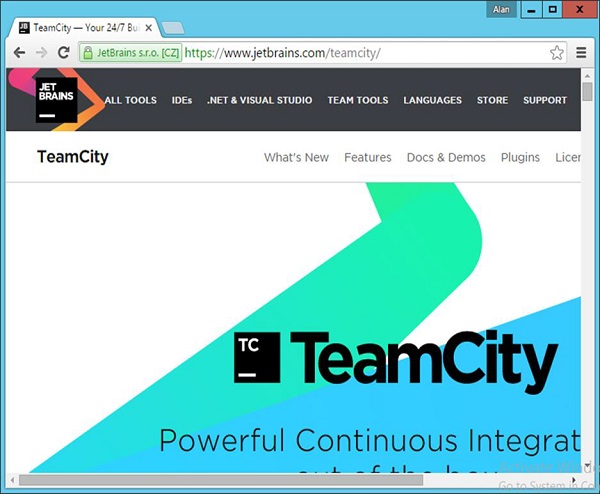
Step 1 − The official website for TeamCity ishttps://www.jetbrains.com/teamcity/. If you click the given link, you will go to the home page of the TeamCity official website as shown in the following screenshot. You can browse the page to download the required software for TeamCity.
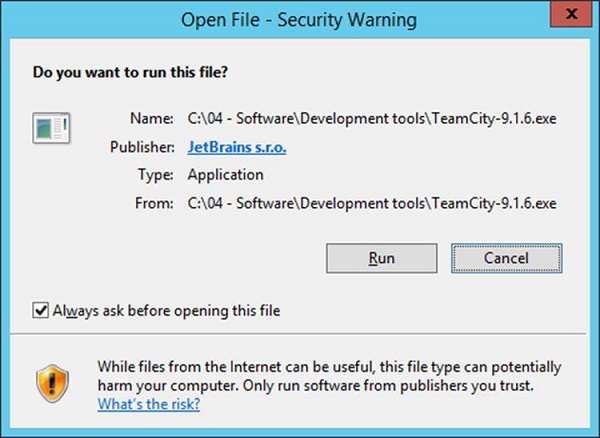
Step 2 − The downloaded .exe is being used for the purpose of executing TeamCity-9.1.6.exe. Double-click the executable and then click Run in the next screen that pops up.
Step 3 − Click Next to start the setup.

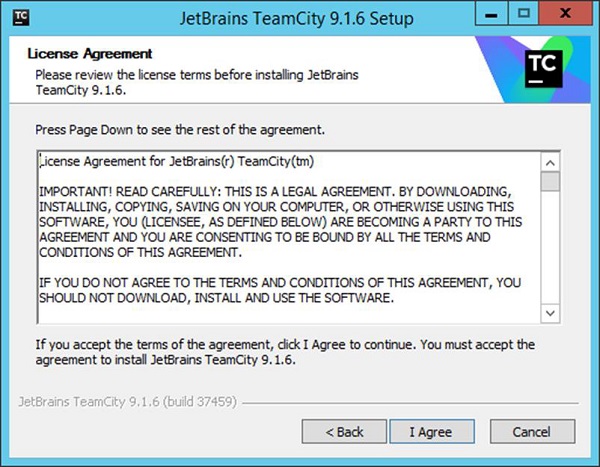
Step 4 − Click the ‘I Agree’ button to accept the license agreement and proceed with the installation.
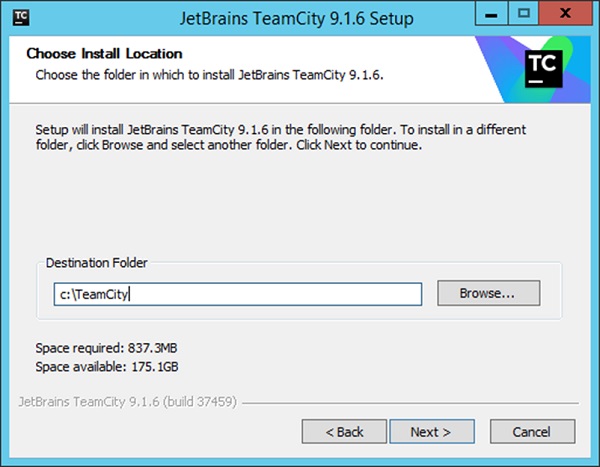
Step 5 − Choose the location for the installation and click Next.
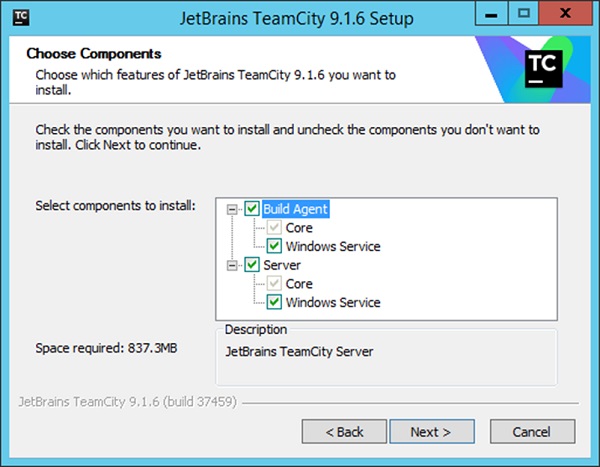
Step 6 − Choose the default components for the installation and click Next
This will start the installation process. Once completed the configuration process will follow.
Step 7 − Choose a port number for the server to run. Best is to use a different port such as 8080.
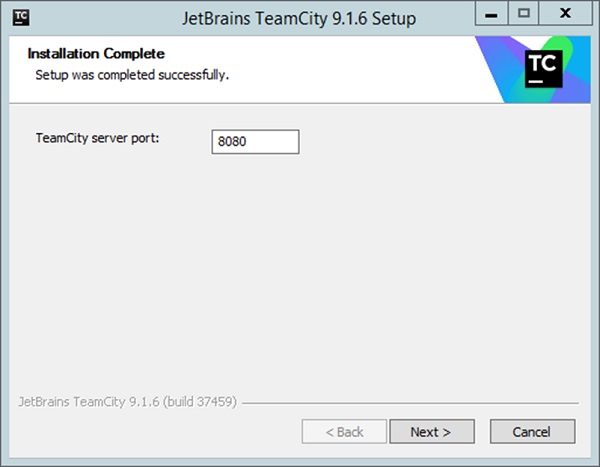
Step 8 − Next it will ask for which account TeamCity needs to run as. Choose the SYSTEM account and Click Next.

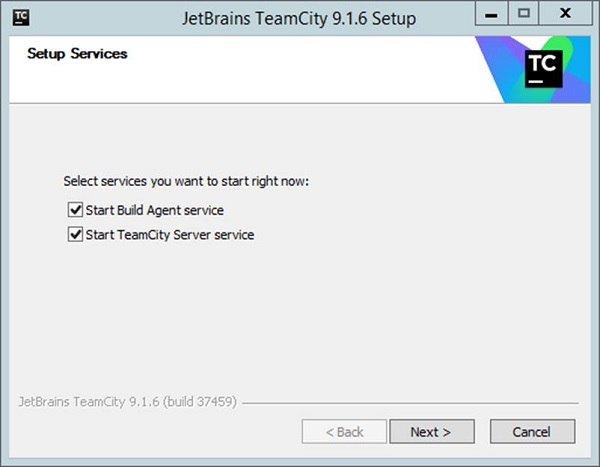
Step 9 − Next it will ask for the services which needs to be started. Accept the default ones and then click Next.
Configuring TeamCity
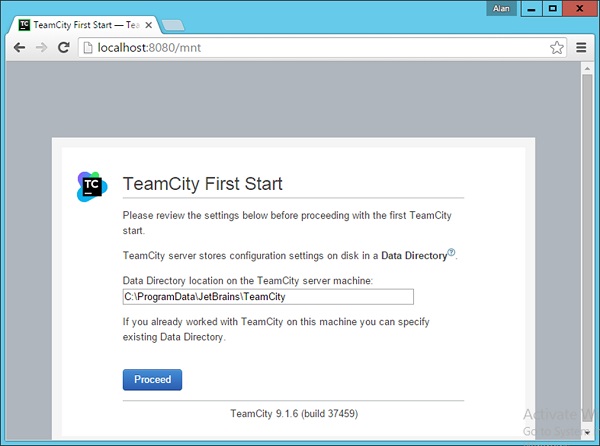
Once the installation is complete, the next step is the configuration of TeamCity. This software can be opened by browsing on the following URL in the browser −
http://locahost:8080
Step 1 − The first step is to provide the location of the builds, which will be carried out by TeamCity. Choose the desired location and click the Proceed button.
Step 2 − The next step is to specify the database for storing all the TeamCity artefacts. For the purpose of the tutorial, one can choose the Internal (HSQLDB), which is an internal database that is best suited when using products for testing purposes.
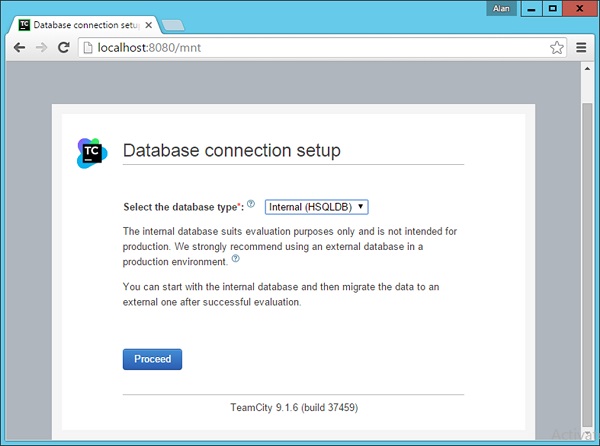
TeamCity will then process all the necessary steps to get it up and running.
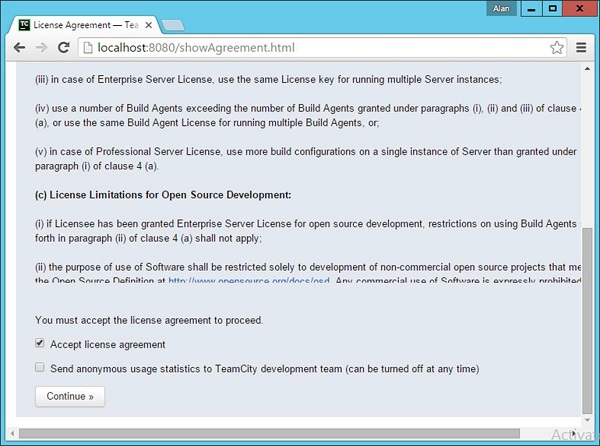
Step 3 − Next you will be requested to Accept the license agreement. Accept the same and click Continue.
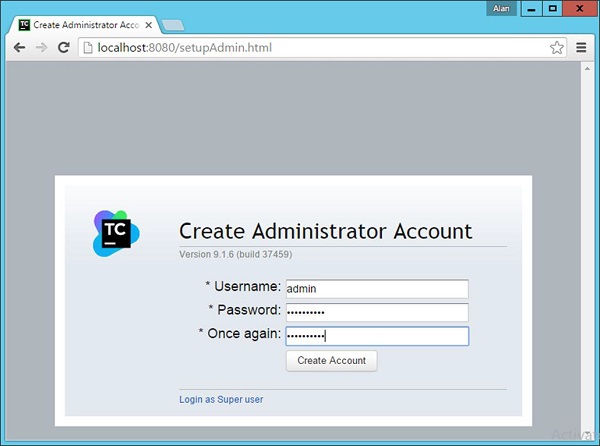
Step 4 − You need to create an administrator account that will be used to log into the TeamCity software. Enter the required details and click the ‘Create Account’ button.
You will now be logged into TeamCity.
The Build Tool
The Build tool is a tool which ensures that the program is built in a particular way. The tool will normally carry out a list of tasks, which are required for the program to be built in a proper manner. Since in our example, we are going to be looking at a .Net program , we will be looking at MSBuild as the build tool. The MSBuild tool looks at a build file which contains a list of tasks that are used to build the project. Let’s look at a typical Build file for a web configuration project.
Following are the key sections of the Build file, which need to be considered.
IIS Settings
Following settings are used to determine which is the port number, what is the path on the web server and what type of authentication is required when the application is run. These are important settings, which will be changed via the MSBuild command when we learn how the deployment will be carried out later on in the tutorial.
<UseIIS>True</UseIIS>
<AutoAssignPort>True</AutoAssignPor>
<DevelopmentServerPort>61581</DevelopmentServerPort>
<DevelopmentServerVPath>/</DevelopmentServerVPath>
<IISUrl>http://localhost:61581/</IISUrl>
<NTLMAuthentication>False</NTLMAuthentication>
ItemGroup
This is used to tell the Build server what are all the dependent binaries that are required to run this project.
<ItemGroup>
   <Reference Include = "System.Web.ApplicationServices" />
   <Reference Include = "System.ComponentModel.DataAnnotations" />
<ItemGroup>
   <Compile Include = "App_Start\BundleConfig.cs" />
   <Compile Include = "App_Start\FilterConfig.cs" />
.Net Framework Version
The TargetFrameworkVersion tells which is the version of .Net that needs to be present for the project to work. This is absolutely required because if the build server does not have this in place, the build will fail.
<TargetFrameworkVersion>v4.5</TargetFrameworkVersion>
Deployment Environment – Amazon
For the purpose of this tutorial, we will ensure our Continuous Integration server has the ability to deploy our application to Amazon. For this, we need to ensure the following artefacts are in place.
Database Server
Perform the following steps to ensure that the database server is in place in Amazon for the deployment.
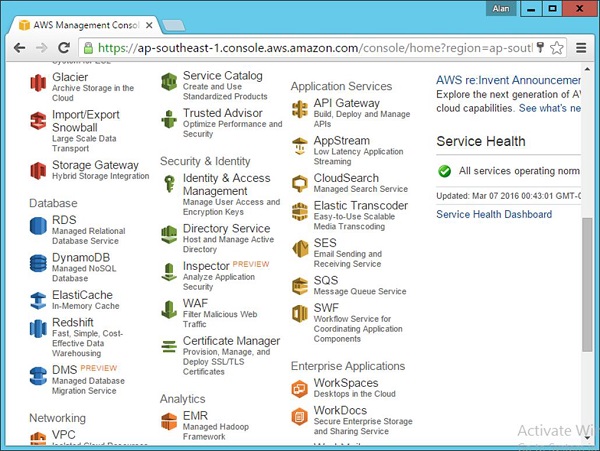
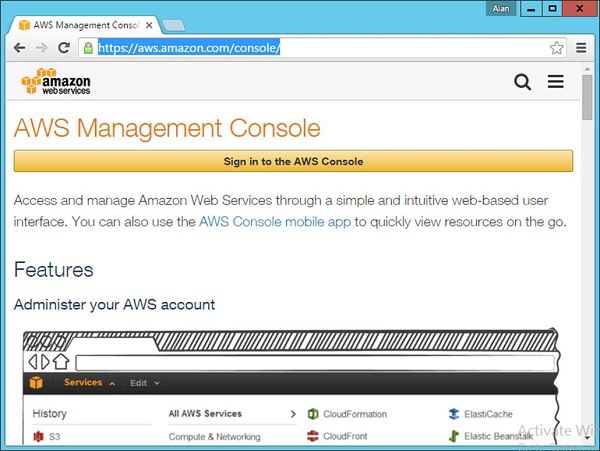
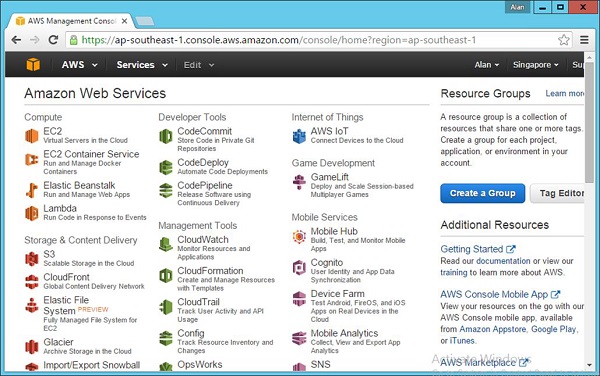
Step 1 − Go to the Amazon Console − https://aws.amazon.com/console/.
Login with your credentials. Note that you can apply for a free id on the amazon site, which will allow you to have a free tier that allows you to use some of the resources on Amazon free of cost.

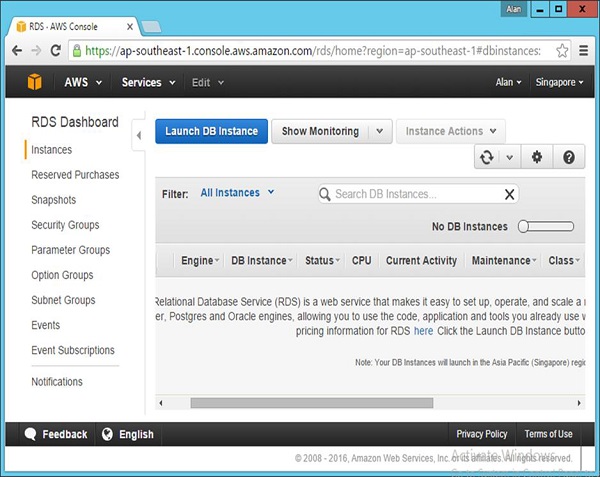
Step 2 − Go to the RDS Section to create your database.
Step 3 − Click Instances in the next screen that pops up.
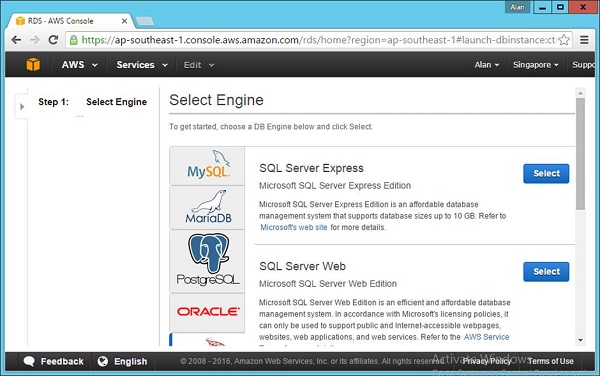
Step 4 − Click the Launch DB option in the next screen that comes up.
Step 5 − Choose the SQL Server tab and then choose the Select option for SQL Server Express.
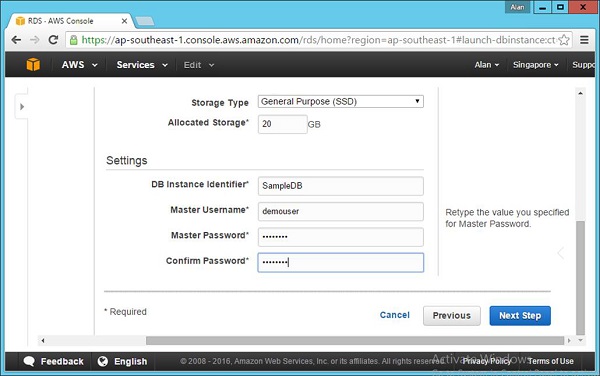
Step 6 − Ensure that the following details are entered to confirm that you are using the free tier of databases available from Amazon.
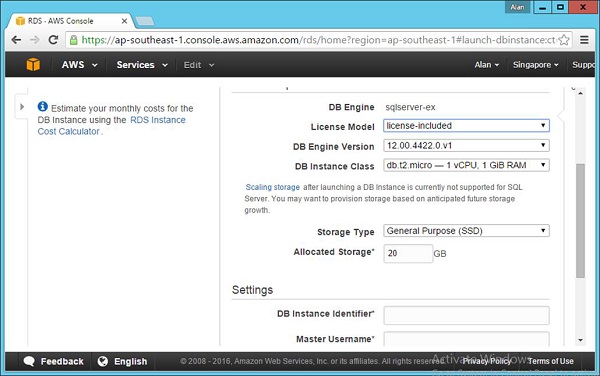
Step 7 − Click the Next Step button once all the fields are filled.
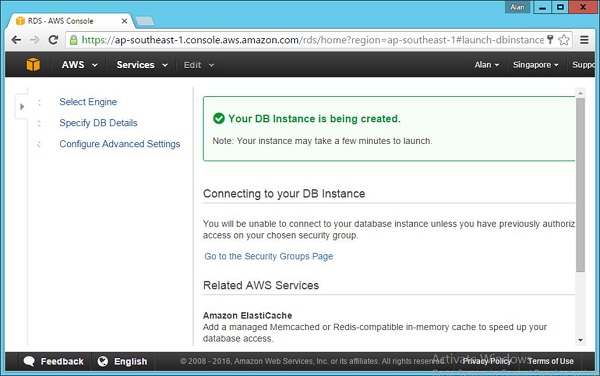
Step 8 − In the next screen that comes up, accept all the default settings and Click Launch DB Instance.

Step 9 − You will then be presented with a screen that says that the DB is being successfully launched. On the same page, there will be a button to view the DB Instance. Click the link to see your DB Instance being set up.
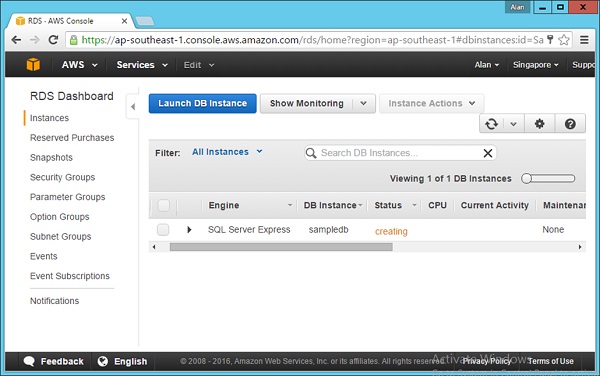
After some time, the status of the above screen will change to notify that the DB Instance has been successfully created.
Web Server
The next step is to create your web server on Amazon, which will host the web application. This can be done by following the subsequent steps to have this in place.
Step 1 − Go to Amazon Console − https://aws.amazon.com/console/.
Login with your credentials. Note that you can apply for a free id on the Amazon site, which will allow you to have a free tier that allows you to use some of the resources on Amazon free of cost.
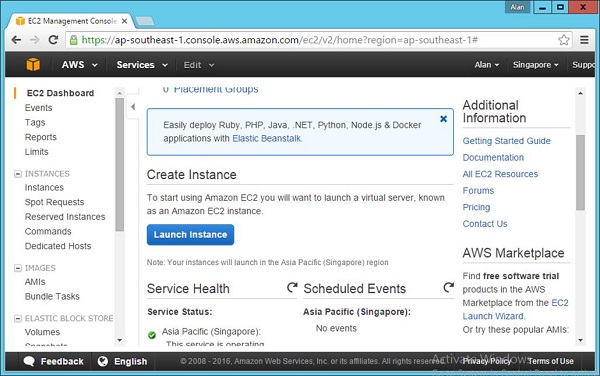
Step 2 − Go to the EC2 section to create your web server.
Step 3 − In the next screen, click Launch Instance.
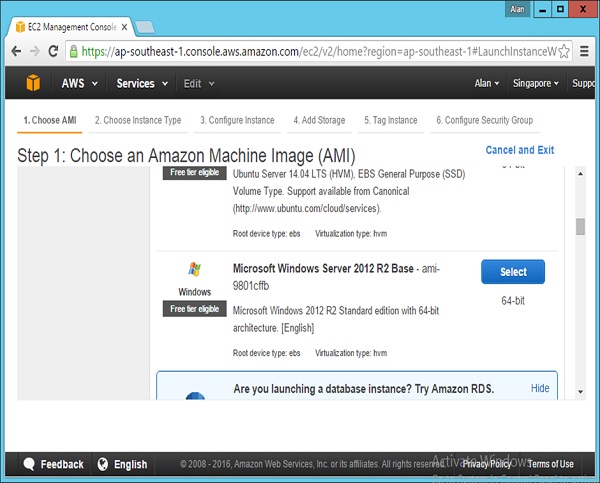
Step 4 − Click Windows – Microsoft Windows Server 2010 R2 Base.
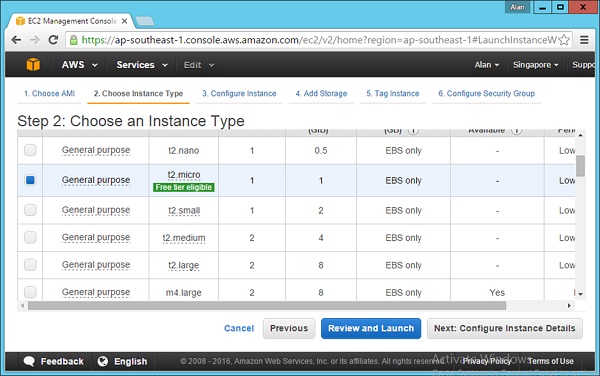
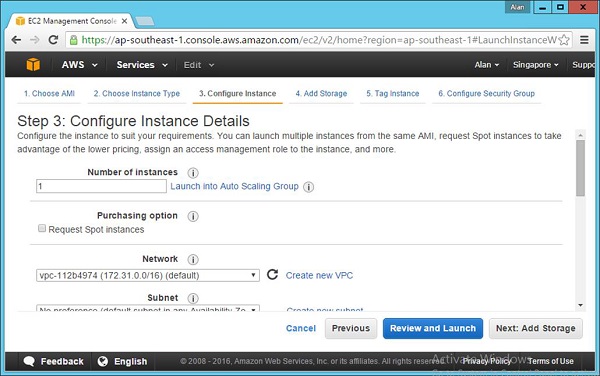
Step 5 − Choose the t2.micro option, which is a part of the free tier. Click Next: Configure Instance Details.
Step 6 − Accept the default settings on the next screen that comes up and then choose the option Next: Add Storage.
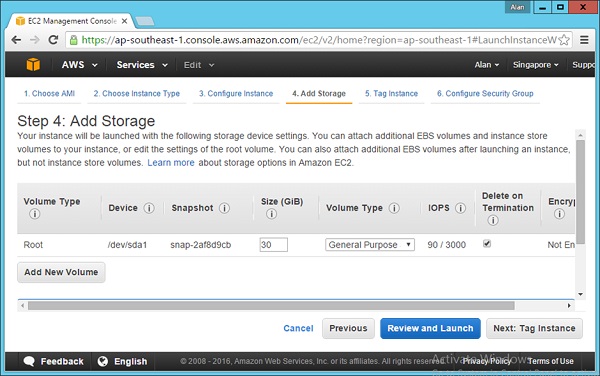
Step 7 − Accept the default settings on the next screen and choose the option Next: Tag Instance.
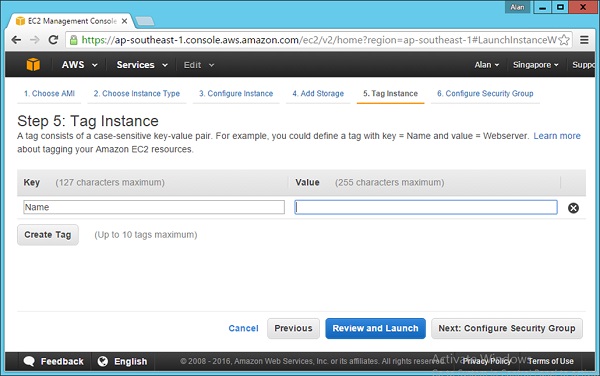
Step 8 − Accept the default settings on the next screen and choose the option of Next: Configure Security Group.
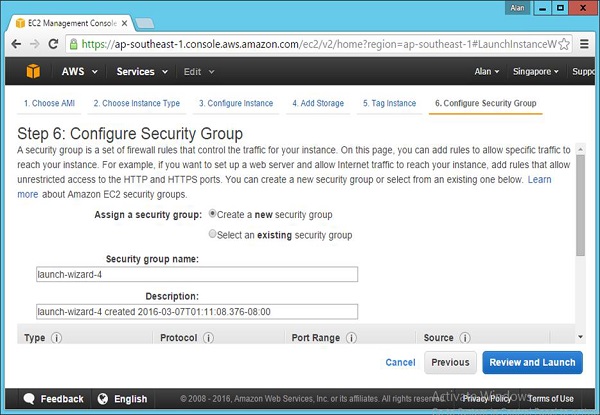
Step 9 − Accept the default settings on the next screen and choose the option of Review and Launch.
Step 10 − Click Launch in the next screen that comes up.
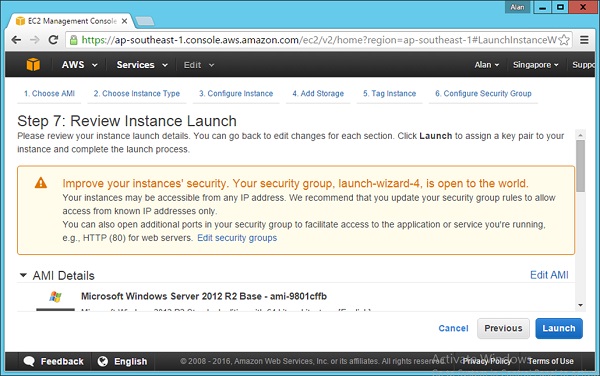
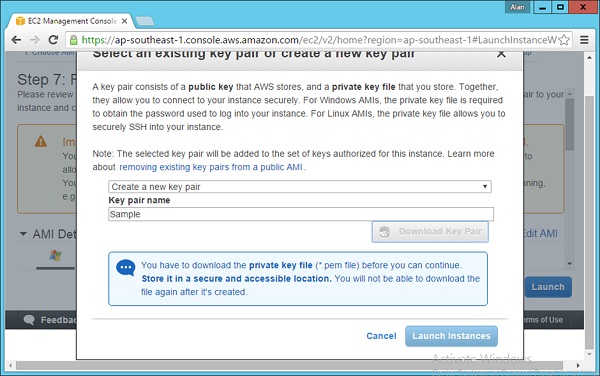
Step 11 − In the next screen that comes up, you will be prompted to create a key pair. This will be used to log into the server at a later point of time. Just create the key pair and click Launch Instance.
The instance will now be set up in Amazon.
Continuous Integration - Reducing Risks
There are chances that things will go wrong on a project. By effectively practicing CI, you find out what happens at every step along the way, rather than later when the project is into the development cycle. CI helps you identify and mitigate risks when they occur, making it easier to evaluate and report on the health of the project based on concrete evidence.
This section is going to concentrate on the risks that can be avoided by using Continuous Integration.
On any project, there are many risks that need to be managed. By eliminating the risks earlier in the development lifecycle, there are lesser chances of these risks developing into issues later on, when the system actually goes live.
Risk 1 – Lack of Deployable Software
“It works on my machine but does not work on another” – This is probably one of the most common phrases encountered in any software organization. Because of the number of changes done to software builds on a daily basis, sometimes there is little confidence on whether the build of the software actually works or not. This concern has the following three side effects.
- Little or no confidence in whether we could even build the software.
- Lengthy integration phases before delivering the software internally (i.e., test team) or externally (i.e., customer), during which time nothing else gets done.
- Inability to produce and reproduce testable builds.
Solution
Eliminating tight coupling between the IDE and the build processes. Use a separate machine solely for integrating the software. Ensure that everything you need to build the software is contained in the version control repository. Finally, create a Continuous Integration system.
The Continuous Integration server can watch for changes in the version control repository and run the project build script when it detects a change to the repository. The capability of the Continuous Integration system can be increased to include having the build run through tests, perform inspections, and deploy the software in the development and test environments; this way you always have a working software.
“Inability to synchronize with the database” – Sometimes developers are unable to recreate the database quickly during development, and hence find it difficult to make changes. Often this is due to a separation between the database team and the development team. Each team will be focused on their own responsibilities and have little collaboration between each other. This concern has the following three side effects −
- Fear of making changes or refactoring the database or source code.
- Difficulty in populating the database with different sets of test data.
- Difficulty in maintaining development and testing environments (e.g., Development, Integration, QA, and Test).
Solution
The solution to the above issue is to ensure that the placement of all database artifacts in the version control repository are carried out. This means everything that is required to recreate the database schema and data: database creation scripts, data manipulation scripts, stored procedures, triggers, and any other database assets are needed.
Rebuild the database and data from your build script, by dropping and recreating your database and tables. Next, apply the stored procedures and triggers, and finally, insert the test data.
Test (and inspect) your database. Typically, you will use the component tests to test the database and data. In some cases, you’ll need to write database-specific tests.
Risk 2 – Discovering Defects Late in the Lifecycle
Since there are so many changes which happen frequently by multiple developers to the source code, there are always chances that a defect can be introduced in the code that could only be detected at a later stage. In such cases, this can cause a big impact because the later the defect is detected in the software, the more expensive it becomes to remove the defect.
Solution
Regression Testing − This is the most important aspect of any software development cycle, test and test again. If there is any major change to the software code, it is absolutely mandatory to ensure that all the tests are run. And this can be automated with the help of the Continuous Integration server.
Test Coverage − There is no point in testing if the test cases do not cover the entire functionality of the code. It is important to ensure that the test cases created to test the application are complete and that all code paths are tested.
For example, if you have a login screen which needs to be tested, you just can’t have a test case that has the scenario of a successful login. You need to have a negative test case wherein a user enters a different combination of user names and passwords and then it is required to see what happens in such scenarios.
Risk 3 – Lack of Project Visibility
Manual communication mechanisms require a lot of coordination to ensure the dissemination of project information to the right people in a timely manner. Leaning over to the developer next to you and letting them know that the latest build is on the shared drive is rather effective, yet it doesn’t scale very well.
What if there are other developers who need this information and they are on a break or otherwise unavailable? If a server goes down, how are you notified? Some believe they can mitigate this risk by manually sending an e-mail. However, this cannot ensure the information is communicated to the right people at the right time because you may accidentally leave out interested parties, and some may not have access to their e-mail at the time.
Solution
The Solution to this issue is again the Continuous Integration server. All CI servers have the facility to have automated emails to be triggered whenever the builds fail. By this automatic notification to all key stakeholders, it is also ensured that everyone is on board on what is the current state of the software.
Risk 4 – Low Quality Software
There are defects and then there are potential defects. You can have potential defects when your software is not well designed or if it is not following the project standards, or is complex to maintain. Sometimes people refer to this as code or design smells — “a symptom that something may be wrong.”
Some believe that lower-quality software is solely a deferred project cost (after delivery). It can be a deferred project cost, but it also leads to many other problems before you deliver the software to the users. Overly complex code, code that does not follow the architecture, and duplicated code - all usually lead to defects in the software. Finding these code and design smells before they manifest into defects can save both time and money, and can lead to higher-quality software.
Solution
There are software components to carry out a code quality check which can be integrated with the CI software. This can be run after the code is built to ensure that the code actually conforms to proper coding guidelines.
Continuous Integration - Version Control
Version control systems, also known as source control, source code management systems, or revision control systems, are a mechanism for keeping multiple versions of your files, so that when you modify a file you can still access the previous revisions.
The first popular version control system was a proprietary UNIX tool called SCCS (Source Code Control System) which dates back to the 1970s. This was superseded by RCS, the Revision Control System, and later CVS, Concurrent Versions System.
Now the most popular version control system used are Subversion and Git. Let’s first look at why we need to use a versioning control system and next let’s look at putting our source code in Git source code repository system.
Purpose of the Version Control System
One reason that we use the term version control in preference to source control is that version control isn’t just for source code. Every single artifact related to the creation of your software should be under version control.
Developers should use it for source code − By default all source code needs to be stored in the versioning control system
Related artefacts − Every system would be having related artefacts to the source code such as database scripts, build and deployment scripts, documentation, libraries and configuration files for your application, your compiler and collection of tools, and so on. All of these compliment the entire development and deployment process and also needs to be stored in the versioning control system.
By storing all the information for the application in source control, it becomes easier to re-create the testing and production environments that your application runs on. This should include configuration information for your application’s software stack and the operating systems that comprise the environment, DNS Zone Files, Firewall Configuration, and so forth.
At the bare minimum, you need everything required to re-create your application’s binaries and the environments in which they run. The objective is to have everything that can possibly change at any point in the life of the project stored in a controlled manner. This allows you to recover an exact snapshot of the state of the entire system, from development environment to production environment, at any point in the project’s history.
It is even helpful to keep the configuration files for the development team’s development environments in version control since it makes it easy for everyone on the team to use the same settings. Analysts should store requirements documents. Testers should keep their test scripts and procedures in version control. Project managers should save their release plans, progress charts, and risk logs here.
In short, every member of the team should store any document or file related to the project in version control.
Working with Git for Source Code Versioning Control System
This section will now focus on how Git can be used as a versioning control system. It will focus on how you can upload your code to the versioning control system and manage changes in it.
Our Demo Application
For the purpose of this entire tutorial we are going to look at a simple Web ASP.Net application which will be used for the entire Continuous Integration Process. We don’t need to focus on the entire code details for this exercise, just having an overview of what the project does is sufficient for understanding the entire continuous integration process. This .Net application was built using the Visual Studio Integrated Development Environment.
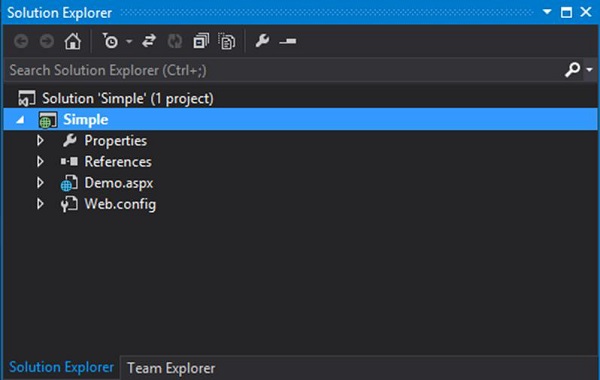
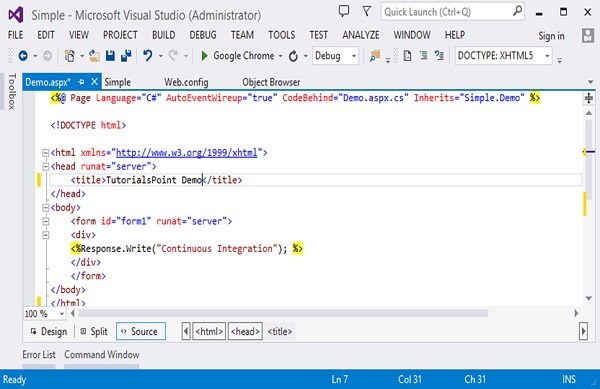
The following screenshot is the structure of the solution in the Visual Studio environment. It is a very simple Web application which has the main code in the Demo.aspx file.
The code in the Demo.aspx file is shown in the following program −
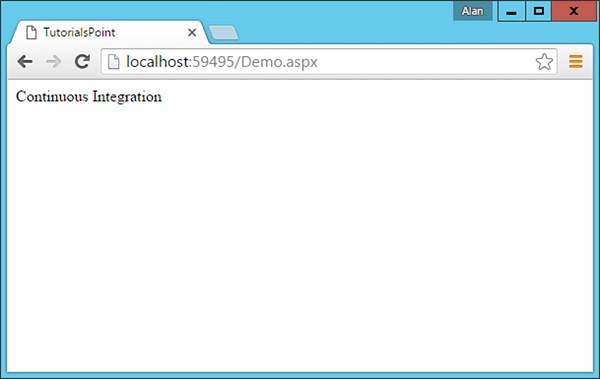
<html xmlns = "http://www.w3.org/1999/xhtml">
   <head runat = "server">
      <title>TutorialsPoint</title>
   </head>

   <body>
      <form id = "form1" runat="server">
         <div><%Response.Write("Continuous Integration"); %></div>
      </form>
   </body>

</html>
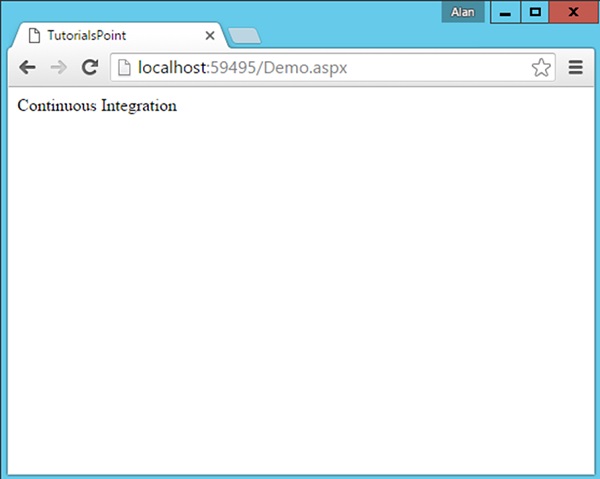
The code is very simple and just outputs the string “Continuous Integration” to the browser.
When you run the project in Google Chrome, the output will be as shown in the following screenshot.
Moving Source Code to Git
We are going to show how to move the source code to Git from the command line interface, so that the knowledge of how Git can be used is clearer to the end user.
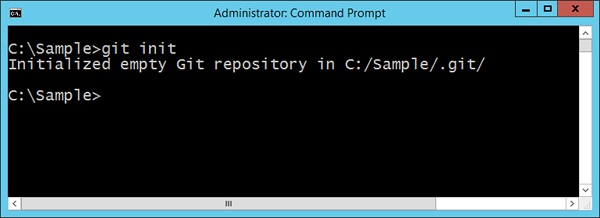
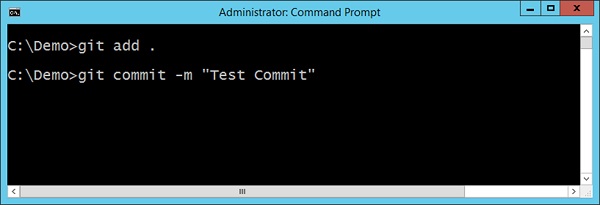
Step 1 − Initialize the Git Repository. Go to the command prompt, go to your project folder and issue the command git init. This command will add the necessary Git files to the project folder, so that it can be recognized by Git when it needs to be uploaded to the repository.
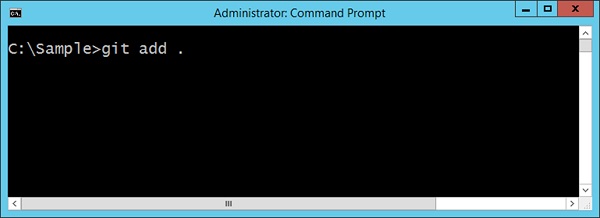
Step 2 − Adding your files which need to be added to the Git repository. This can be done by issuing the git add command. The dot option tells Git that all files in the project folder need to be added to the Git repository.
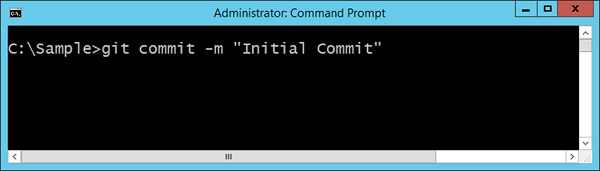
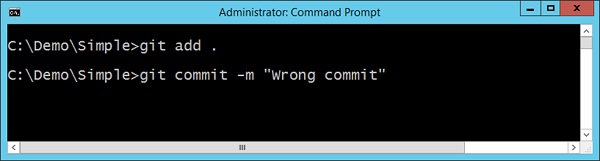
Step 3 − The final step is to commit the project files to the Git repository. This step is required to ensure all files are now a part of Git. The command to be issued is given in the following screenshot. The –m option is to provide a comment to the upload of files.
Your solution is now available in Git.
Continuous Integration - Features
Following are some of the main features or practices for Continuous Integration.
- Maintain a single source repository − All source code is maintained in a single repository. This avoids having source code being scattered across multiple locations. Tools such as Subversion and Gitare the most popular tools for maintaining source code.
- Automate the build − The build of the software should be carried out in such a way that it can be automated. If there are multiple steps that need to be carried out, then the build tool needs to be capable of doing this. For .Net, MSBuild is the default build tool and for Java based applications you have tools such as Maven and Grunt.
- Make your build self-testing − The build should be testable. Directly after the build occurs, test cases should be run to ensure that testing can be carried out for the various functionality of the software.
- Every commit should build on an integration machine − The integration machine is the build server and it should be ensured that the build runs on this machine. This means that all dependent components should exist on the Continuous Integration server.
- Keep the build fast − The build should happen in minutes. The build should not take hours to happen, because this would mean the build steps are not properly configured.
- Test in a clone of the production environment − The build environment should be close in nature to the production environment. If there are vast differences between these environments, then there can be a case that the build may fail in production even though it passes on the build server.
- Everyone can see what is happening − The entire process of build and testing and deployment should be visible to all.
- Automate deployment − Continuous Integration leads to Continuous deployment. It is absolutely necessary to ensure that the build should be easy to deploy onto either a staging or production environment.
Continuous Integration - Requirements
Following is the list of the most significant requirements for Continuous Integration.
- Check-In Regularly − The most important practice for continuous integration to work properly is frequent check-ins to trunk or mainline of the source code repository. The check-in of code should happen at least a couple of times a day. Checking in regularly brings lots of other benefits. It makes changes smaller and thus less likely to break the build. It means the recent most version of the software to revert to is known when a mistake is made in any subsequent build.It also helps to be more disciplined about refactoring code and to stick to small changes that preserve behavior. It helps to ensure that changes altering a lot of files are less likely to conflict with other people’s work. It allows the developers to be more explorative, trying out ideas and discarding them by reverting back to the last committed version.
- Create a Comprehensive Automated Test Suite − If you don’t have a comprehensive suite of automated tests, a passing build only means that the application could be compiled and assembled. While for some teams this is a big step, it’s essential to have some level of automated testing to provide confidence that your application is actually working.Normally, there are 3 types of tests conducted in Continuous Integration namely unit tests, component tests, and acceptance tests.Unit tests are written to test the behavior of small pieces of your application in isolation. They can usually be run without starting the whole application. They do not hit the database (if your application has one), the filesystem, or the network. They don’t require your application to be running in a production-like environment. Unit tests should run very fast — your whole suite, even for a large application, should be able to run in under ten minutes.Component tests test the behavior of several components of your application. Like unit tests, they don’t always require starting the whole application. However, they may hit the database, the filesystem, or other systems (which may be stubbed out). Component tests typically take longer to run.
- Keep the Build and Test Process Short − If it takes too long to build the code and run the unit tests, you will run into the following problems.
- People will stop doing a full build and will run the tests before they check-in. You will start to get more failing builds.
- The Continuous Integration process will take so long that multiple commits would have taken place by the time you can run the build again, so you won’t know which check-in broke the build.
- People will check-in less often because they have to sit around for ages waiting for the software to build and the tests to run.
- Don’t Check-In on a Broken Build − The biggest blunder of continuous integration is checking in on a broken build. If the build breaks, the developers responsible are waiting to fix it. They identify the cause of the breakage as soon as possible and fix it. If we adopt this strategy, we will always be in the best position to work out what caused the breakage and fix it immediately.If one of our colleagues has made a check-in and has as a result broken the build, then to have the best chance of fixing it, they will need a clear run at the problem. When this rule is broken, it inevitably takes much longer for the build to be fixed. People get used to seeing the build broken, and very quickly you get into a situation where the build stays broken all of the time.
- Always Run All Commit Tests Locally Before Committing − Always ensure that the tests designed for the application are run first on a local machine before running them on the CI server. This is to ensure the right test cases are written and if there is any failure in the CI process, it is because of the failed test results.
- Take Responsibility for All Breakages that Result from Your Changes − If you commit a change and all the tests you wrote pass, but others break, the build is still broken. Usually this means that you have introduced a regression bug into the application. It is your responsibility — because you made the change — to fix all tests that are not passing as a result of your changes. In the context of CI this seems obvious, but actually it is not a common practice in many projects.
Continuous Integration - Building a Solution
There are a variety of build tools available for a variety of programming languages. Some of the most popular build tools include Ant for Java and MSBuild for .NET. Using a scripting tool designed specifically for building software, instead of a custom set of shell or batch scripts, is the most effective manner for developing a consistent, repeatable build solution.
So why do we need a build process to start with. Well for starters, for a Continuous Integration server, the build process should be easy to work with and should be seamless to implement.
Let’s take a simple example of what a build file can look like for .Net −
<?xml version = "1.0" encoding = "utf-8"?>
<project xmlns = "http://schemas.microsoft.com/developer/msbuild/2003">
   <Target Name = "Build">
      <Message Text = "Building Project" />
      <MSBuild Projects = "project.csproj" Targets = "Build/>"
   </Target>
</project>
The following aspects need to be noted about the above code −
- A target is specified with a name of the Build. Wherein, a target is a collection of logical steps which need to be performed in a build process. You can have multiple targets and have dependencies between targets.
- In our target, we keep an option message which will be shown when the build process starts.
- The MSBuild task is used to specify which .Net project needs to be built.
The above example is a case of a very simple build file. In Continuous Integration, it is ensured that this file is kept up-to-date to ensure that the entire build process is seamless.
Building a Solution in .Net
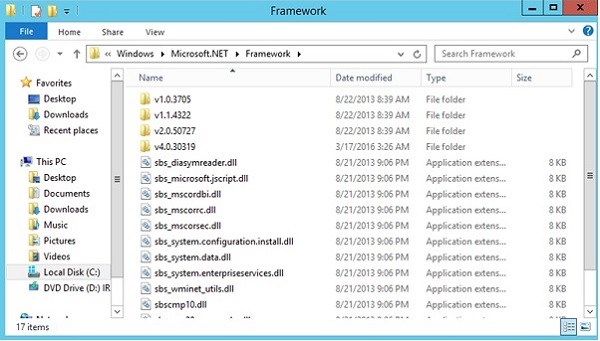
The default build tool for .Net is MSBuild and is something that comes shipped with the .Net framework. Depending on the framework on your system, you will have the relevant MSbuild version available. As an example, if you have the .Net framework installed in the default location, you will find the MSBuild.exe file in the following location −
C:\Windows\Microsoft.NET\Framework\v4.0.30319
Let’s see how we can go about building our sample project. Let’s assume our Sample project is located in a folder called C:\Demo\Simple.
In order to use MSBuild to build the above solution, we need to open the command prompt and use the MSBuild option as shown in the following program.
msbuild C:\Demo\Simple\Simple.csproj
In the above example, csproj is the project file which is specific to .Net. The csproj file contains all the relevant information to ensure that the required information is present for the software to build properly. Following is the screenshot of the output of the MSBuild command.

You don’t need to worry about the output warnings as long as the Build was successful and there were no errors.
Continuous Integration - Build Scripts
Now let’s look at certain aspects of the MSBuild file to see what they mean. These aspects are important to know from a Continuous Integration Cycle.
Build scripts are used to build the solution which will be a part of the entire continuous Integration cycle. Let’s look at the general build script which is created as a part of Visual Studio in .Net for our sample solution. The build script is a pretty big one, even for a simple solution, so we will go through the most important parts of it. By default, the build script will be stored in a file with the same name as the main solution in Visual Studio. So in our case, if you open the file Simple.csproj, you will see all the settings which will be used to build the solution.
- Dependency on the MSBuild version used − The following settings will use the MSBuild files installed on the CI server.
<VisualStudioVersion Condition = "'$(VisualStudioVersion)' ==
   ''">10.0</VisualStudioVersion>

<VSToolsPath Condition = "'$(VSToolsPath)' == ''">
   $(MSBuildExtensionsPath32)\Microsoft\VisualStudio\v$(VisualStudioVersion)
</VSToolsPath>

<TargetFrameworkVersion>v4.5</TargetFrameworkVersion>

<Import Project = "$(MSBuildBinPath)\Microsoft.CSharp.targets" />
<Import Project = "$(VSToolsPath)\WebApplications\
   Microsoft.WebApplication.targets" Condition = "'$(VSToolsPath)' ! = ''" />

<Import Project = "$(MSBuildExtensionsPath32)\Microsoft\VisualStudio\v10.0\
   WebApplications\Microsoft.WebApplication.targets" Condition = "false" />
- What files are required to build the solution properly – The ItemGroup tag will contain all the necessary .Net files which are required for the project to build successfully. These files will need to reside on the build server accordingly.
<ItemGroup>
   <Reference Include = "Microsoft.CSharp" />
   <Reference Include = "System.Web.DynamicData" />
   <Reference Include = "System.Web.Entity" />
   <Reference Include = "System.Web.ApplicationServices" />
   <Reference Include = "System.ComponentModel.DataAnnotations" />
   <Reference Include = "System" />
   <Reference Include = "System.Data" />
   <Reference Include = "System.Core" />
   <Reference Include = "System.Data.DataSetExtensions" />
   <Reference Include = "System.Web.Extensions" />
   <Reference Include = "System.Xml.Linq" />
   <Reference Include = "System.Drawing" />
   <Reference Include = "System.Web" />
   <Reference Include = "System.Xml" />
   <Reference Include = "System.Configuration" />
   <Reference Include = "System.Web.Services" />
   <Reference Include = "System.EnterpriseServices"/>
</ItemGroup>
- What are the Web server settings to be used − When we visit our topic of Continuous Deployment, you will see how MSBuild will be used to override these settings and deploy this to our server of choice.
<UseIIS>True</UseIIS>
<AutoAssignPort>True</AutoAssignPort>
<DevelopmentServerPort>59495</DevelopmentServerPort>
<DevelopmentServerVPath>/</DevelopmentServerVPath>
<IISUrl></IISUrl>
<NTLMAuthentication>False</NTLMAuthentication>
<UseCustomServer>False</UseCustomServer>
CI - Building On the Server
The next important step is to ensure that the solution builds on the build server. The first part is a manual step, because before the continuous integration tool is used, we first must ensure that the build gets run on the build server in the same manner as what was done on the client machine. To do this, we must implement the following steps −
Step 1 − Copy the entire solution file to the server. We had created an Amazon instance server which would be used as our build server. So, do a manual copy to the server of the entire .Net solution onto the server.
Step 2 − Ensure that the framework is present on the server. If you have compiled your application in .Net framework 4.0 on your client machine, you have to ensure that it is installed on the server machine as well. So go to the location C:\Windows\Microsoft.NET\Framework on your server and ensure the desired framework is present.
Step 3 − Now let’s just run MSBuild on the server and see what happens.
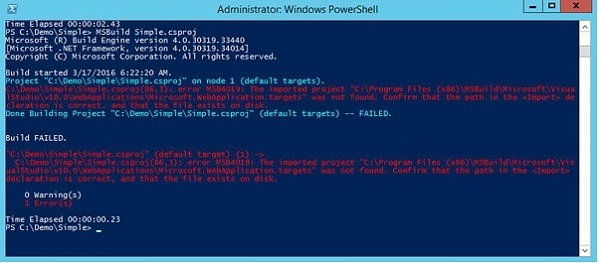
Ok, so it looks like we have hit an error. There is one important lesson in Continuous Integration and that is you need to ensure that the Build works on the build server. For this you need to ensure that all prerequisite software is installed on the build server.
For .Net, we need to install a component called Visual Studio Redistributable package. This package contains all the necessary files which are required for a .Net application to build on a server. So let’s carry out the following installation steps on the build server.
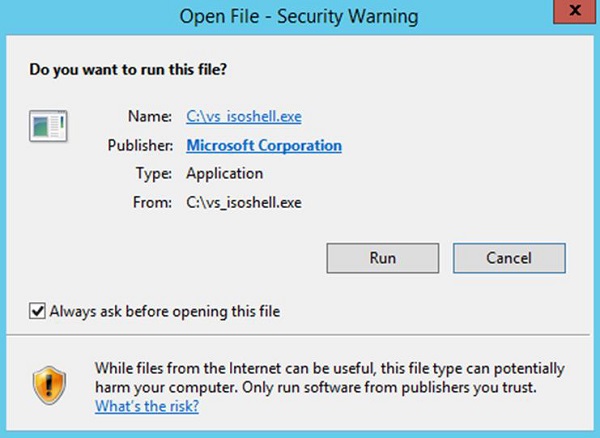
Step 4 − Double-click the executable file to start the installation.
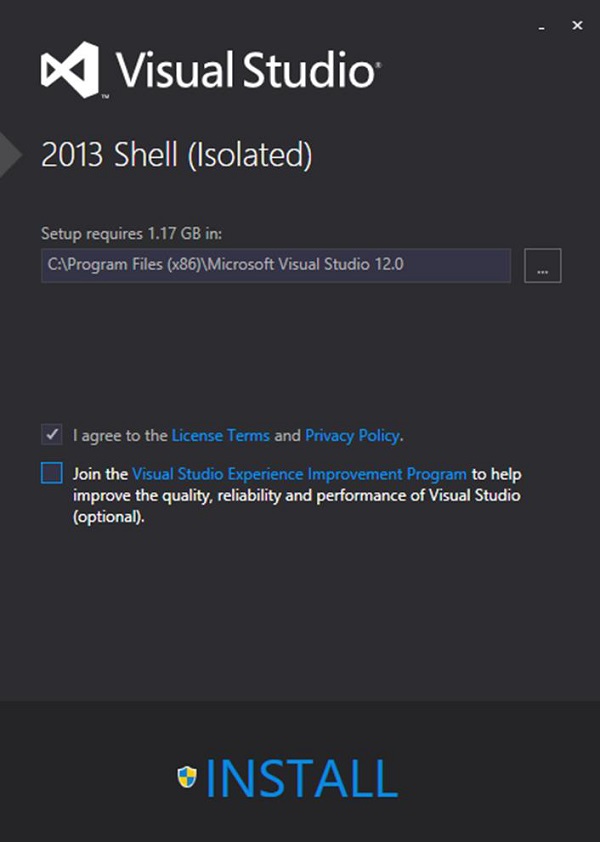
Step 5 − In the next step, agree to the License Terms and click Install.
Step 6 − Now when running MSBuild, we need to ensure that we include an additional parameter when calling MSBuild which is – p:VisualStudioversion = 12.0. This ensures that MSBuild references those files that were downloaded in the earlier step.
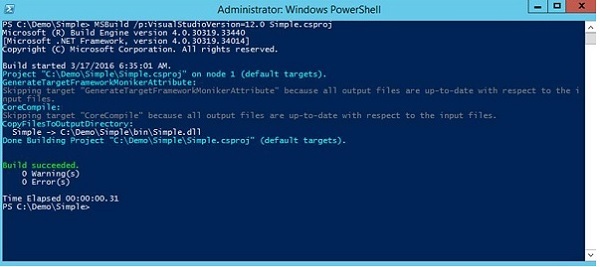
Now we can see that the solution has been built properly and we also know our baseline project builds correctly on the server.
CI - Checking in Source Code
The next key aspect is to ensure our baseline code is checked into our source code repository management server which is Git. To do this, we need to follow these steps.
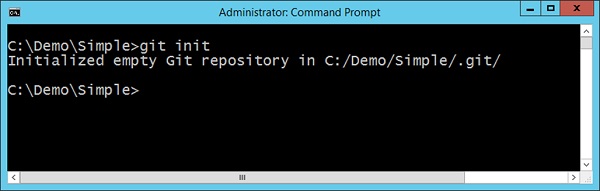
Step 1 − Initialize the repository so that it can be uploaded to Git. This is done with the git init command. So you need to go to your project folder and issue the git init command.
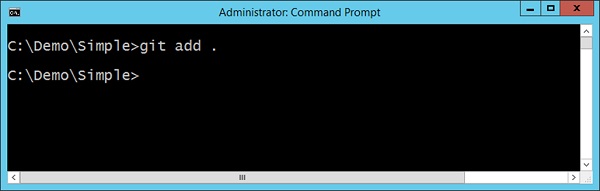
Step 2 − The next step is called staging files in Git. This prepares all the files in the project folder, which need to be added to Git. You do this with the git add command as shown in the following screenshot. The ‘.’ notation is used to say that all files in the directory and subdirectory should be included in the commit.
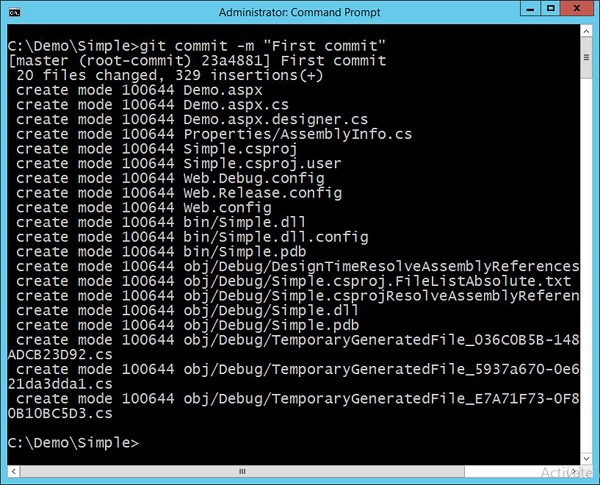
Step 3 − The final step is to commit the files to the Git repository, so that it is now a full-fledged Git repository.
CI - Creating a Project in TeamCity
Now that we have our source code in the Git repository and all of our initial code works on the build server, it is time to create a project in our Continuous Integration server. This can be done via the following steps −
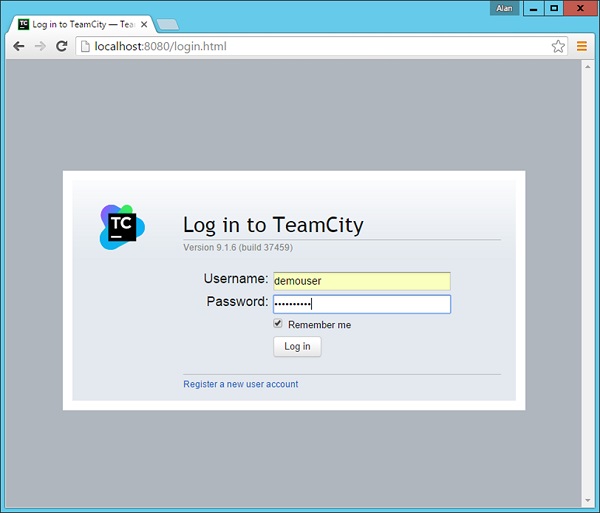
Step 1 − Login to the TeamCity software. Go to the url on your Continuous Integration server − http://localhost:8080/login.html.
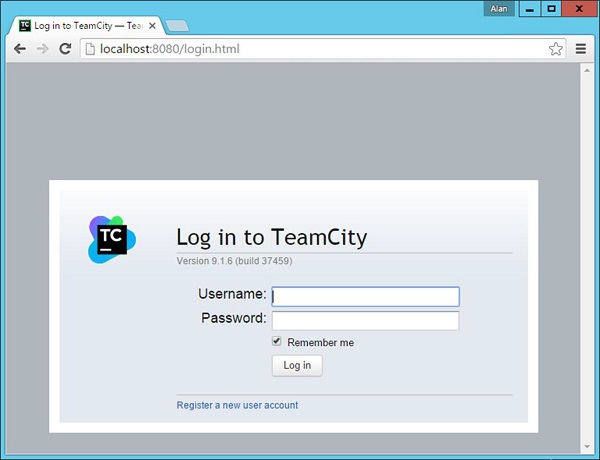
Enter the admin credentials and login to the server.
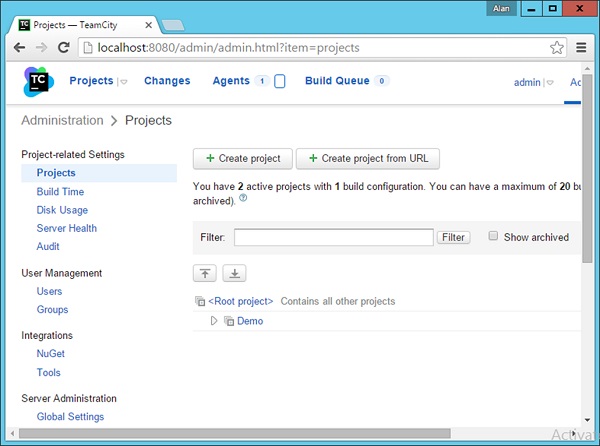
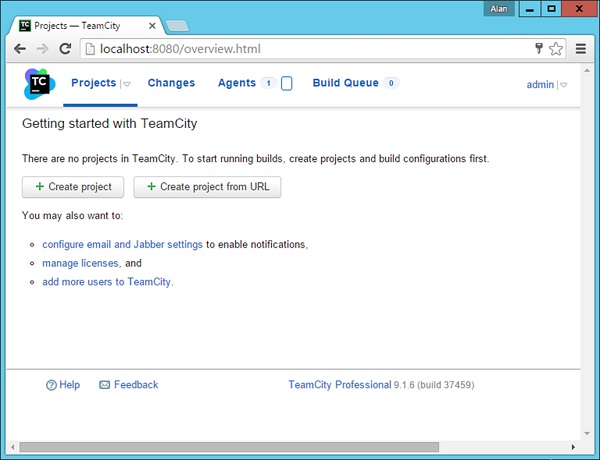
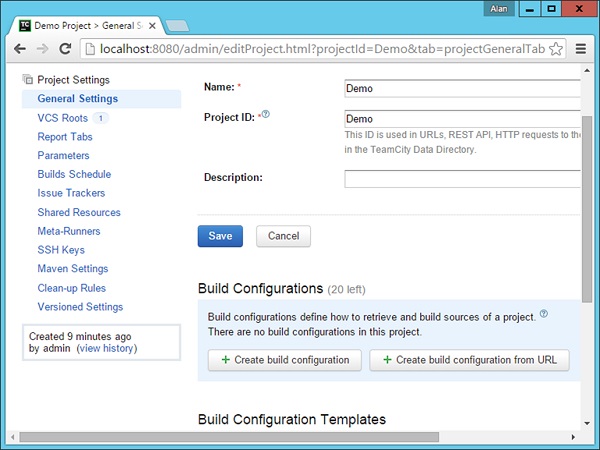
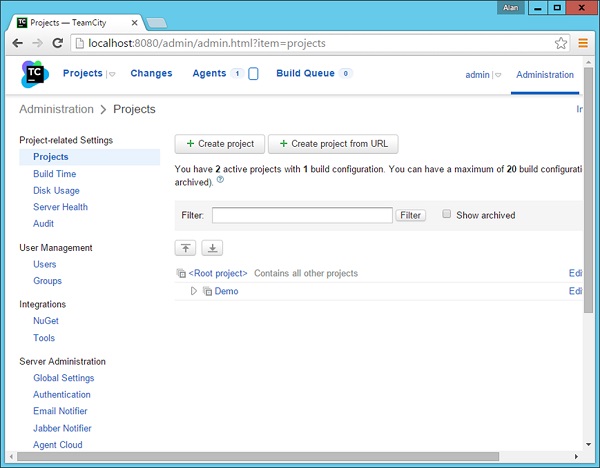
Step 2 − Once logged in, you will be presented with the home screen. Click Create Project to start a new project.
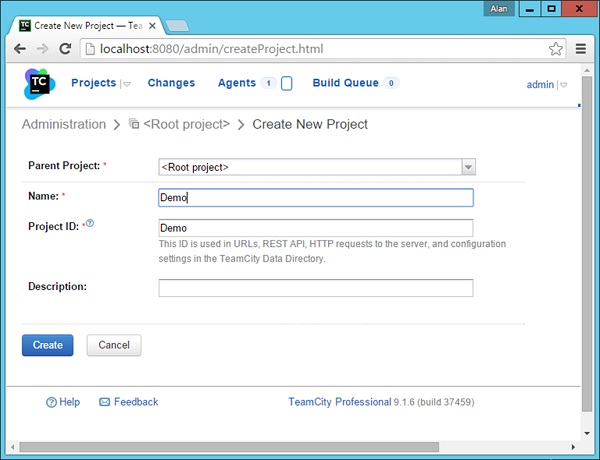
Step 3 − Give a name for the project and click Create to start the project. In our case, we are giving the name as ‘Demo’ to our project as shown in the following screenshot.
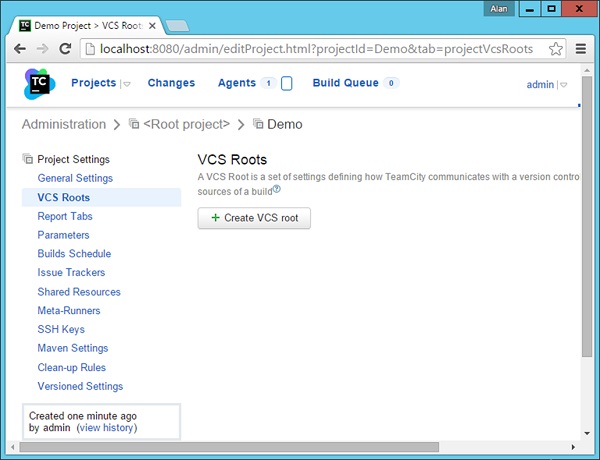
Step 4 − The next step is to mention the Git repository which will be used in our project. Remember that in a Continuous Integration environment, the CI server needs to pick up the code from the Git enabled repository. We have already enabled our project folder to be a Git enabled repository in the earlier step. In TeamCity, you need to create a VCS root. For this, click VCS Roots in the project’s main screen.
Step 5 − In the screen that comes up next, click Create VCS root as shown in the following screenshot.
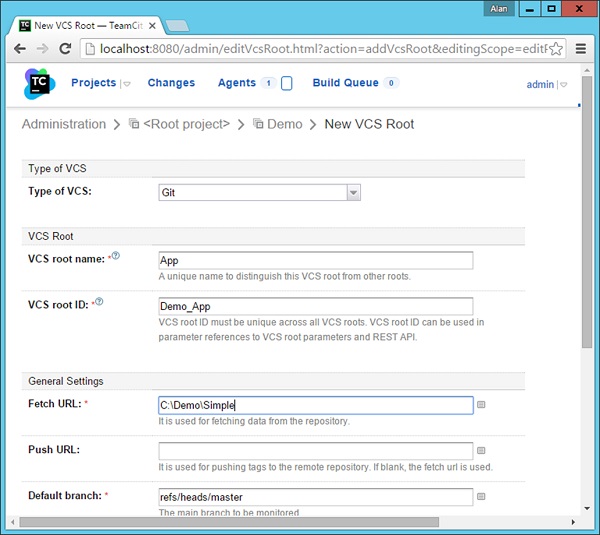
Step 6 − In the next screen that comes up, perform the following steps −
- Mention the type of VCS as Git.
- Give a name for the VCS root, this can be any friendly name. We have given the name as App.
- Give the Fetch url as C:\Demo\Simple – This is out git enabled repository.
- If you scroll down the screen, you will get a Test connection button. Click it to ensure that you can successfully connect to the Git enabled repository.
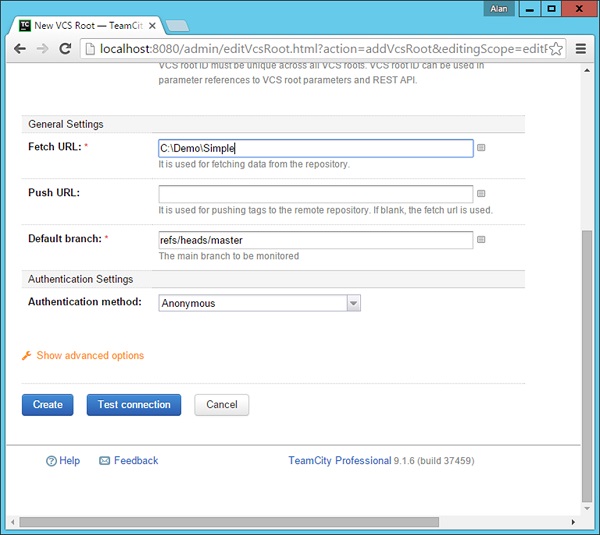
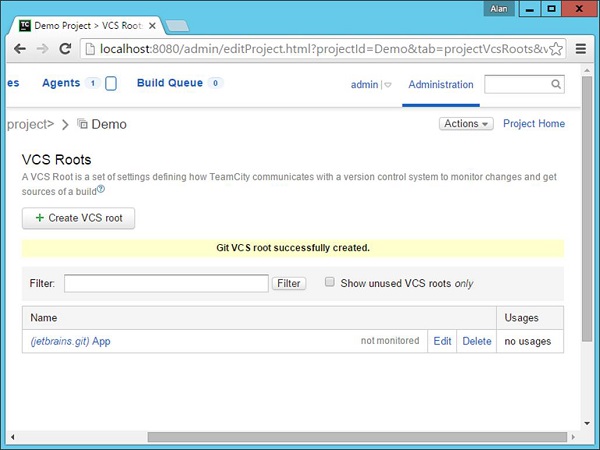
Step 7 − Click Create and you will now see your repository registered as shown in the following image.
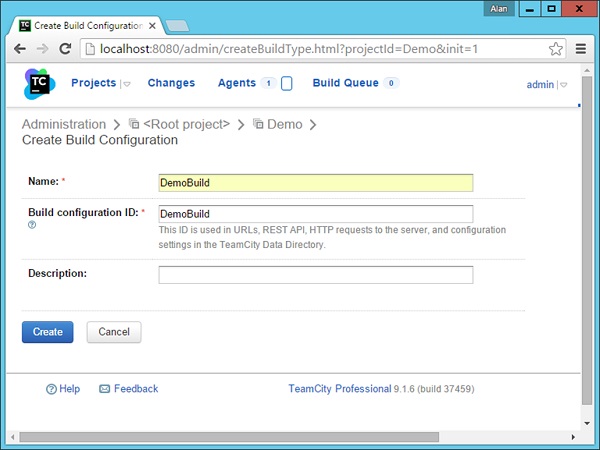
Step 8 − The next step is to create a build configuration which will be used to build the project. Go to your project screen in TeamCity → General Settings. Click Create Build Configuration.
Step 9 − In the following screen, give a name for the Build Configuration. In our case we have named it as DemoBuild and then click Create.
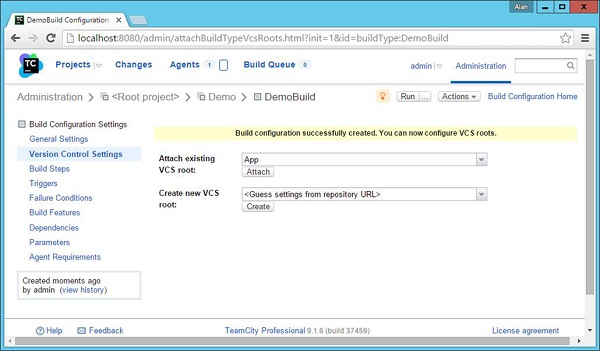
Step 10 − In the next screen that comes up, you will be asked to choose the VCS repository which was created in the earlier steps. So choose the name ‘App’ and click Attach.
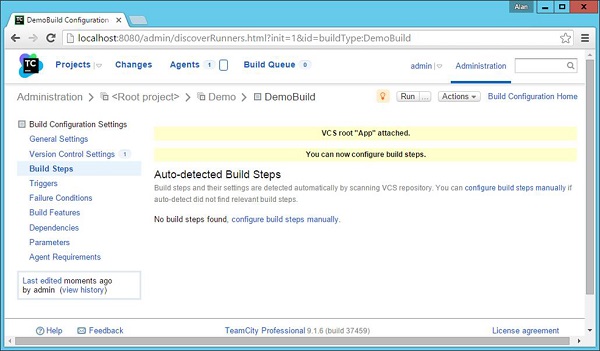
Step 11 − Now in the next screen that pops up, we need to configure the build steps. So click the ‘configure build steps manually’ hyperlink.
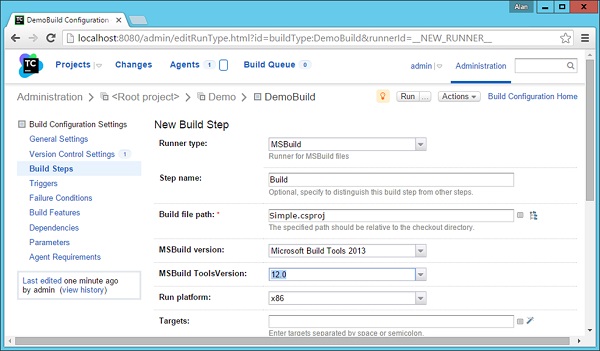
Step 12 − In the next build screen, we need to enter the following details −
- Choose the Runner type as MSBuild.
- Give an optional name for the step name.
- Give the name of the file which needs to be built. When we specify MSbuild in the earlier sections, we normally see that we give the option of Simple.csproj. The same thing is needed to be specified here.
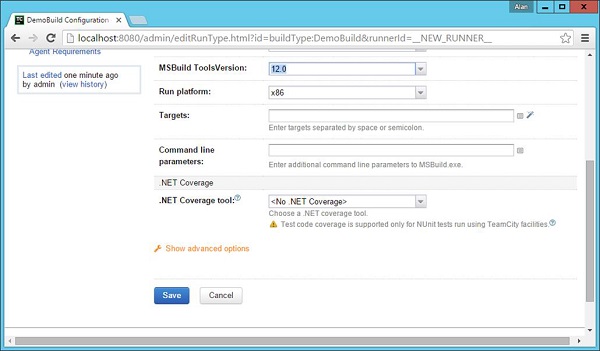
- Choose the MSBuild version as ‘Microsoft Build Tools 2013’.
- Choose the MSBuild ToolsVersion as 12.0.
- Scroll down the page to Save the settings.
Step 13 − In the next screen, click Run.
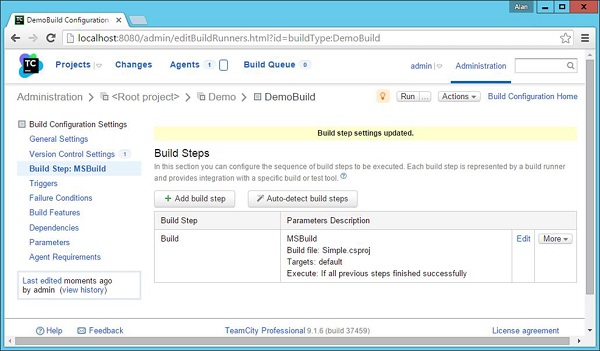
You will see the build of your application now in progress.
You should get a successful screen, which is a good sign that your solution is building properly.
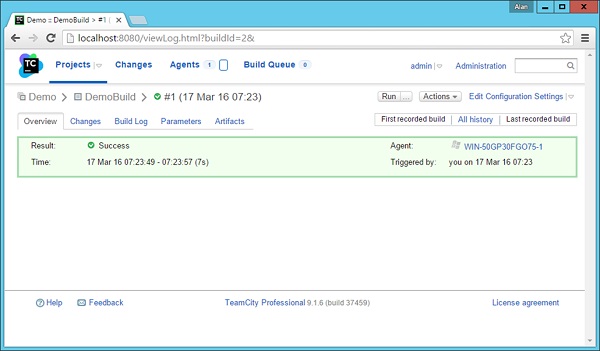
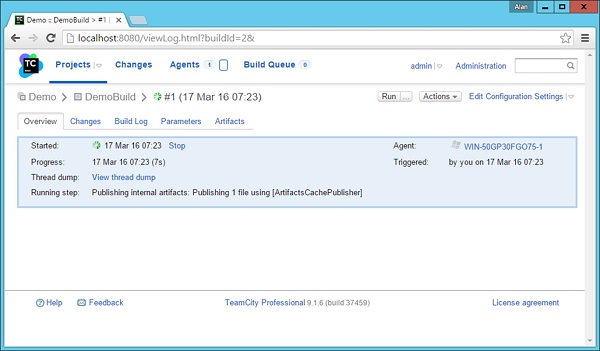
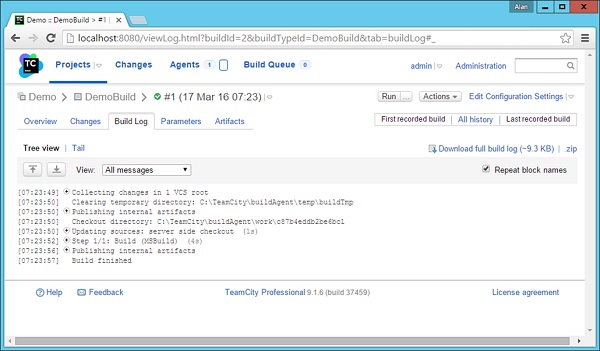
You can also go to your build log to see all the steps that were covered by the Continuous Integration server as shown in the following screenshot.
Continuous Integration - Defining Tasks
Now that we have our base code in Git and a link to the Continuous Integration server, its finally time to see the first step of Continuous Integration in action. This is done by defining tasks in the Continuous Integration server such as triggers, which makes the entire Continuous Integration Process as seamless as possible. Let’s make a change to our code in Visual Studio.
Step 1 − Go to the Demo.aspx page in Visual Studio and make a change to the title of the page.
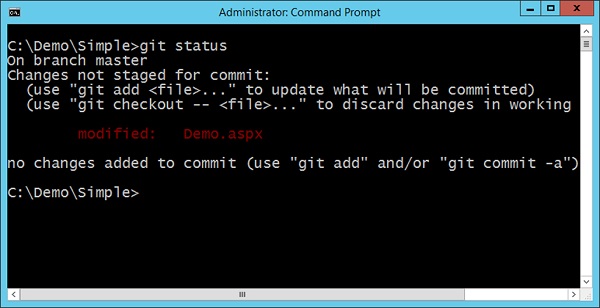
Step 2 − If we query our Git repository via the git status command, you will in fact see that the Demo.aspx file has been modified.
Now we need to ensure that every change in our code should trigger a build in our continuous integration server. For this we need to do the following changes.
Step 3 − Go to your project dashboard and click the triggers section and click Add new trigger.
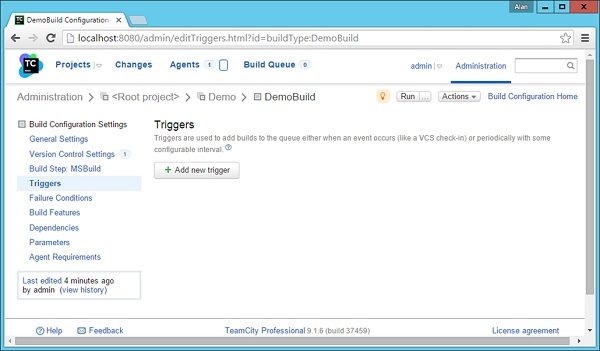
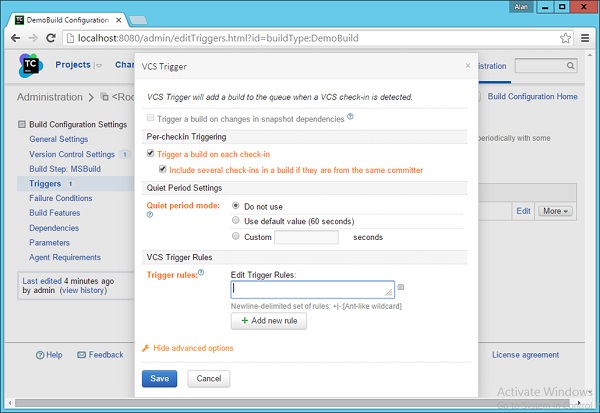
Step 4 − In the next screen that comes up, choose VCS trigger, which will be used to create a trigger so that when a check-in is made to the repository, a build will be triggered.

Step 5 − Click Show Advanced Options and ensure the options shown in the following screenshot are selected.
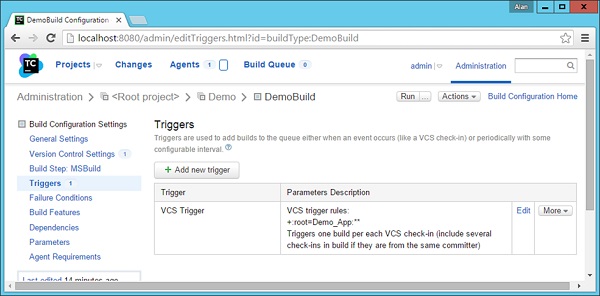
Step 6 − Click Save. You will now see the trigger successfully registered as shown in the following screenshot.
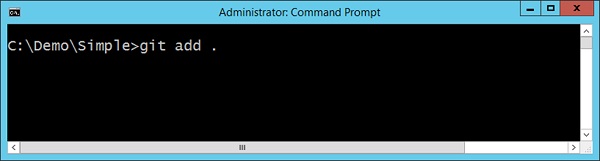
Step 7 − Now it’s time to check in our code into the Git repository and see what happens. So let’s go to our command prompt and issue the git addcommand to stage our changed files.
Step 8 − Now issue the git commit command, and it will push the changes into the Git repository.

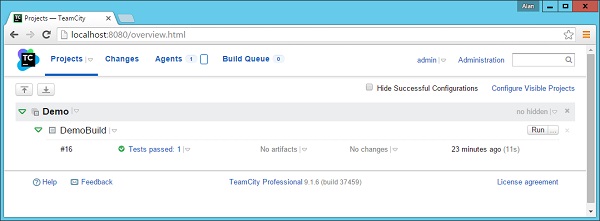
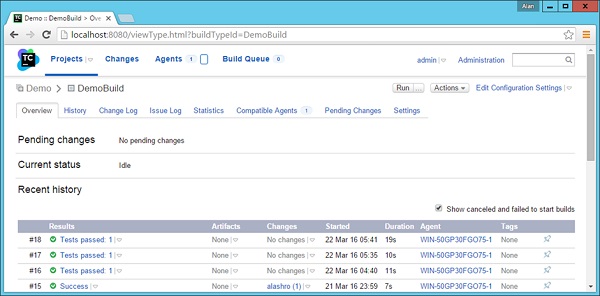
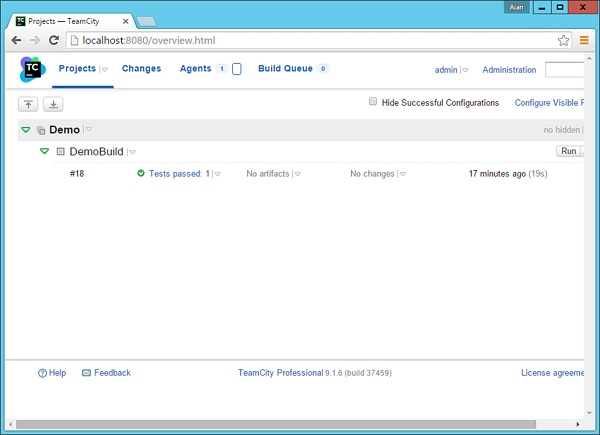
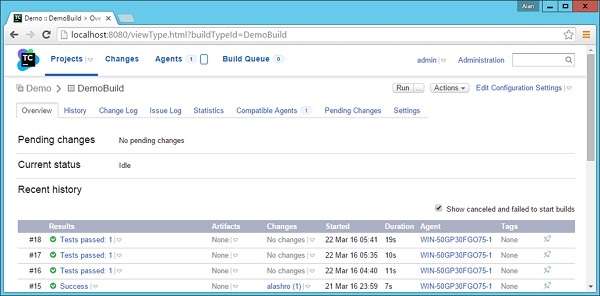
Step 9 − If you now go to your Projects Overview screen, you will now see a new build would have been triggered and run.

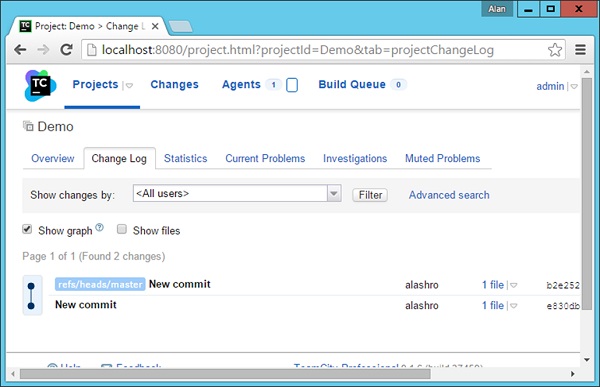
If you see the Change log Tab, you will see the git comment which triggered the build.
Let’s try it one more time. Let’s make another change to the Demo.aspx file. Let’s carry out a git add command and a git commit command with the following commit message.

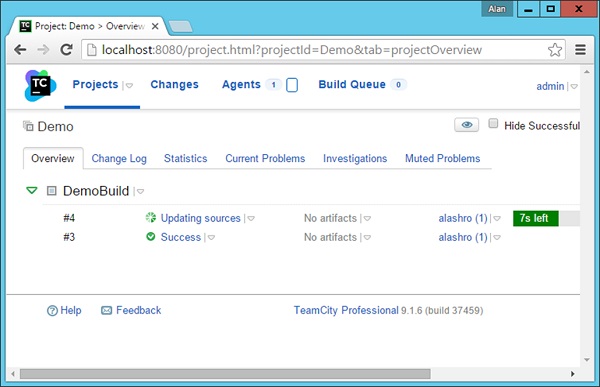
You will now see a build being automatically triggered in the Project dashboard in TeamCity.
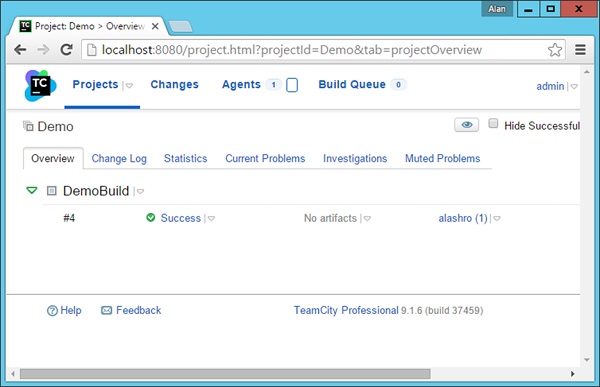
The build will show a success message.
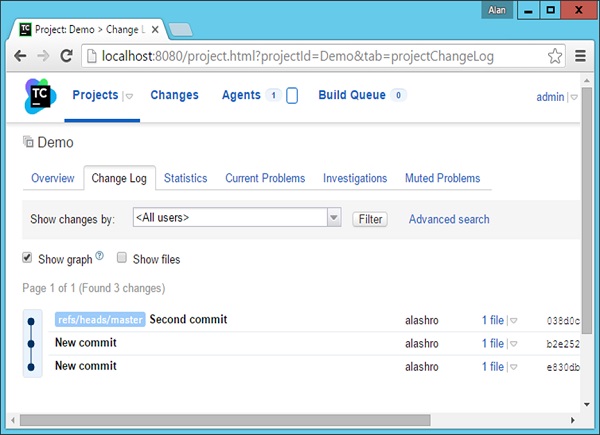
You will now see the message of ‘Second commit’ which was used when the change was committed to the git repository.
We have now successfully completed the first part of the Continuous Integration process.
CI - Build Failure Notifications
A Build Failure Notification is an event which is triggered whenever a build fails. The notification is sent to all key people whenever a build fails. The first important thing to do in such a case is to ensure time is spent on the failed build to ensure the build passed. The following steps are used to ensure that the build notifications are put in place in TeamCity.
Following are the steps to set up email notifications in TeamCity.
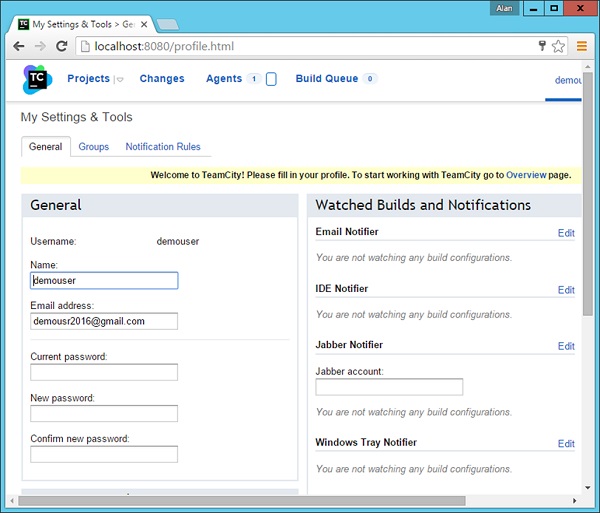
Step 1 − In TeamCity, go to your Project dashboard, click on Administration in the top right hand corner. You will then see the Email Notifier link in the left hand side. Click on this link to bring up the general settings for Email.
Step 2 − Next step is to enter the details of a valid SMTP Server. Gmail provides a free SMTP facility, which can be used by anyone. So we can enter those details in the next screen that comes up as shown in the following screenshot.
- SMTP Host – smtp.gmail.com
- SMTP port no – 465
- Send email messages from and SMTP login – This should be a valid Gmail id
- SMTP password – Valid password for that Gmail id
- Secure connection – Put this as SSL
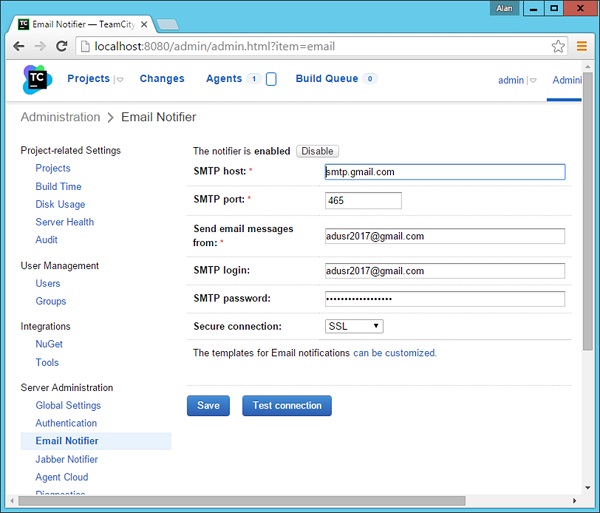
Step 3 − Click Test Connection just to ensure that the settings are working properly. Then click Save to save the settings.
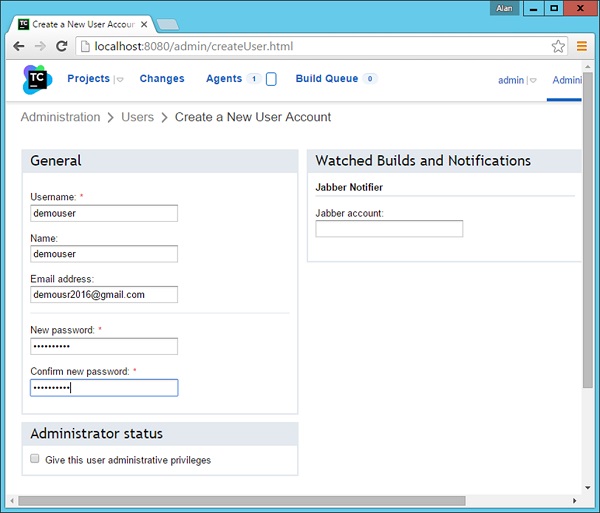
Step 4 − The next step is to enable build notifications for a user. The first task is to create a user which will receive these build notifications. Go to your project dashboard and choose the Users Option.

Step 5 − Create a new user. Enter the required username and password. Then Click the Create User button, which will be located at the bottom of the screen.
Step 6 − Now login to the TeamCity system with this new user id and password.
Step 7 − After you log in, you will be presented with the General settings of the user. In the Email Notifier section, click Edit.
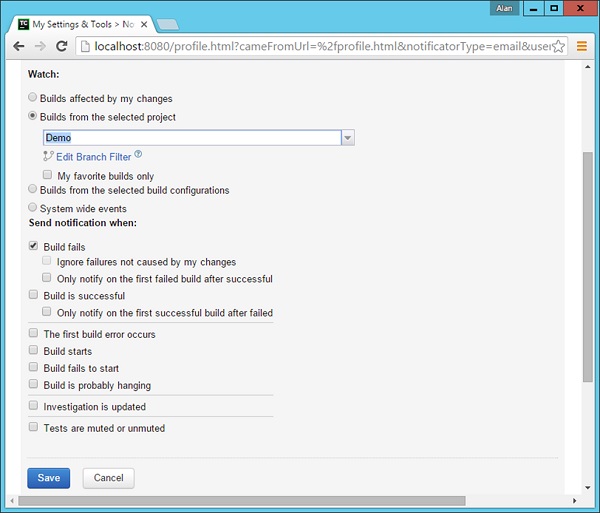
Step 8 − In the next screen that comes up, click Add new rule.
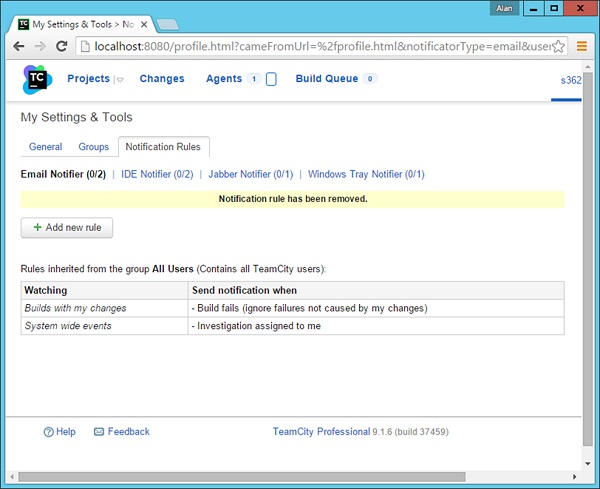
Step 9 − In Add new rule, choose the following two options and then click Save.
- Builds from select projects – Choose the Demo project.
- Enable the checkbox for ‘Build fails’.
By enabling these two options, now whenever a build fails for the Demo project, an email notification will be sent to the user – demouser.
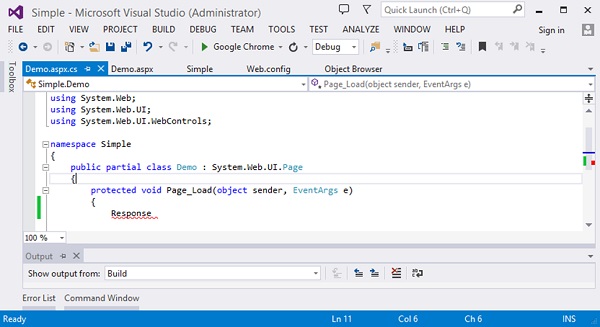
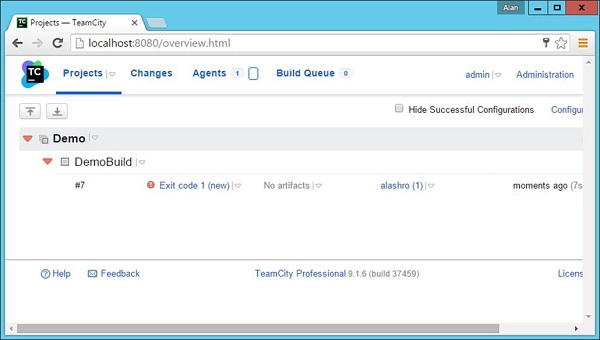
Step 10 − Now let’s trigger a wrong build to see this in action. In Visual Studio, go to the demo.aspx.cs file and add a wrong line of code.
Step 11 − Now check-in the code from Git by doing a git add and git commit.
Now in the Project Dashboard, the build will automatically be triggered and you will see that the build would have failed as shown in the following screenshot.
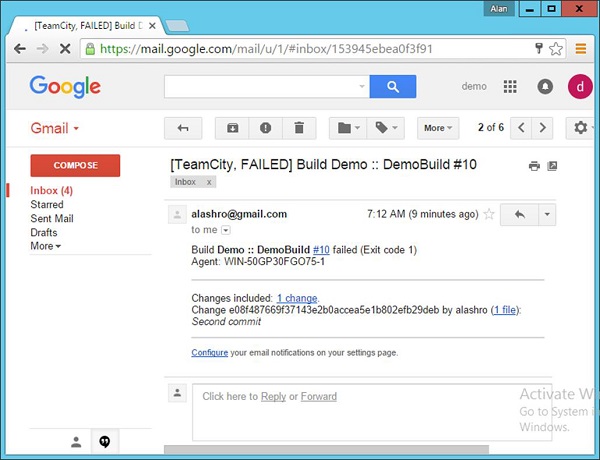
If you login into the Gmail id of the demouser, you will actually see a build failure notification in it as shown in the following screenshot.
CI - Documentation and Feedback
One of the key aspects of Continuous Integration is always to see how the builds are performing, gathering important metrics, documenting those outcomes and generating continuous feedback through continuous builds.
What are the benefits of having these metrics in place?
- Not Committing Code Enough − If developers are not committing code to a version control repository frequently, the reason may be a slow integration build. To begin to reduce build duration, perform a high-level analysis of the integration build environment to determine the bottlenecks.Next, analyze the findings and determine the most appropriate improvement, then attempt to make changes in the build process to reduce the build’s duration. Lastly, reevaluate the build duration to determine if further improvements are warranted.
- Improve Test Performance − Even in a well-functioning CI system, a bulk of the integration build time will be taken up by the execution of automated tests. Evaluating and improving the performance of these tests can dramatically reduce build duration.
- Infrastructure Issues − You may discover that integration builds are slow because of the system infrastructure. Perhaps network performance is slow or there is a slow-performing virtual private network connection.Geographically dispersed systems and unreliable hardware or software can also induce performance issues. Investigate and improve any infrastructure resources to reduce the build duration.
Metrics
Following are some of the metrics which are available in a Continuous Integration server.
Let’s look at what TeamCity has to offer −
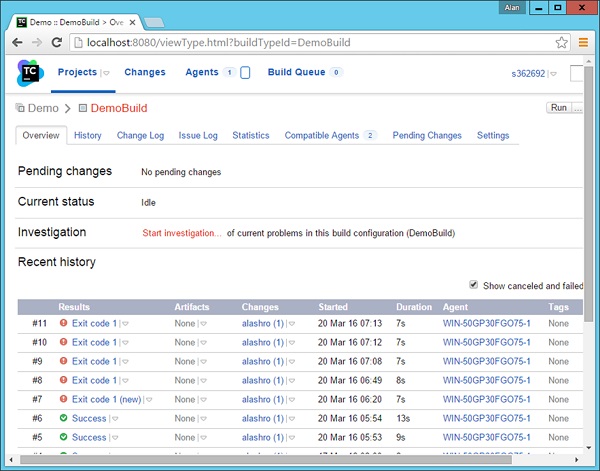
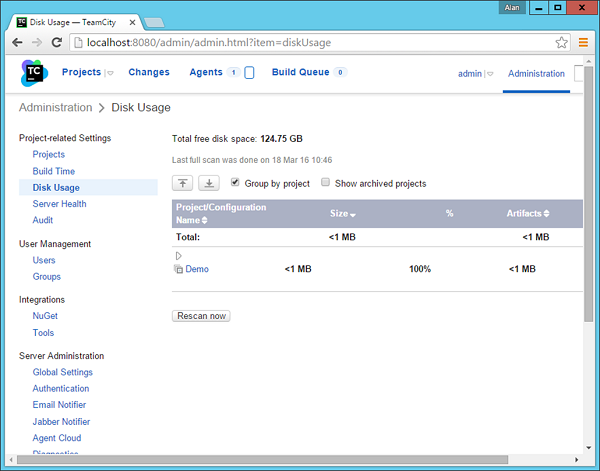
One of the simplest form of metrics is what is available in the project dashboard. The key element here is to note the duration of each build. If the duration of each build starts increasing disproportionally to the code being built, then this could be an issue. So, this is one feedback that can be taken and the causes of this could be that the CI server is low on resources and maybe the capacity of the server needs to be increased.
TeamCity has the facility to see if the CI server is in fact having any sort of issues with regards to infrastructure. In the admin dashboard in TeamCity, one can click on Disk Usage to see how much disk space is being consumed by each build.
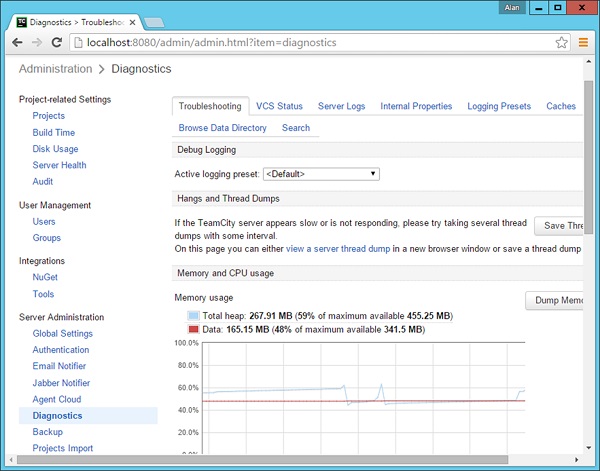
If any more details are required, then TeamCity has the diagnostics button, which can give more information on the CPU and Memory being utilized by the CI Server.
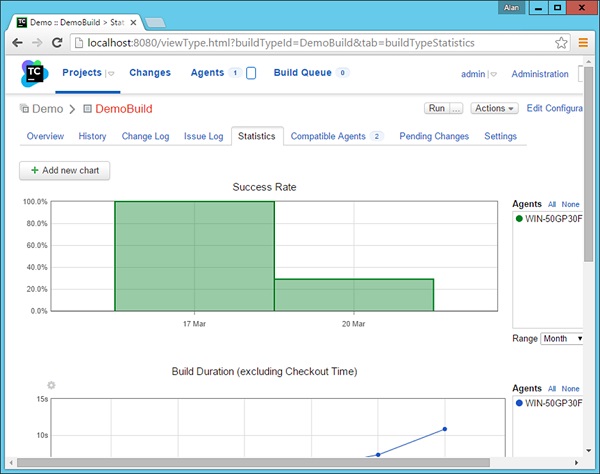
Detailed View of Build Metrics
If one wants to see a detailed view of the builds of a particular project over time, then this is available as a part of the project builds. In the Project build screen, go to the Statistics screen, this will provide various statistics and charts on how the build is performing.
Continuous Integration - Testing
One of the key features of Continuous Integration is to ensure that the on-going testing holds all the code which gets built by the CI server. After a build is carried out by the CI Server, it has to be ensured that the test cases are in place to get the required code tested. Every CI server has the ability to run unit test cases as part of the CI suite. In .Net, the unit testing is a feature which is inbuilt into the .Net framework and the same thing can be incorporated into the CI Server as well.
This chapter will see how we can define a test case in .Net and then let our TeamCity server run this test case after the build is completed. For this, we first need to ensure that we have a unit test defined for our sample project.
To do this, we must follow the ensuing steps with utmost carefulness.
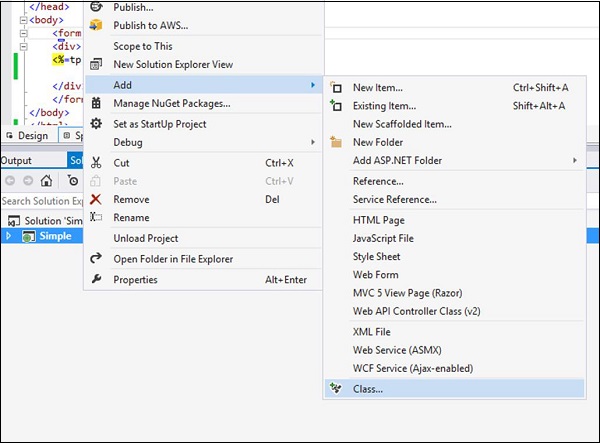
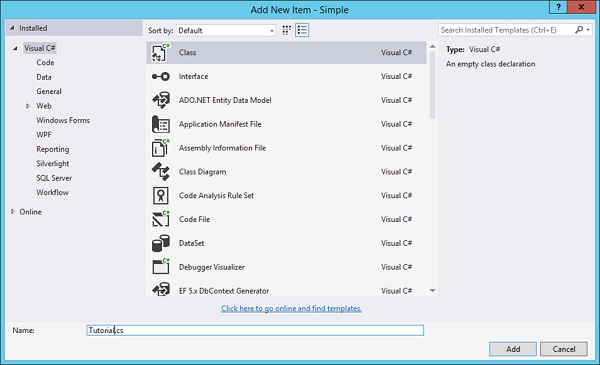
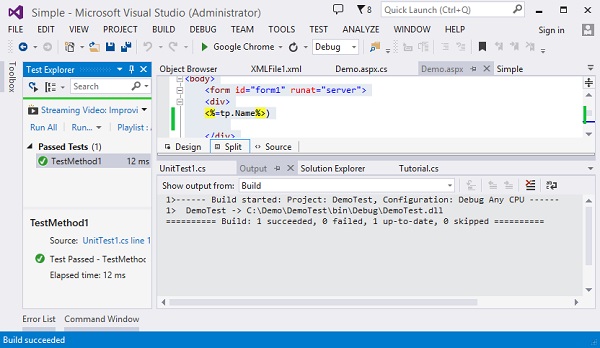
Step 1 − Let’s add a new class to our solution, which will be used in our Unit Test. This class will have a name variable, which will hold the string “Continuous Integration”. This string will be displayed on the web page. Right-click on the Simple Project and choose the menu option Add → Class.
Step 2 − Give a name for the class as Tutorial.cs and click the Add button at the bottom of the screen.
Step 3 − Open the Tutorial.cs file and add the following code in it. This code just creates a string called Name, and in the Constructor assign the name to a string value as Continuous Integration.
using System;
using System.Collections.Generic;
using System.Linq;
using System.Web;

namespace Simple {
   public class Tutorial {
      public String Name;
      public Tutorial() {
         Name = "Continuous Integration";
      }
   }
}
Step 4 − Let us make the change to our Demo.aspx.cs file to use this new class. Update the code in this file with the following code. So this code will now create a new instance of the class created above.
using System;
using System.Collections.Generic;
using System.Linq;
using System.Web;
using System.Web.UI;
using System.Web.UI.WebControls;

namespace Simple {
   public partial class Demo : System.Web.UI.Page {
      Tutorial tp = new Tutorial();
      protected void Page_Load(object sender, EventArgs e) {
         tp.Name = "Continuous Integration";
      }
   }
}
Step 5 − In our demo.aspx file, let us now reference the tp.Name variable, which was created in the aspx.cs file.
<%@ Page Language = "C#" AutoEventWireup = "true"
   CodeBehind = "Demo.aspx.cs" Inherits = "Simple.Demo" %>
<!DOCTYPE html>
<html xmlns = "http://www.w3.org/1999/xhtml">

   <head runat = "server">
      <title>TutorialsPoint1</title>
   </head>

   <body>
      <form id = "form1" runat = "server">
         <div>
            <% = tp.Name%>)
         </div>
      </form>
   </body>

</html>
Just to ensure our code works fine with these changes, you can run the code in Visual Studio. You should get the following output once the compilation is complete.
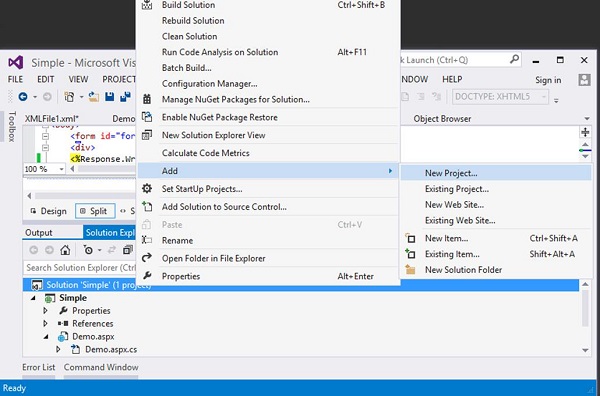
Step 6 − Now it is time to add our Unit tests to the project. Right-click on Solution and choose the menu option Add → New Project.
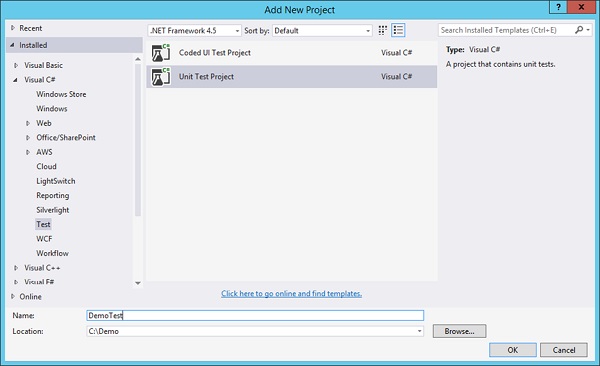
Step 7 − Navigate to Test and on the right hand side, choose Unit Test Project. Give a name as DemoTest and then click OK.
Step 8 − In your Demo Test project, you need to add a reference to the Simple project and to the necessary testing assemblies. Right-click on the project and choose the menu option Add Reference.
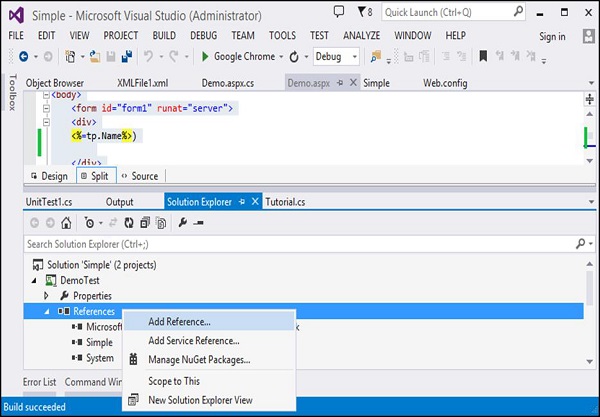
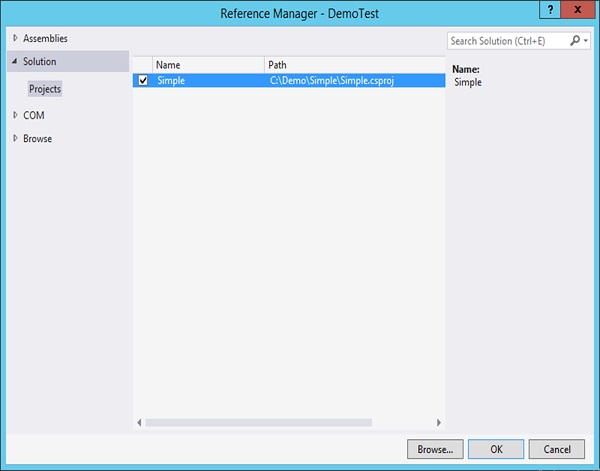
Step 9 − In the next screen that comes up, go to Projects, choose Simple Reference and click OK.
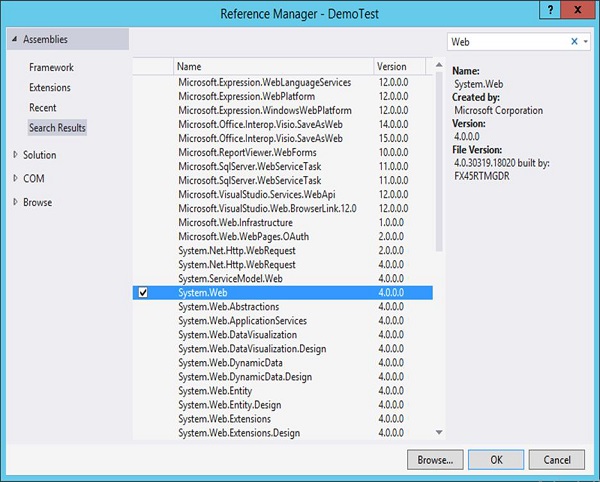
Step 10 − Click Add Reference again, go to Assemblies and type Web in the Search box. Then add a reference of System.Web.
Step 11 − In the Unit Test file, add the following code. This code will ensure that the Tutorial class has a string name variable. It will also assert the fact that the Name should equal a value of “Continuous Integration”. This will be our simple Test case.
using System;
using Microsoft.VisualStudio.TestTools.UnitTesting;
using Microsoft.VisualStudio.TestTools.UnitTesting.Web;
using System.Web.UI;
using System.Web.UI.WebControls;
using Simple;

namespace DemoTest {
   [TestClass]
   public class UnitTest1 {
      [TestMethod]
      public void TestMethod1() {
         Tutorial tp = new Tutorial();
         Assert.AreEqual(tp.Name, "Continuous Integration");
      }
   }
}
Step 12 − Now let’s run our test in Visual Studio to make sure it works. In Visual Studio, choose the menu option Test → Run → All Tests.
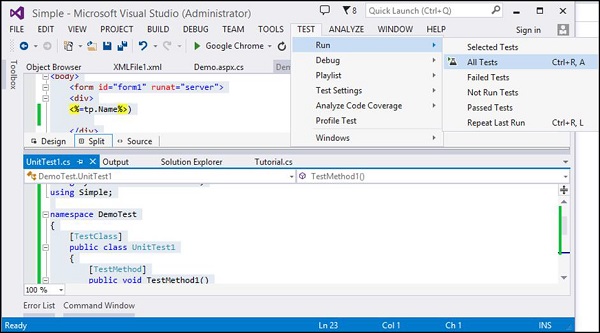
After running the test, you will see the Test successfully run on the left hand side of Visual Studio.
Enabling Continuous Testing within TeamCity – Now that all the test cases are in place, it is time to integrate these into our Team City server.
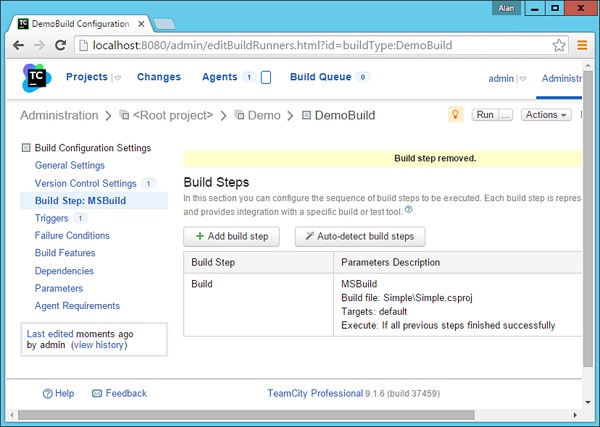
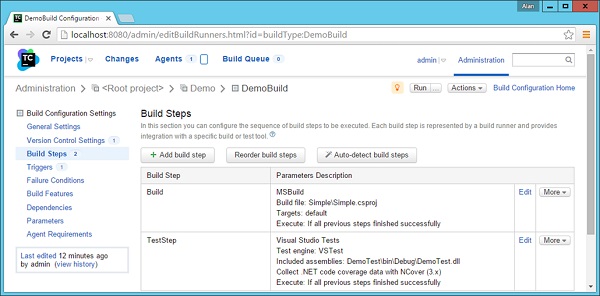
Step 13 − For this, we need to create a build step in our Project configuration. Go to your project home and click Edit Configuration Settings.

step 14 − Then go to Build Step → MS Build and click Add build step as depicted in the following screenshot.
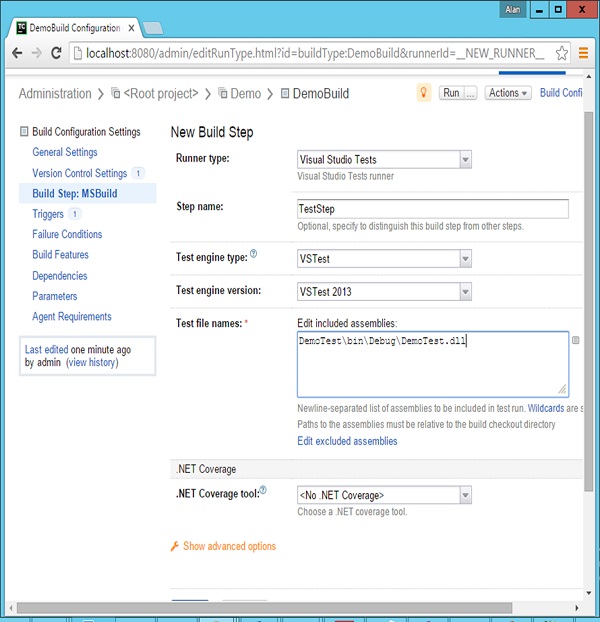
In the next screen that comes up, add the following values −
- Choose the runner type as Visual Studio Tests.
- Enter an optional Test step name.
- Choose the Test Engine type as VSTest.
- Choose the Test Engine version as VSTest2013.
- In the Test files name, provide the location as DemoTest\bin\Debug\DemoTest.dll – Remember that DemoTestis the name of our project which contains our Unit Tests. The DemoTest.dll will be generated by our first build step.
- Click Save which will be available at the end of the screen.
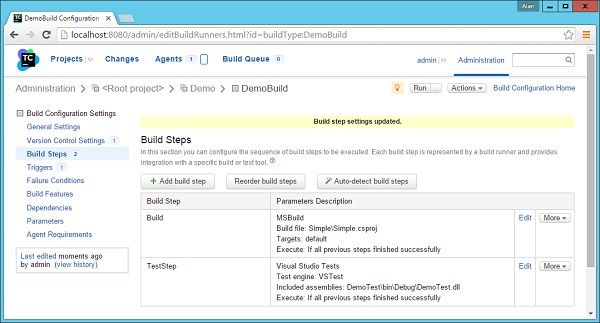
Now you will have 2 build steps for your project. The first is the Build step which will build your application code and your test project. And the next will be used to run your test cases.
Step 15 − Now it is time to check-in all your code in Git, so that the entire build process can be triggered. The only difference is this time, you need to run the git add and git commit command from the Demo parent folder as shown in the following screenshot.
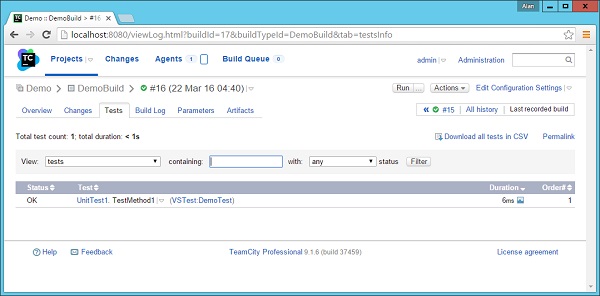
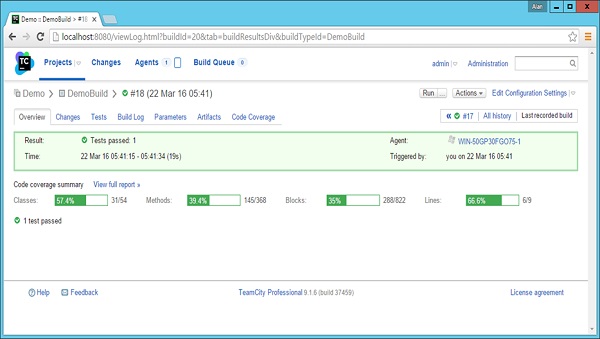
Now when the build is triggered, you will see an initial output which will say that the test passed.
Step 16 − If you click on the Test passed result and go to the Test tab, you will now see that the UnitTest1 was executed and that it is passed.
Continuous Integration - Inspection
Continuous Inspection is the process of an automated code review of inspection conducted for your code before the actual tests are run. There are subtle differences between inspecting and testing software. Testing is dynamic and executes the software in order to test the functionality. Inspection analyzes the code based on a set of predefined rules.
Inspectors (or static and dynamic analysis tools) are directed by identified standards that teams should adhere to (usually coding or design metrics). Examples of inspection targets include coding “grammar” standards, architectural layering adherence, code duplication, and many others.
Continuous Inspection reduces the time between a discovery and a fix. There are a number of Continuous Inspection tools available. For this example, we are going to be using NCover 3.x which has an integration with TeamCity. Let’s see how we can carry out Continuous Inspection and what it can do for us.
Download and Install NCover
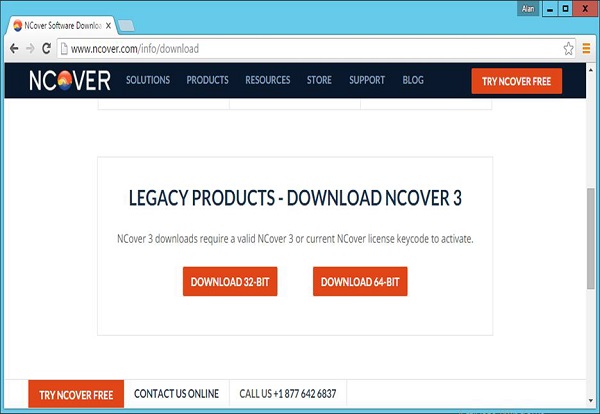
NCover is a separate product which needs to be downloaded and installed. To Download NCover, please click on the following link and download the 32-bit installer − http://www.ncover.com/info/download.
Run the downloaded installer and then click Next after the installer is started.
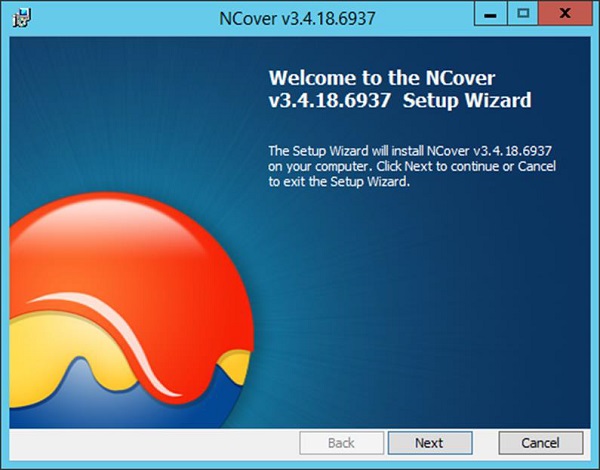
Accept the License agreement and then click Next.
Accept the default components and click Next.

Click on the Install button to begin the installation.
Click the Finish button to complete the installation.
Launch the NCover installation for the first time by going to C:\Program Files (x86)\NCover\ NCover.Explorer.exe. You will just need to install a trial key for the first time, which is a straightforward process.
Configure the Project in TeamCity to Use NCover
Step 1 − Go to your project home screen and click Edit Configuration Settings.
Step 2 − Go to Build Steps and click Edit for the TestStep. Continuous Inspection needs to run along with the Unit tests which are defined.

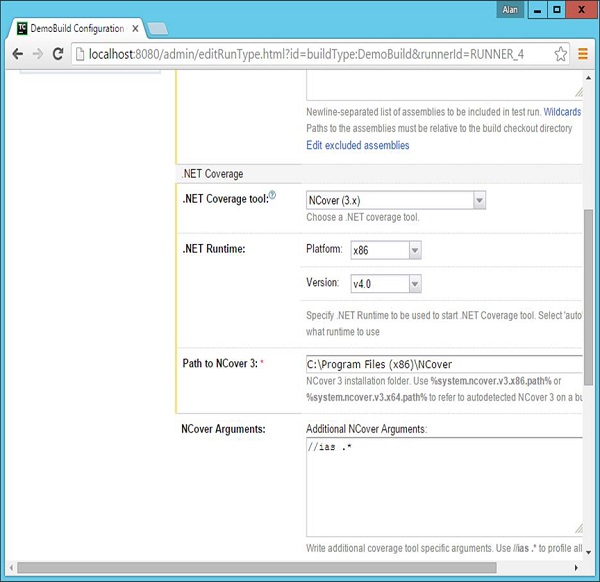
Step 3 − In the .Net Coverage section, click on .Net Coverage Tool. And then choose the following settings.
- Choose the .Net Coverage tool as NCover(3.x)
- Platform as x86
- Version as v4.0
- Path to NCover as C:\Program Files (x86)\NCover
- Leave the other settings as they are
Step 4 − Click Save.
Step 5 − Now go to the main screen of your project and click Run.
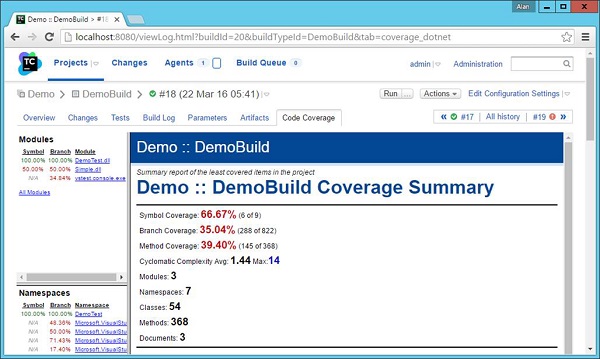
Step 6 − Once the build is run, click on the Test passed. You will now see a Code Coverage screen and you will see many metric indicators.
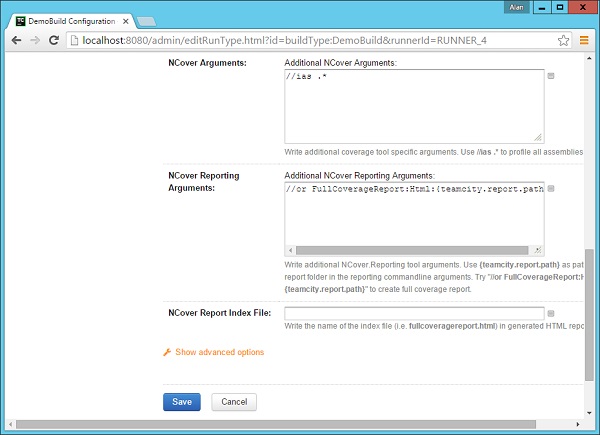
Step 7 − You can now click the Code Coverage tab to get more information on the Code Analysis.
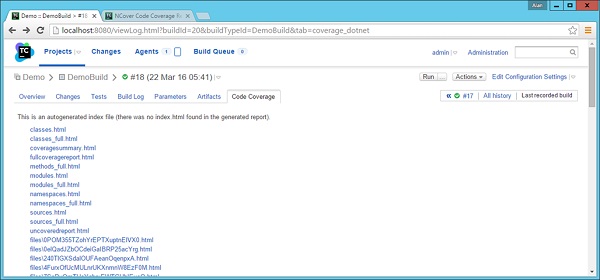
Step 8 − Click the fullcoveragereport.html. You will now get a full comprehensive report on the inspection carried out for the .Net code.
Continuous Integration - Database
Continuous Database Integration is the process of rebuilding your database and test data any time a change is applied to a project’s version control repository.
In Database Integration, generally all the artifacts related to the database integration −
- Should reside in a version control system.
- Can be tested for rigor and inspected for policy compliance.
- Can be generated using your build scripts.
Activities that can be involved in Continuous Database Integration can be any one of the following −
Drop a Database − Drop the database and remove the associated data, so that you can create a new database with the same name
Create a new Database − Create a new database using Data Definition Language (DDL).
Insert the Initial Data − Insert any initial data (e.g., lookup tables) that your system is expected to contain when delivered.
Migrate Database and Data − Migrate the database schema and data on a periodic basis (if you are creating a system based on an existing database).
Modify Column Attributes − Modify table column attributes and constraints based on requirements and refactoring.
Modify Test Data − Alter test data as needed for multiple environments.
So in our Continuous Database example, we are going to do the following steps −
- We will create a MS SQL Server database and a corresponding table.
- We will create a script out of SQL Server Management Studio. This database script will be used to set up our table in the database.
- We will write a code in our ASP.Net project to access this database.
- We will create a step in our project in TeamCity to run this script.
- We will check in our script into Git.
Steps to do this in the AWS database which was created in an earlier section.
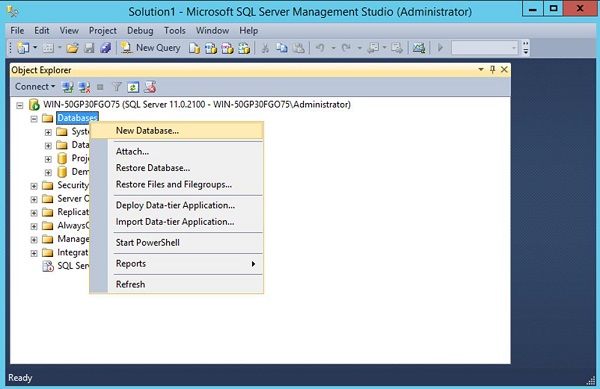
Step 1 − Create an MS SQL Server database and a corresponding table. Let’s open SQL Server Management Studio and create a simple database and table. Right-click databases and click on New Database.
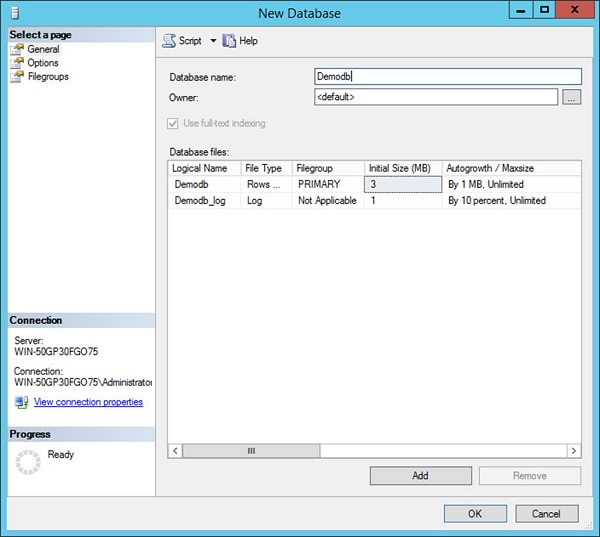
Step 2 − Name it as Demodb and click OK
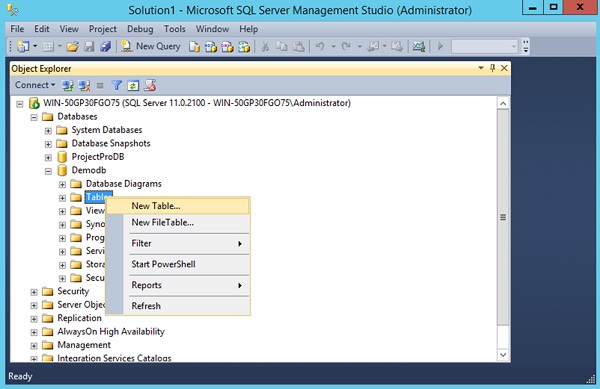
Step 3 − In the new database, right-click and create a new table.
Step 4 − You can add your desired columns to the table.

Step 5 − Save the table and name it as Demotb.
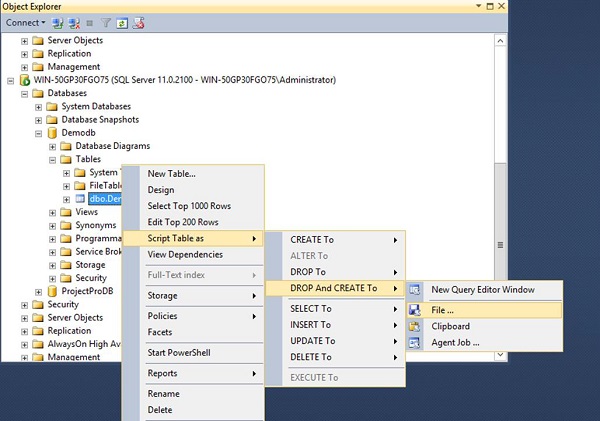
Step 6 − Now right-click on the table and choose the menu option Script Table as → Drop and Create to → File.
Step 7 − Save the file to the demo project folder as Sample.sql.
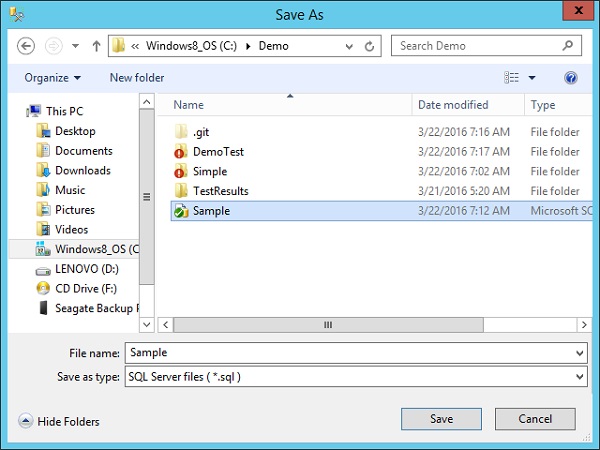
This is what the database script would look like. It would first drop an existing table if present and then re-create the table.
USE [Demodb]
GO

/****** Object: Table [dbo].[Demotb] Script Date: 3/22/2016 7:03:25 AM

******

DROP TABLE [dbo].[Demotb]
GO

/****** Object: Table [dbo].[Demotb] Script Date: 3/22/2016 7:03:25 AM

******/
SET ANSI_NULLS ON
GO

SET QUOTED_IDENTIFIER ON
GO

CREATE TABLE [dbo].[Demotb](
   [TutorialName] [nvarchar](max) NULL,
   [TutorialID] [smallint] NULL
) ON [PRIMARY] TEXTIMAGE_ON [PRIMARY]

GO
Step 8 − Now let’s quickly change our ASP.Net code to refer to the new database.
Step 9 − In the Tutorial.cs file in your Demo project, add the following lines of code. These lines of code will connect to your database, take the Server version and store the version name in the Name variable. We can display this Name variable in our Demo.aspx.cs file through a Response.write command.
using System;
using System.Collections.Generic;
using System.Data.SqlClient;
using System.Linq;
using System.Web;

namespace Simple {
   public class Tutorial {
      public String Name;

      public Tutorial() {
         string connectionString = "Data Source = WIN-50GP30FGO75;
         Initial Catalog = Demodb;
         Integrated Security = true;";

         using (SqlConnection connection = new SqlConnection()) {
            connection.ConnectionString = connectionString;
            connection.Open();
            Name = connection.ServerVersion;
            connection.Close();
         }
      }
   }
}
Step 10 − Add the following code to the Demo.aspx.cs file to ensure that it displays the SQL Server version.
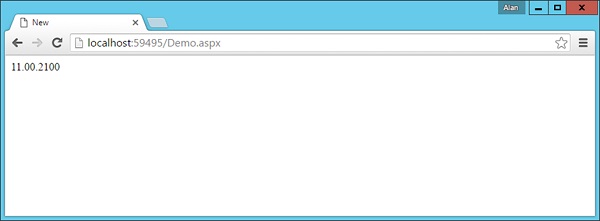
using System;
using System.Collections.Generic;
using System.Data.SqlClient;
using System.Linq;
using System.Web;
using System.Web.UI;
using System.Web.UI.WebControls;

namespace Simple {
   public partial class Demo : System.Web.UI.Page {
      Tutorial tp = new Tutorial();

      protected void Page_Load(object sender, EventArgs e){
         Response.Write(tp.Name);
      }
   }
}
Now if we run the code, you will get the following output in the browser.
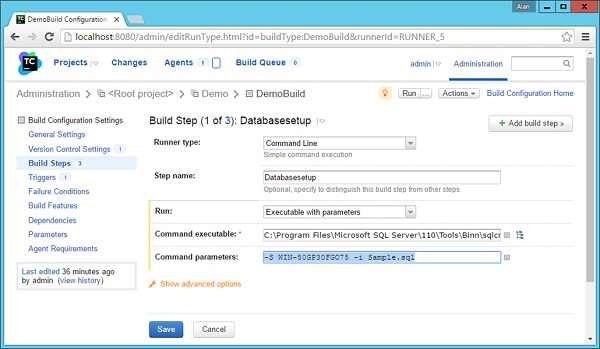
Step 11 − Now let us add our step in TeamCity which will invoke the database script. Go to your project dashboard and click Edit Configuration Settings.
Step 12 − Go to Build Steps and click Add build step.
Choose the following options (Note that MS SQL Server client should be installed on the CI Server).
- Runner type should be the Command Line.
- Give an optional Step Name.
- Run should be Executable with parameters.
- Command executable should be C:\Program Files\Microsoft SQL Server\110\Tools\Binn\sqlcmd.exe
- Command parameters should be -S WIN-50GP30FGO75 -i Sample.sql. Where –S gives the name of the SQL Server instance.
Step 13 − Click Save.
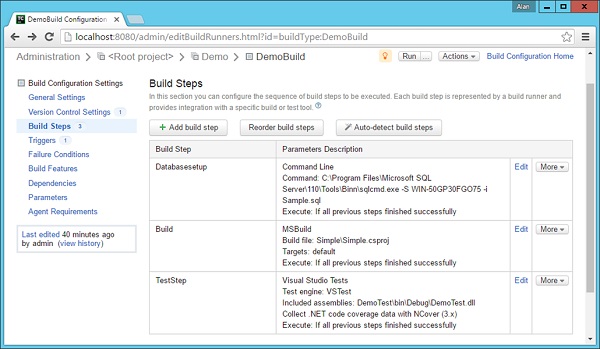
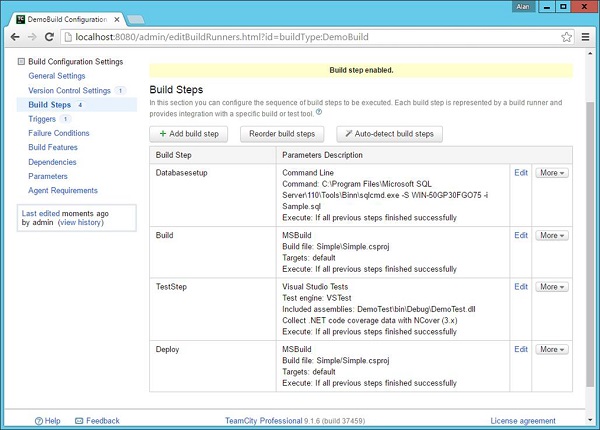
Now what needs to be ensured is the build order. You have to ensure the build order is as follows.
Step 14 − You can change the build order by choosing the option to reorder build steps.
- The database setup should be first – So this will be used to recreate your database from fresh.
- Next is the build of your application.
- Finally your test setup.
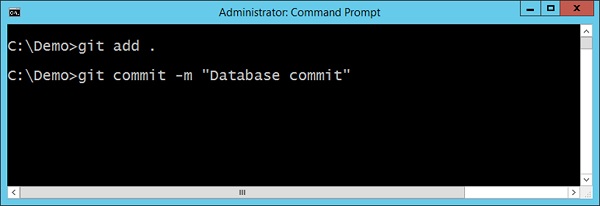
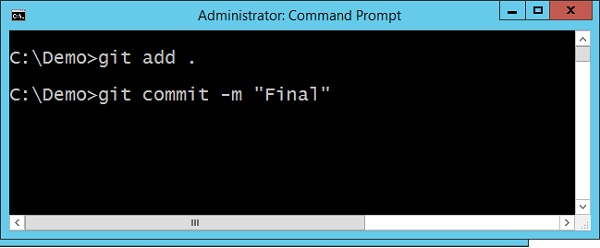
Step 15 − Now run the git add and git commit command so that the Sample.sql file is checked into Git. This will trigger a build automatically. And this build should pass.
You now have a full-fledged build cycle with a continuous database integration aspect as well in your cycle. In the next section, let’s take this further and look at Continuous Deployment.
Now that you have done this with a local SQL Server, we can repeat the same steps for a AWS MS SQL Server which was created in one of the earlier sections. To connect to a Microsoft SQL Server, you need to connect via the following convention.
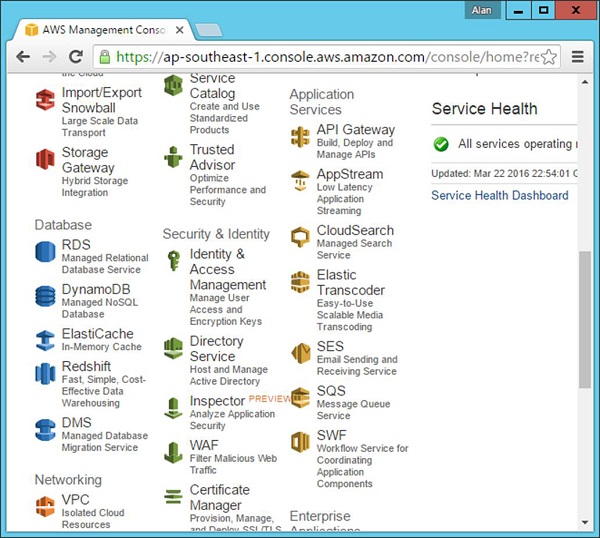
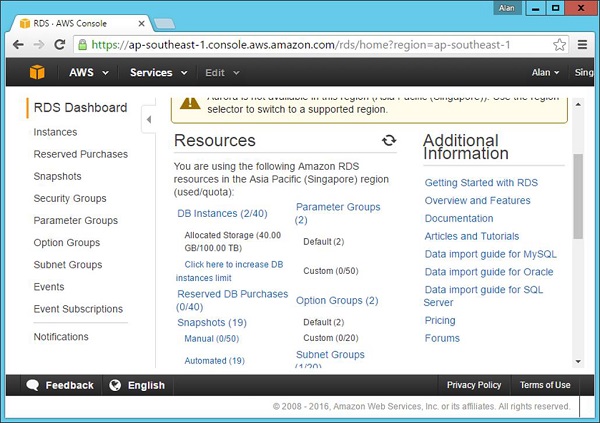
Step 16 − First see what is the name assigned to your database instance in AWS. When you log-in to the AWS, go to the RDS section under the database section.
Step 17 − Click on DB Instances in the next screen that comes up.
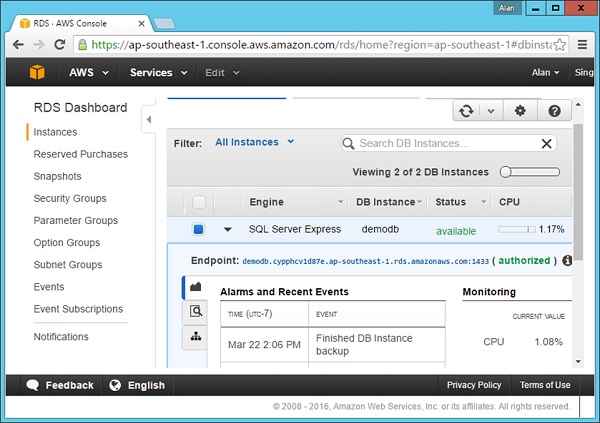
step 18 − Click on your database and make a note of the endpoint. In the following screenshot, it is demodb.cypphcv1d87e.ap-southeast-1.rds.amazonaws.com:1433
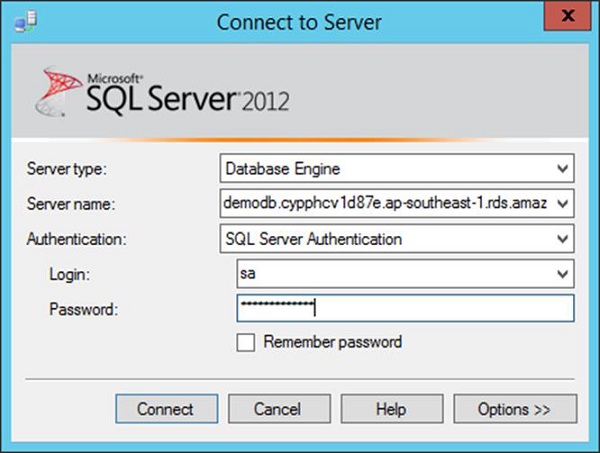
Step 19 − Now to connect to the database from SQL Server Management Studio, you need to specify the connection as demodb.cypphcv1d87e.ap-southeast-1.rds.amazonaws.com,1433 (Note the comma used between instance name and port no).
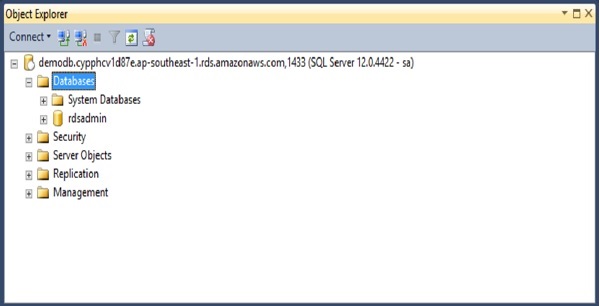
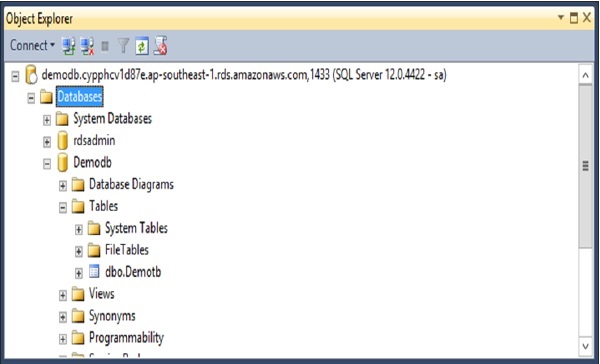
The following screenshot shows a successful connection to the database.
Then you can repeat all the same steps. The Sqlcmd command will be as follows −
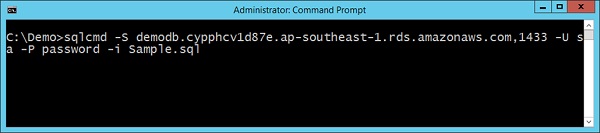
This same command can be replaced in the Database build step in TeamCity. When you execute the sqlcmd command, the table will be created automatically in your SQL Server database in AWS.
Continuous Integration - Deployment
Automated builds and repeatable builds. Automated tests and repeatable tests. Test categories and test frequencies. Continuous inspections. Continuous database integration. These string of tasks in creating an effective CI environment primarily enables one key benefit: releasing working software at any point in time, in any environment.
In our previous chapters, we have accomplished all of the following segments −
- Created our code.
- Ensured a proper build in TeamCity.
- Created a Database Integration process.
- Conducted successful testing.
Now the only thing remaining is to carry out an automated deployment, so that our entire process is complete.
For an automated deployment in our case, we need to follow these steps −
- In our deployment server, ensure that IIS is installed.
- Ensure that IIS user is given access to our database.
- Create a publish profile which will be used to publish the site when it is built.
- Ensure we change our MSBuild command to do an automatic deployment.
- Automate TeamCity to do an automatic publish.
- Do a git commit to ensure all your files are in Git.
Step 1 − Configure a local IIS Server. If you have a local or remote IIS Server, the following configuration can be carried out to deploy our application. It’s always a good practice to see if a deployment can be done manually before it is done in an automated fashion.
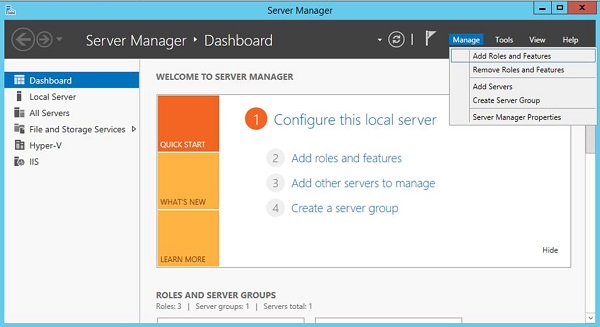
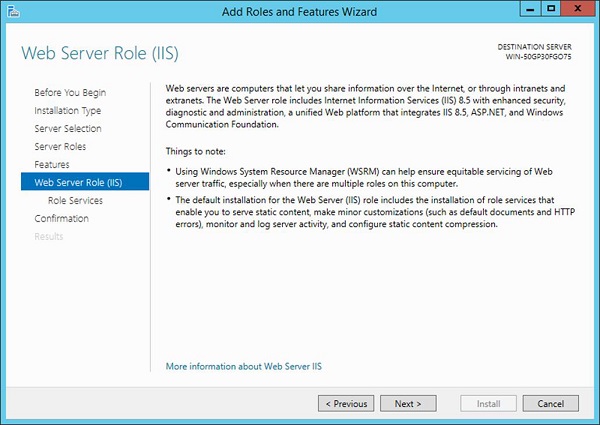
Step 2 − On a Windows 2012 server, go to your Server Manager and click on Add Roles and Features.
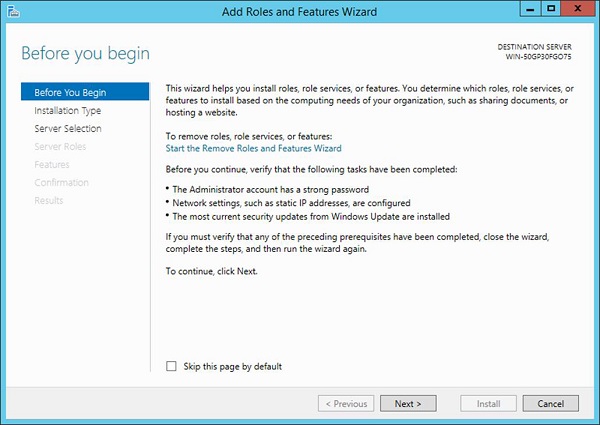
Step 3 − Click Next on the following screen that comes up.
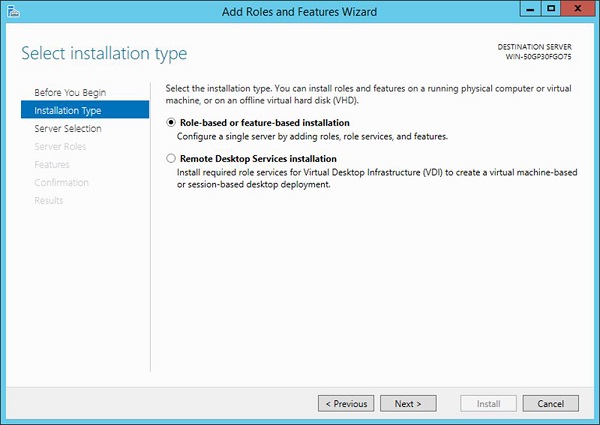
Step 4 − Choose roles-based or feature-based installation on the next screen and click Next.
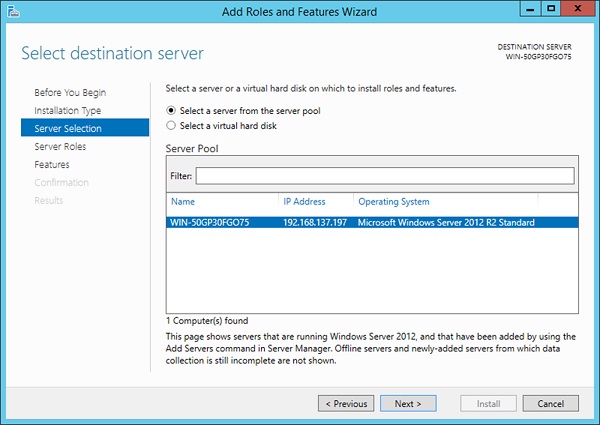
Step 5 − Select the default server and click Next.
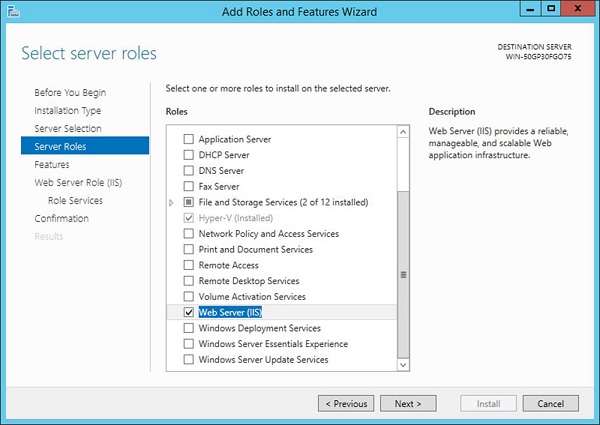
Step 6 − Choose the Web server role and click Next.
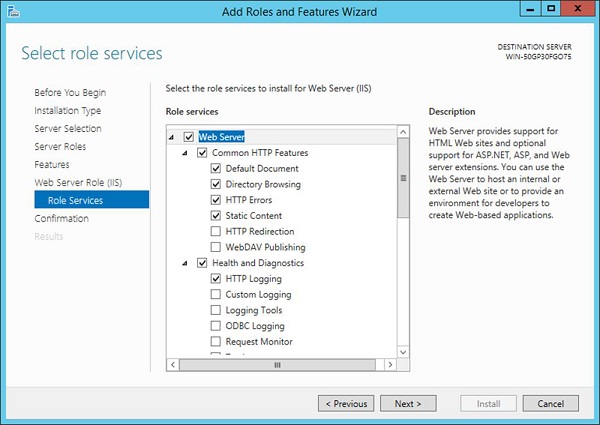
Step 7 − In the next screen that comes up, click Next.
Step 8 − Click Next again on the following screen that appears.
Step 9 − In the next screen that pops up, click Next.
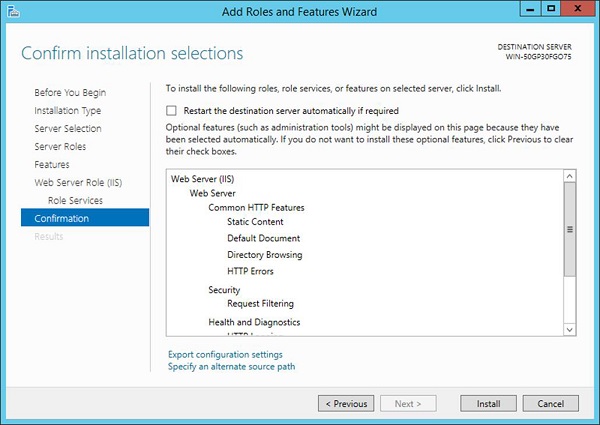
Step 10 − In the final screen, you can click the Install button to install the IIS.
Once you have IIS installed, you can open it by opening the Internet Information Services.
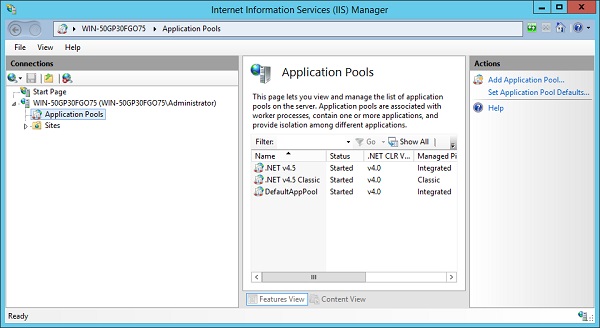
Step 11 − Click Application Pools, you will see a pool with the name of DefaultAppPool. This needs to have access to SQL Server in the next step.
Step 12 − If we need to connect a ASP.Net application to a MS SQL Server application, we have to give access to the default application pool to the SQL Server instance, so that it can connect to our Demodb database.
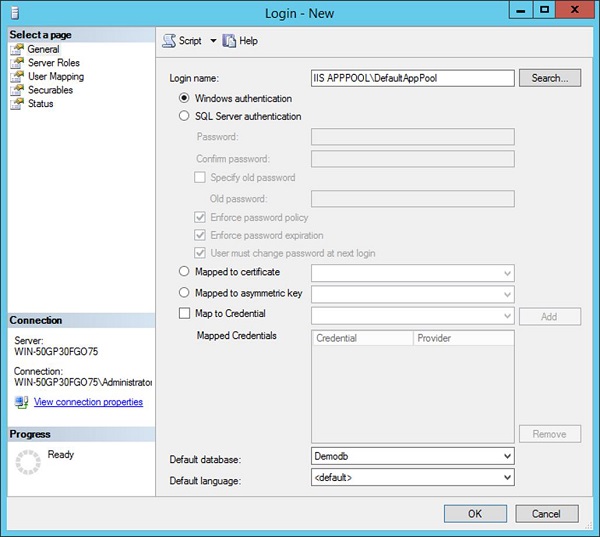
Step 13 − Open SQL Server Management Studio. Go to Logins, right-click and choose the menu option New Login.
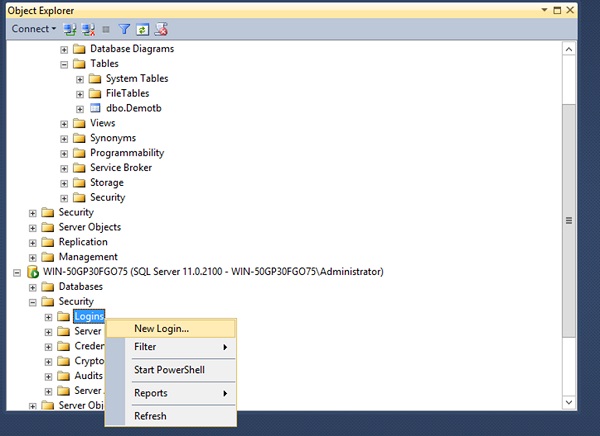
In the next screen, update the following parameters and click OK.
- Login name as IIS APPPOOL\DefaultAppPool.
- Default database – This should be our database, which is demodb.
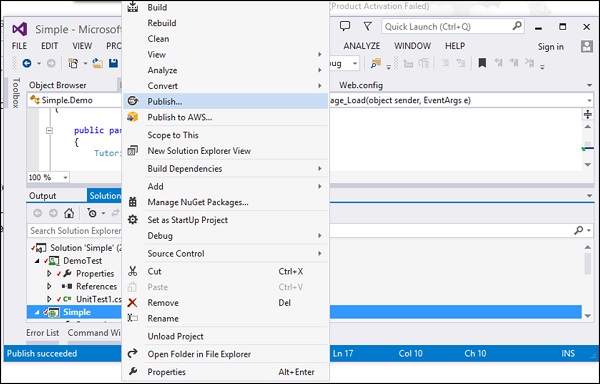
Step 14 − Creating a Publish Profile. The publish profile is used in Visual Studio to create a deployment package that can then be used with MS Build and in any CI Server accordingly. To do this, from Visual Studio, right-click on the project and click the menu option of Publish
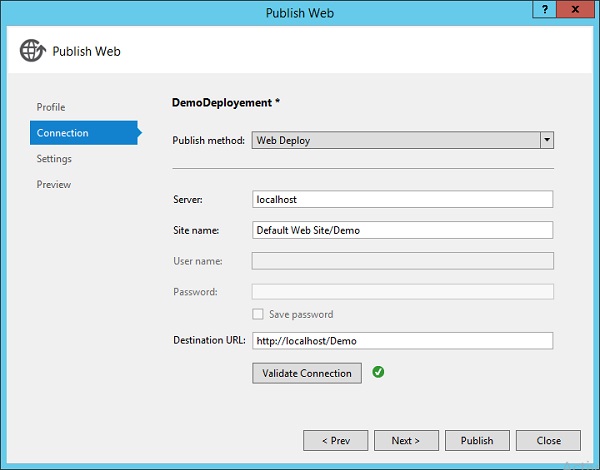
Step 15 − In the next screen that comes up, choose to create a new Publish profile, give it a name – DemoDeployment. Then click the Next button.
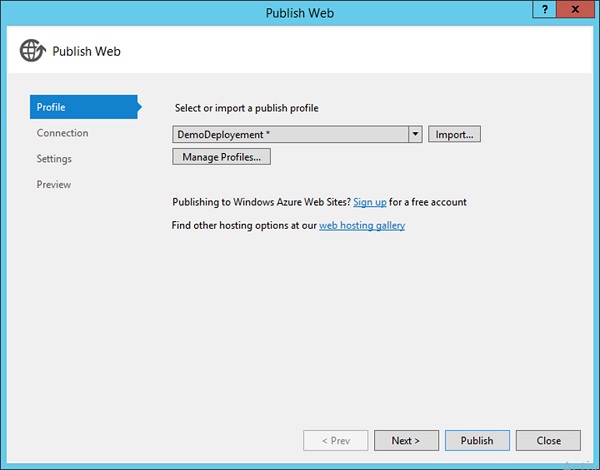
In the ensuing screen that shows up, add the following values −
- Choose the Publish method as Web Deploy.
- Enter the server as localhost.
- Enter the site name as Default Web Site/Demo.
- Put the destination url as http://localhost/Demo
Then click the Next button.
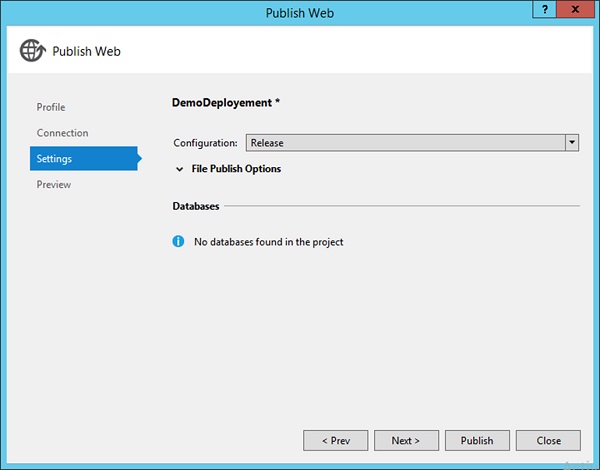
Step 16 − In the next screen, click Next.
Step 17 − In the final screen that comes up, click the Publish button.
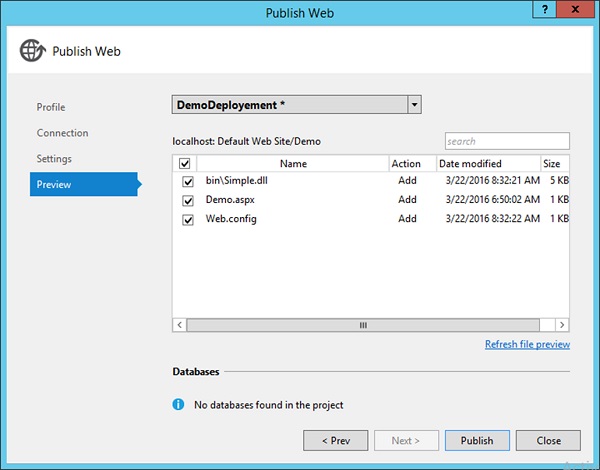
Now if you go to the C:\Demo\Simple\Properties\PublishProfileslocation of your project, you will see a new publish profile xml file created. This publish profile file will have all the details required to publish your application to the local IIS server.
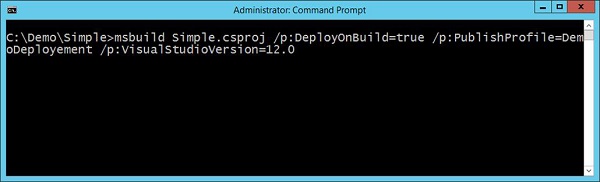
Step 18 − Now let’s customize our MSBuild command and use the above publish profile and see what happens. In our MSBuild command, we specify the following parameters −
- Deploy on Build is true – this will trigger an automatic deployment once a successful build is done.
- We are then mentioning to use the Publish profile which was used in the above step.
- The Visual Studio version is just to be mentioned to the MSBuild deployment capability on what is the version of the Visual Studio being used.
When you run the above command, MSBuild will trigger a build and deployment process. What you will note that, it is deploying it to our Default Website in our IIS Server.
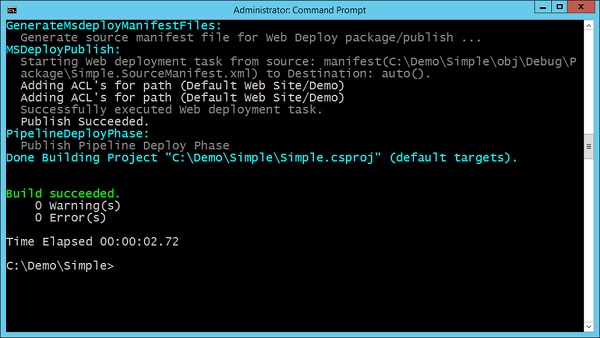
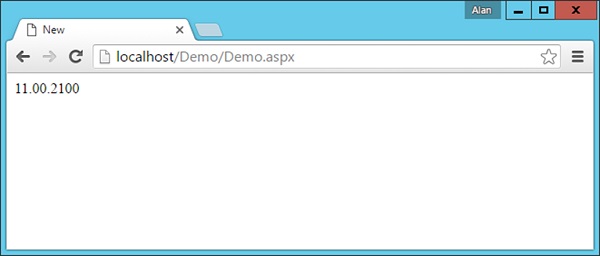
Now if we browse to the site – http://localhost/Demo/Demo.aspx we will see the following output, which means that the MSBuild did a successful deployment to our website.
Step 19 − Automating through TeamCity – Now it is time to add a task to our TeamCity server to automatically use MSBuild to deploy our application, based on the above mentioned steps.
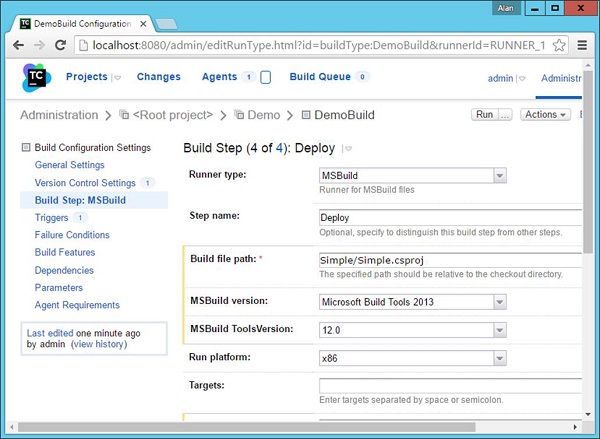
Step 20 − Go to your project dashboard and click Edit Configuration Settings.

Step 21 − Go to Build Steps and click Add a Build step.

Choose the following options −
- The runner type should be MSBuild
- Give an optional Step name
- Enter the build path as Simple/Simple.csproj
- Keep the MSBuild version as Microsoft Build Tools 2013
- Keep the MSBuild Toolsversion as 12.0
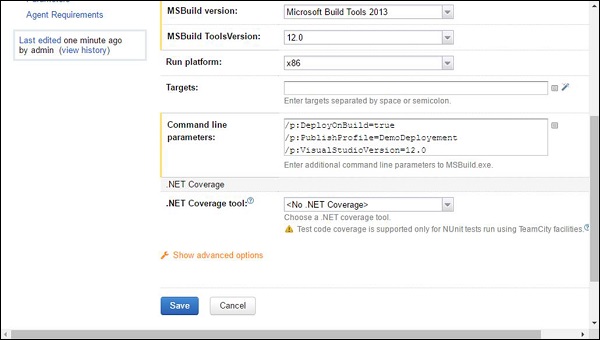
- Put the command line as /p:DeployOnBuild = true /p:PublishProfile = DemoDeployement /p:VisualStudioVersion = 12.0
Step 22 − Click Save.
Make sure that in the build steps, the Deploy step is the last step in the chain.
Step 23 − Now let’s do a final git commit, to ensure all the files are in Git and can be used by TeamCity.
Congratulations, you have successfully set up a complete Continuous Integration Cycle for your application, which can be run at any point in time.
Continuous Integration - Best Practices
Let’s have a final review of the best practices of Continuous Integration based on all the lessons we have learnt so far −
- Maintain a code repository − This is the most basic step. In all our examples, everything is maintained in a Git repository right from the code base to the Publish profiles, to the database scripts. It must always be ensured that everything is kept in the code repository.
- Automate the build − We have seen how to use MSBuild to automate a build along with using a publish profile. This is again a key step in the continuous Integration process.
- Make the build self-testing − Ensure that you can test the build by keeping unit test cases in place and these test cases should be in such a way that it can be run by the Continuous Integration server.
- Everyone commits to the baseline every day − This is a key principle of Continuous Integration. There is no point staying till the end of the entire process to see who breaks the build.
- Every commit (to baseline) should be built − Every commit made to the application, needs to be successfully built. If the build fails for whatever reason, then the code needs to be changed to ensure the build passes.
- Keep the build fast − If the build is slow, then it would indicate a problem in the entire Continuous Integration process. Ensure that the builds are always limited to a duration, preferably should never go beyond 10 minutes.
- Everyone can see the results of the latest build − The TeamCity dashboard gives everyone a view of all the builds, which have either passed or failed. This gives a good insight to all the people who are involved in the Continuous Integration process.


Comments
Post a Comment